One truth about developing a mobile application is there are so many constraints for example, a hardware limitation (CPU, RAM, Battery, etc). If your code design is not good enough, prepare to say hi to the most critical problem on earth: "Crash". According to a study, it shows that:
Application Crashing is the most complained problem from mobile app user.
and moreover
If application crashes 3 times in a row, about half of users will remove it from their phone.
Crash Tracking System, which lets developer to collect every single details of crash directly from user's device, has been invented to take care of this issue especially. The most two popular Crash Tracking System to date are Crashlytics and Parse Crash Reporting, which are both totally-free service. Developer could integreate any of them in their app without charge. Whenever application crashes, the whole stacktrace will be sent to the backend which allow developer to fix every critical problems at the easiest manner. With this method, you would be able to deliver a Crash-Free Application in very short time.
However, those data are collected in the service provider's server which may raise some concern for a big company about user data's privacy.
So ... is there any crash tracking system that allow us to set up our own server? Of course, there is! And it is actually quite easy to set up one. Here we go Application Crash Reporting on Android (ACRA), a library enabling Android Application to automatically post their crash reports to our own server.
Let's start.
Setting up a server
Server side is a prerequisite for client side. So let's start with server side first.
Since ACRA is well designed and is quite popular. It allows developer to develop their own server system which we could see many of them out there. Anyway the best one I recommend is Acralyzer which is also developed by ACRA team. Acralyzer works on top of Apache CouchDB, so there is no need to install any additional software but only CouchDB.
Acralyzer is quite be a full-featured backend for crash tracking system. The same stacktrace from different will be grouped as a single issue. If you are done fixing any issue, you can close it easily in just a single click. Moreover it also works in real-time. Only weakness I found in this system is its UI is a little too geeky. But who's care? It is made for developer =P
It is quite easy to install one. Here is the full instruction on how to install Acralyzer on Ubuntu.
Start with installing couchdb. Open Terminal and type a command:
apt-get install couchdb
Test the installation with this command:
curl http://127.0.0.1:5984
If you did it right, it would return as:
{"couchdb":"Welcome","version":"1.2.0"}
Edit /etc/couchdb/local.ini file to allow us to access CouchDB through External IP (by default, it could be accessed through 127.0.0.1 only). Just simply uncomment these two lines:
;port = 5984
;bind_address = 127.0.0.1
and change it to
port = 5984
bind_address = 0.0.0.0
In the same file, you have to do adding a username/password as an administrator account. Find this line (it supposes to be almost at the end of file):
[admins]
Add a username/password in the next line in username = password form, for example:
nuuneoi = 12345
Please feel free to place a raw password there. Once CouchDB is restarted, your password will be hashed automatically and will be unreadable.
Save your edited file and restart CouchDB through command line:
curl -X POST http://localhost:5984/_restart -H"Content-Type: application/json"
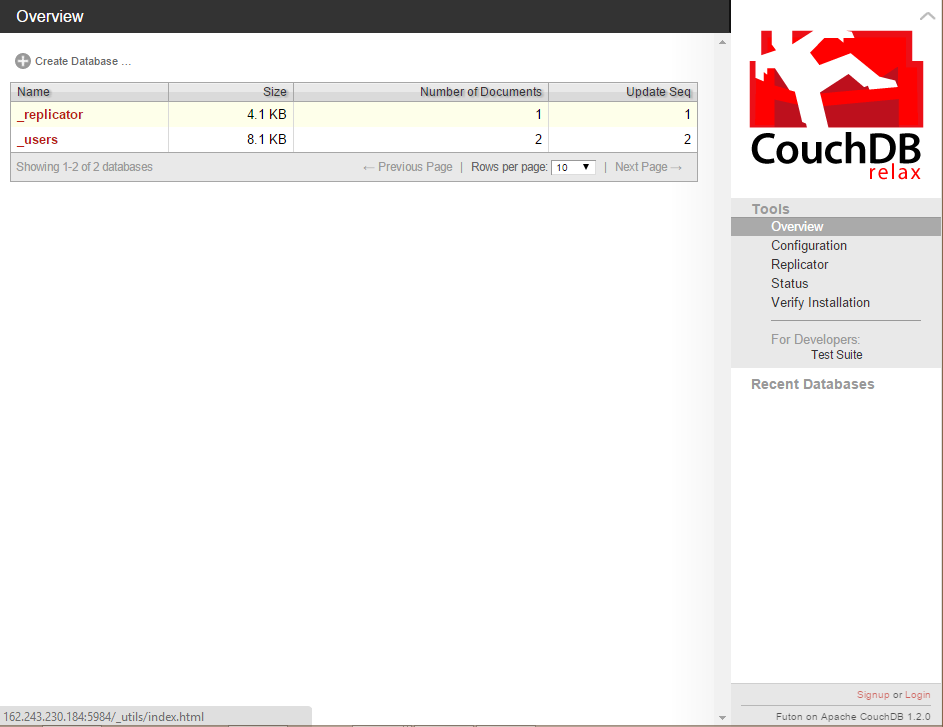
From now you, you will be able to access CouchDB through web browser. This web service is called Futon, a CouchDB's UI Backend. Just simply open this url on your web browser.
http://<YOUR_SERVER_IP>:5984/_utils
Here we go, Futon.
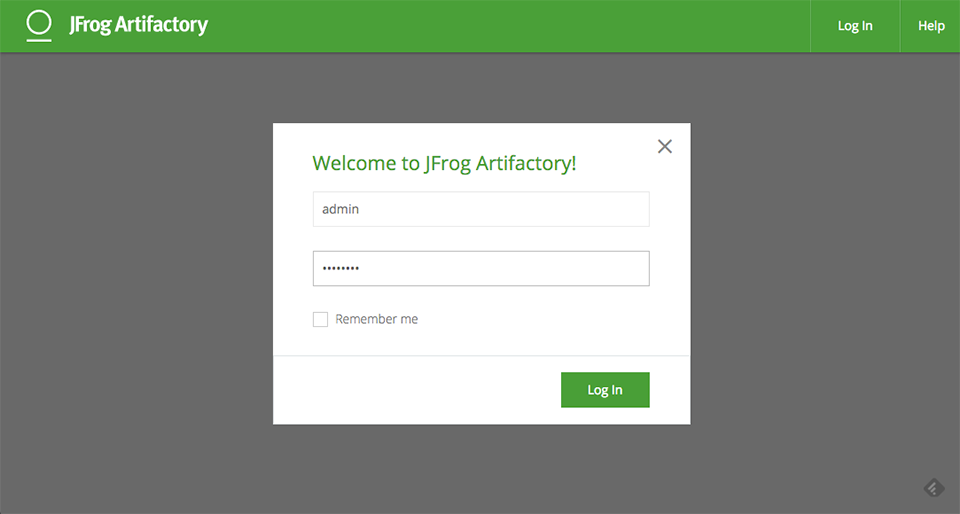
First of all, login into the system with your administrator account set previously.
Now we are going to install an acro-storage (Acralyzer's Storage Endpoing). From the right menu, press Replicator and fill in the form from Remote Database and to Local Database like this:
from Remote Database: http://get.acralyzer.com/distrib-acra-storage

to Local Database: acra-myapp
Press Replicate and wait until it is done.
Next install Acralyzer with the same method but different parameters.
from Remote Database: http://get.acralyzer.com/distrib-acralyzer

to Local Database: acralyzer
Press Replicate to install.
If you did it right, there will be 2 databases added in the system, acra-myapp and acralyzer.
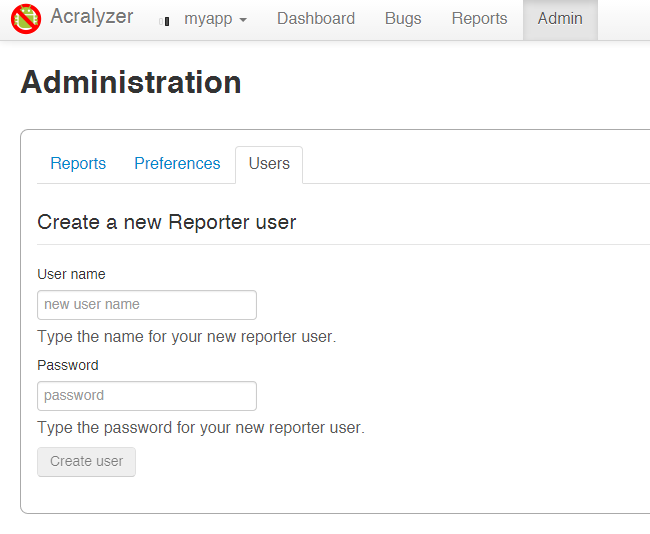
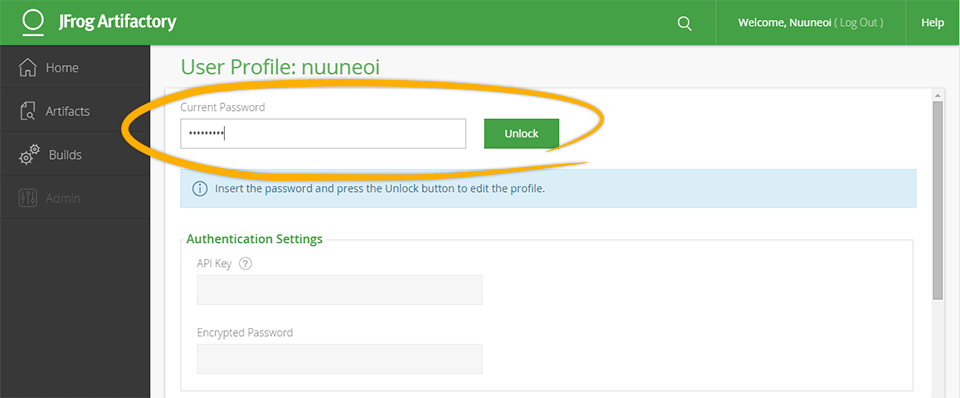
We are almost there. Next step, we have to create a user for the client. Open Web Browser and go to this url:
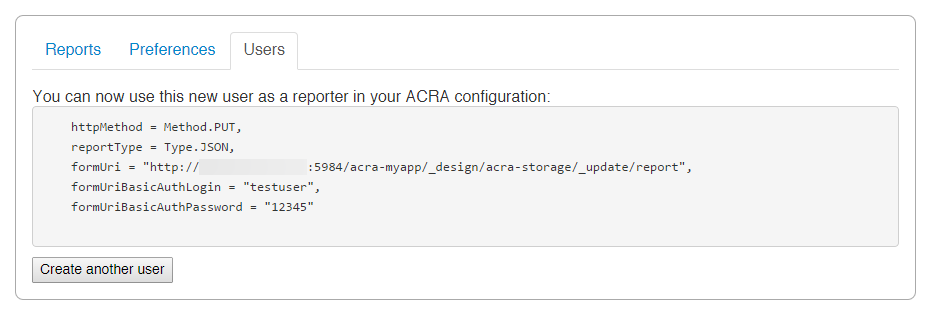
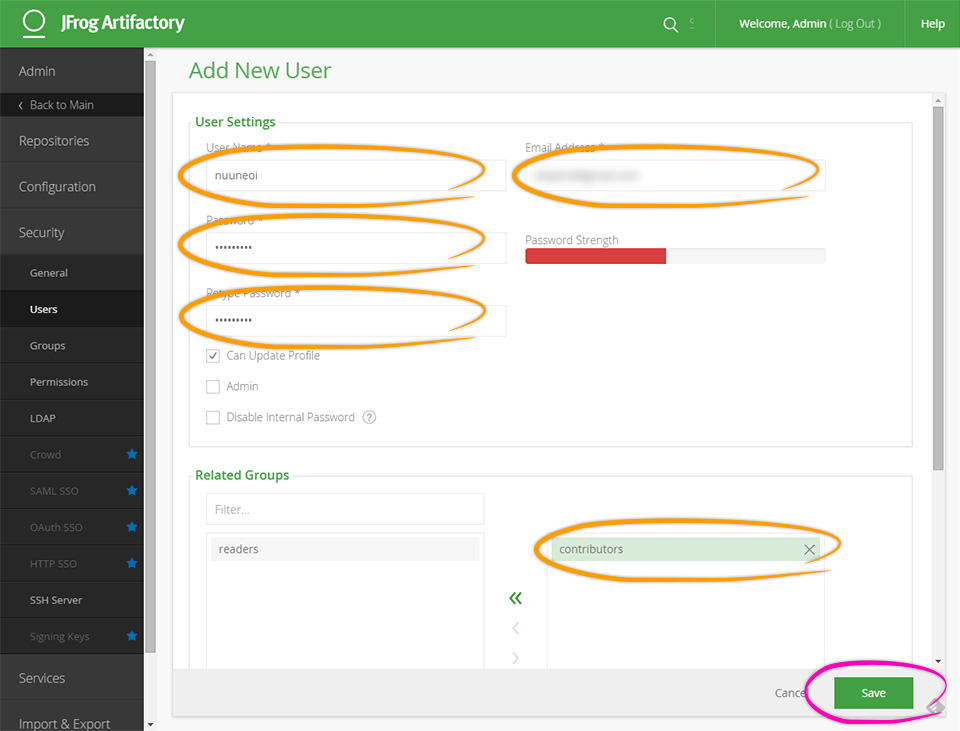
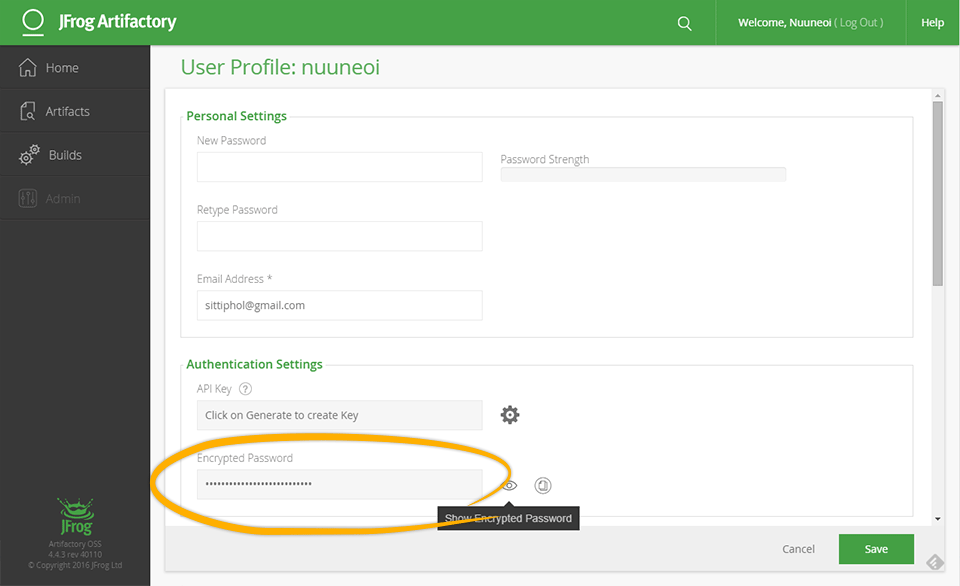
Fill in any Username/Password you desire (no need to be the same as administrator account) and press Create User. These information will appear.
Copy them all and paste it to your favorite text editor. We would use it in client setting up part.
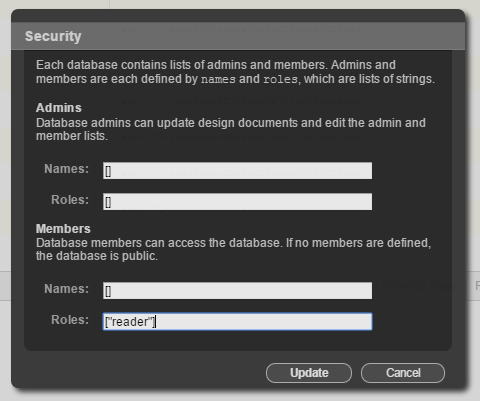
The last thing we have to do it to protect the data inside acra-myapp by limit access just to the administrator or anyone would be able to access it. To do that, go into acra-myapp and press Securities, fill in Roles in Members section like this:
["reader"]
Done !
After this, you could access the Dashboard from the same link as above:
Please note that acro-myapp is created just for one app. In case you want to create a backend system for another app, please replicate another acro-storage with the same exact procedure but change the Local Database name to acra-<your_app_name>. Please note that it is necessary to start the name with acra- or it would not be listed as a choice on Dashboard.
If there is more than one app in the system, there will be a drop-down listbox in Acralyzer Dashboard page to let you choose which one you want to see the issues. Please feel free to give a try.
Setting up ACRA on Client Side
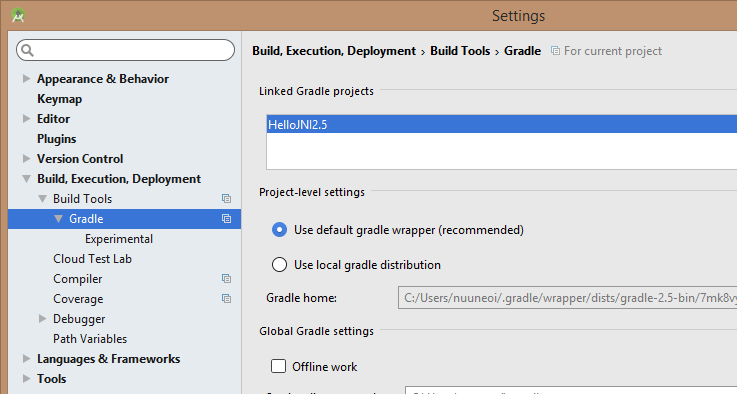
It is pretty easy to setup ACRA on client side. First of all, add a dependency on your build.gradle
compile 'ch.acra:acra:4.6.1'
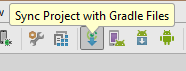
Sync your gradle files and then create a custom Application class and don't forget to define it in AndroidManifest.xml. (I assume that every Android Developer could do this)
Add a Annotation @ReportCrashes above your custom Application created.
import android.app.Application;

import org.acra.ACRA;
import org.acra.annotation.ReportsCrashes;
import org.acra.sender.HttpSender;

/**
 * Created by nuuneoi on 2/19/2015.
 */

@ReportsCrashes(
)
public class MainApplication extends Application {

    @Override
    public void onCreate() {
        super.onCreate();

        ACRA.init(this);
    }

}
Now let's copy message generated from server side above and paste it inside @ReportsCrashes like this:
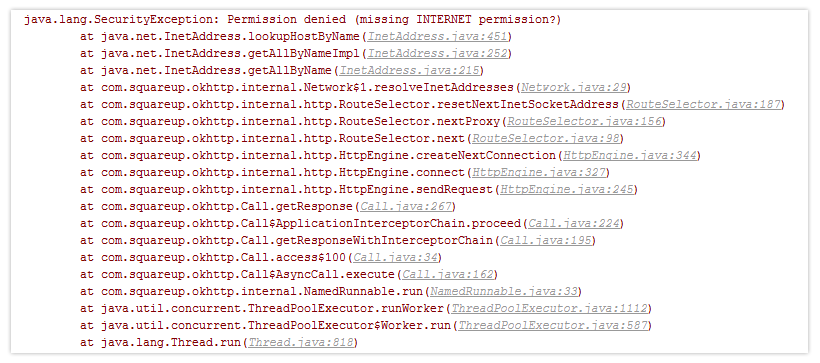
And the final step, just don't forget to add INTERNET permission inside AndroidManifest.xml or ACRA may not be able to send those stacktraces to your server.
Run your application and then change a reason of crash and then run it again. And check your dashboard, you will see that those bugs report are sent to the backend system already.
Each bug item is a group of same reports from different user sent at the different time.
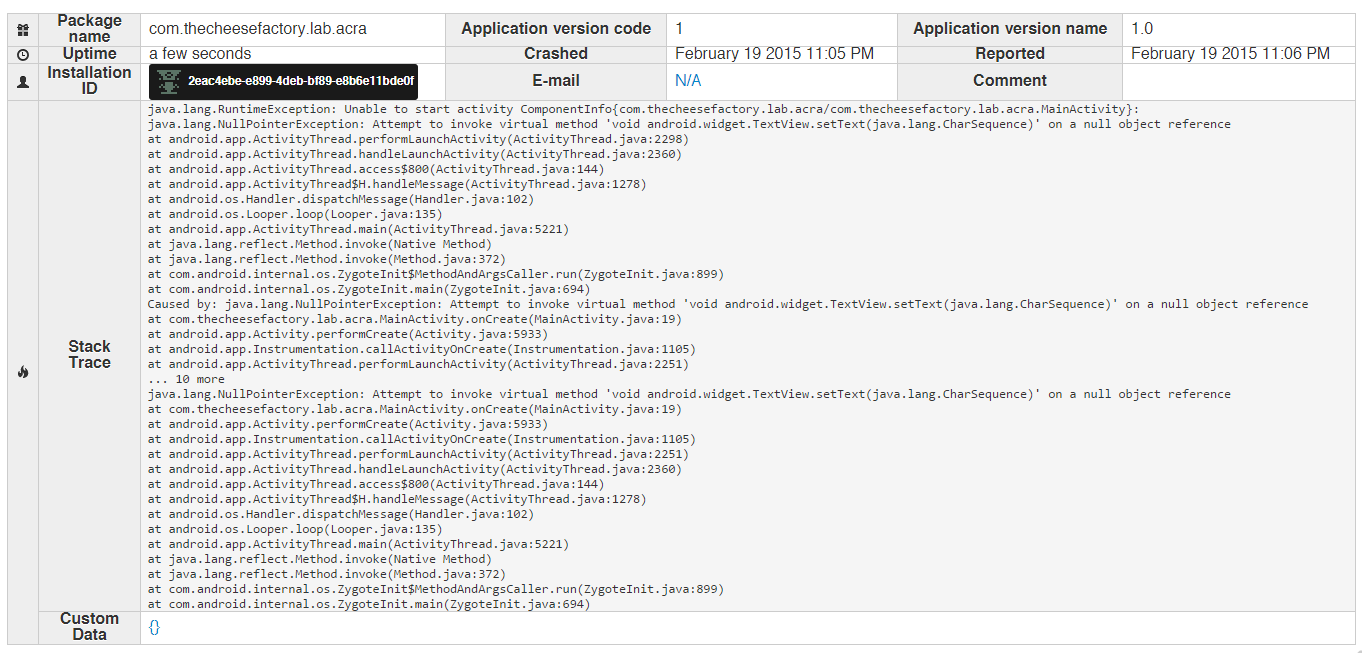
Take a deeper look into report, you will see that it comes with a full stacktrace.
And also bunch of information which is enough to let you scroll for 7 pages...
If you finish fixing any bug, you could close the issue by simply press at the "bug" icon as highlighted in picture below.
Hope that you guys find this article useful especially for a big company who need a Application Crash Tracking System but has a privacy concern on using those ready-to-use services.
Actually ACRA comes with a lot of features for example, show a Toast or popup a Report Dialog when crashes. You could find those options in ACRA website.
Acralytics is also the same, there are a lot of features to play with for example, you could set the server to send us email once there is a bug report sent into our system. More info are at Acralyzer.
Years after struggling with applying the Fragment on Android Application Development, I must say that although Fragment’s concept is brilliant but it comes together with bunch of problems that need to be fixed case by case especially when we need to handle instance state saving.
First of all, although there is an onSaveInstanceState just like the Activity one but it appears that it doesn’t cover all the cases. In the other words, you can’t just rely on onSaveInstanceState to save/restore the view state. Here are the case studies for this story.
Case 1: Rotate screen while there is only 1 fragment in stack
Well, screen rotation is the easiest case to test the instance state saving/restoring. It is easy to handle this case, you just simply save things including member variable which also will be lost from screen rotation in onSaveInstanceState and restore in onActivityCreated or onViewStateRestored just like this:
Looks great? Well, not all roses. It appears that there are some case that onSaveInstanceState isn’t called but the View is newly recreated. What does it mean? Everything in the UI is gone. Here is the case.
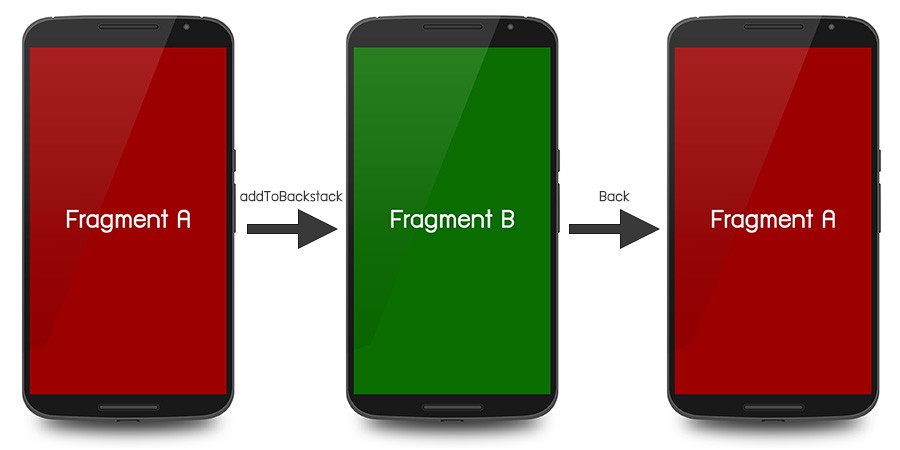
Case 2: Fragment in Back Stack
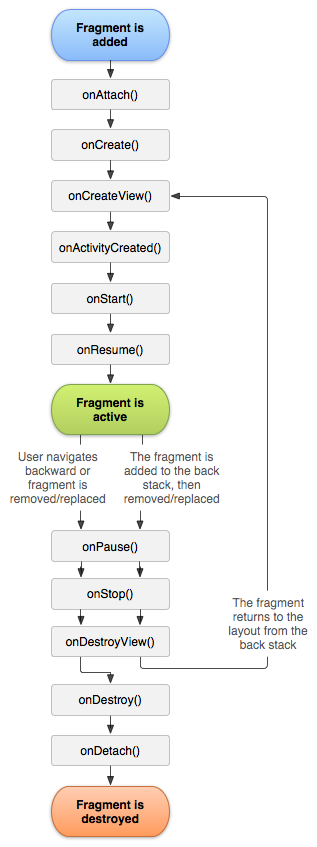
When fragment is back from backstack (in this case, Fragment A), the view inside Fragment A will be recreated following the Fragment Lifecycle documented here.
You will see that when fragment returns from backstack, onDestroyView and onCreateView will be called. Anyway, it appears that onSaveInstanceState is not called in this case. The result is everything in the UI is gone and is reset to default as defined in Layout XML.
Anyway, the view that implements inner view state saving, such as EditText or TextView with android:freezeText, still be able to retain the view state since Fragment has implemented state saving for inner view but we developer cannot hook the event. Only way we can do is to manually save instance state in onDestroyView.
@Override
public void onSaveInstanceState(Bundle outState) {
   super.onSaveInstanceState(outState);
   // Save State Here
}
@Override
public void onDestroyView() {
   super.onDestroyView();
   // Save State Here
}
Here comes the question, where should we save those instance states to since onDestroyView doesn’t provide any mechanic to save instance state to a Bundle? The answer is an Argument which will still be persisted with Fragment.
The code now looks like this:
Bundle savedState;
@Override
public void onActivityCreated(Bundle savedInstanceState) {
   super.onActivityCreated(savedInstanceState);
   // Restore State Here
   if (!restoreStateFromArguments()) {
      // First Time running, Initialize something here
   }
}
@Override
public void onSaveInstanceState(Bundle outState) {
   super.onSaveInstanceState(outState);
   // Save State Here
   saveStateToArguments();
}
@Override
public void onDestroyView() {
   super.onDestroyView();
   // Save State Here
   saveStateToArguments();
}
private void saveStateToArguments() {
   savedState = saveState();
   if (savedState != null) {
      Bundle b = getArguments();
      b.putBundle(“internalSavedViewState8954201239547”, savedState);
   }
}
private boolean restoreStateFromArguments() {
   Bundle b = getArguments();
   savedState = b.getBundle(“internalSavedViewState8954201239547”);
   if (savedState != null) {
      restoreState();
      return true;
   }
   return false;
}
/////////////////////////////////
// Restore Instance State Here
/////////////////////////////////
private void restoreState() {
   if (savedState != null) {
      // For Example
      //tv1.setText(savedState.getString(“text”));
   }
}
//////////////////////////////
// Save Instance State Here
//////////////////////////////
private Bundle saveState() {
   Bundle state = new Bundle();
   // For Example
   //state.putString(“text”, tv1.getText().toString());
   return state;
}
You can now save your fragment's state in saveState and restore it in restoreState easily. It now looks far better. We are almost there. But there is still another weird case.
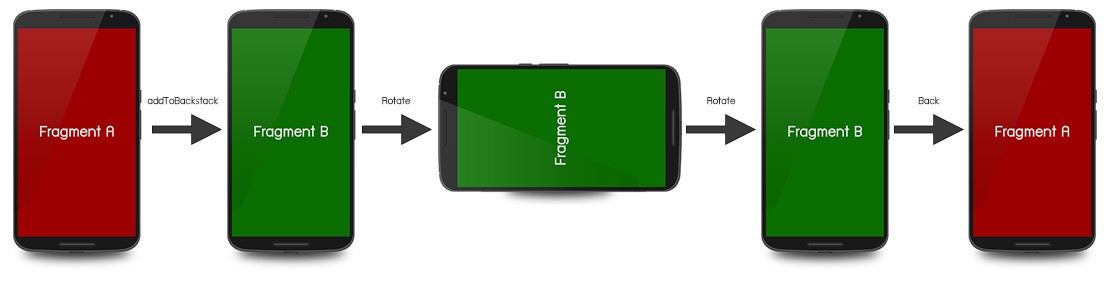
Case 3: Rotate screen twice while there is more than one fragment in backstack
When you rotate the screen once, onSaveInstanceState will be called as the UI state will be saved as we expected but when you rotate the screen once more, the above code might crash the application. The reason is although onSaveInstanceState is called but when you rotate the screen, the fragment in the backstack will completely destroy the view and will not create it back until you browse back to the fragment. As a result, the next time you rotate the screen, there is no view to save state. saveState() will crash the application with NullPointerException if you try to access those unexisted view(s).
Here is the workaround, just check that is view existed in fragment. If yes, save it, if not, just pass the savedState saved in Argument and then save it back or just doesn’t do anything since it is already inside the Argument.
private void saveStateToArguments() {
   if (getView() != null)
      savedState = saveState();
   if (savedState != null) {
      Bundle b = getArguments();
      b.putBundle(“savedState”, savedState);
   }
}
Yah, it is now done !
Final template for Fragment:
Here comes the fragment template I currently use for my work.
import android.os.Bundle;
import android.support.v4.app.Fragment;
import android.view.LayoutInflater;
import android.view.View;
import android.view.ViewGroup;

import com.inthecheesefactory.thecheeselibrary.R;

/**
 * Created by nuuneoi on 11/16/2014.
 */
public class StatedFragment extends Fragment {

    Bundle savedState;

    public StatedFragment() {
        super();
    }

    @Override
    public void onActivityCreated(Bundle savedInstanceState) {
        super.onActivityCreated(savedInstanceState);
        // Restore State Here
        if (!restoreStateFromArguments()) {
            // First Time, Initialize something here
            onFirstTimeLaunched();
        }
    }

    protected void onFirstTimeLaunched() {

    }

    @Override
    public void onSaveInstanceState(Bundle outState) {
        super.onSaveInstanceState(outState);
        // Save State Here
        saveStateToArguments();
    }

    @Override
    public void onDestroyView() {
        super.onDestroyView();
        // Save State Here
        saveStateToArguments();
    }

    ////////////////////
    // Don't Touch !!
    ////////////////////

    private void saveStateToArguments() {
        if (getView() != null)
            savedState = saveState();
        if (savedState != null) {
            Bundle b = getArguments();
            b.putBundle("internalSavedViewState8954201239547", savedState);
        }
    }

    ////////////////////
    // Don't Touch !!
    ////////////////////

    private boolean restoreStateFromArguments() {
        Bundle b = getArguments();
        savedState = b.getBundle("internalSavedViewState8954201239547");
        if (savedState != null) {
            restoreState();
            return true;
        }
        return false;
    }

    /////////////////////////////////
    // Restore Instance State Here
    /////////////////////////////////

    private void restoreState() {
        if (savedState != null) {
            // For Example
            //tv1.setText(savedState.getString("text"));
            onRestoreState(savedState);
        }
    }

    protected void onRestoreState(Bundle savedInstanceState) {

    }

    //////////////////////////////
    // Save Instance State Here
    //////////////////////////////

    private Bundle saveState() {
        Bundle state = new Bundle();
        // For Example
        //state.putString("text", tv1.getText().toString());
        onSaveState(state);
        return state;
    }

    protected void onSaveState(Bundle outState) {

    }
}
If you use this template, just simply extends this class extends StatedFragment and save things in onSaveState() and restore them in onRestoreState(). The above code will do the rest for you and I believe that it covers all the possible cases I know.
You might notice that I didn’t setRetainInstance to true which will help developer handling member variable(s) from configuration changed for example, screen rotation. Please note that it is an intention since setRetainInstance(true) doesn’t cover all the case. The biggest one is you can’t retain the nested fragment which is being used more frequent time by time so I suggest not to retain instance unless you are 100% sure that the fragment will not be used as nested.
Usage
Good news. StatedFragment described in this blog is now made to be a very easy-to-use library and is already published on jcenter. You can now simply add a dependency like below in your project’s build.gradle.
Extends StatedFragment and save state in onSaveState(Bundle outState) and restore state inonRestoreState(Bundle savedInstanceState). You are also able to override onFirstTimeLaunched(), if you want to do something as the first time the fragment is launched (is not called again after that).
public class MainFragment extends StatedFragment {

    ...

    /**
     * Save Fragment's State here
     */
    @Override
    protected void onSaveState(Bundle outState) {
        super.onSaveState(outState);
        // For example:
        //outState.putString("text", tvSample.getText().toString());
    }

    /**
     * Restore Fragment's State here
     */
    @Override
    protected void onRestoreState(Bundle savedInstanceState) {
        super.onRestoreState(savedInstanceState);
        // For example:
        //tvSample.setText(savedInstanceState.getString("text"));
    }

    ...

}
One of the common problem we always meet in the world of Fragment is: although we could call startActivityForResult directly from Nested Fragment but it appears that onActivityResult would never been called which brought a lot of trouble to handle Activity Result from Nested Fragment.
Why does this happen? That's because Fragment is not first designed to be nested. Once its capability was expanded, the architecture behind Fragment couldn't cover all the case. And we developers have to handle the problem case by case by ourselves.
But don't worry, we already have a sustainable and robust workaround for this problem. Ok, let's start !
Although we could call startActivityForResult directly from Fragment but actually mechanic behind are all handled by Activity. Once you call startActivityForResult from a Fragment, requestCode will be changed to attach Fragment's identity to the code. That will let Activity be able to track back that who send this request once result is received.
Once Activity was navigated back, the result will be sent to Activity's onActivityResult with the modified requestCode which will be decoded to original requestCode + Fragment's identity. After that, Activity will send the Activity Result to that Fragment through onActivityResult. And it's all done.
The problem is: Activity could send the result to only the Fragment that has been attached directly to Activity but not the nested one. That's the reason why onActivityResult of nested fragment would never been called no matter what.
The Solution
This behavior is one of the most popular issue in town. We could found a lot of thread related to this in stackoverflow. There are a lot of workaround provided by people there. Anyway none of them is sustainable enough to be used in any case (at least all of those that I discovered). So we spend a day research all the mechanic behind and try to find the way to cover all the cases available. And finally we found one!
The problem, as described above, is the request could be sent from nested fragment but couldn't be received properly. Thus there is no need to do those things in Fragment. Let them be all done in Activity level.
So we will call getActivity().startActivityForResult(...) from Fragment instead of just startActivityResult(...) from now on. Like this:
// In Fragment
Intent intent = new Intent(getActivity(), SecondActivity.class);
getActivity().startActivityForResult(intent, 12345);
As a result, all of the result received will be handled at the single place: onActivityResult of the Activity that Fragment is placed on.
Question is how to send the Activity Result to Fragment?
Due to the fact that we couldn't directly communicate with all of the nested fragment in the normal way, or at least in the easy way. And another fact is, every Fragment knows that which requestCode it has to handled since it is also the one that call startActivityForResult. So we choose the way to "broadcast to every single Fragment that is active at time. And let those Fragments check requestCode and do what they want."
Talk about broadcasting, LocalBroadcastManager could do the job but the mechanic is the way too old. I choose another alternative, an EventBus, which has a lot of choices out there. The one that I chose was Otto from square. It is really good at performance and robustness.
First of all, add a following line in build.gradle to include Otto to our project:
In the Otto way, let's create a Bus Event as a package carry those Activity Result values.
ActivityResultEvent.java
import android.content.Intent;

/**
 * Created by nuuneoi on 3/12/2015.
 */
public class ActivityResultEvent {

    private int requestCode;
    private int resultCode;
    private Intent data;

    public ActivityResultEvent(int requestCode, int resultCode, Intent data) {
        this.requestCode = requestCode;
        this.resultCode = resultCode;
        this.data = data;
    }

    public int getRequestCode() {
        return requestCode;
    }

    public void setRequestCode(int requestCode) {
        this.requestCode = requestCode;
    }

    public int getResultCode() {
        return resultCode;
    }

    public void setResultCode(int resultCode) {
        this.resultCode = resultCode;
    }

    public Intent getData() {
        return data;
    }

    public void setData(Intent data) {
        this.data = data;
    }
}
And of course, also create a Singleton of Event Bus which will be used to send a package from an Activity to all of active Fragments.
ActivityResultBus.java
import android.os.Handler;
import android.os.Looper;

import com.squareup.otto.Bus;

/**
 * Created by nuuneoi on 3/12/2015.
 */
public class ActivityResultBus extends Bus {

    private static ActivityResultBus instance;

    public static ActivityResultBus getInstance() {
        if (instance == null)
            instance = new ActivityResultBus();
        return instance;
    }

    private Handler mHandler = new Handler(Looper.getMainLooper());

    public void postQueue(final Object obj) {
        mHandler.post(new Runnable() {
            @Override
            public void run() {
                ActivityResultBus.getInstance().post(obj);
            }
        });
    }

}
You may notice that I also create a custom method named postQueue in the bus object. This one is used to send a package into the bus. And the reason why we have to do it this way is because we have to delay a package sending a little bit since at the moment that Activitiy's onActivityResult has been called, the Fragment is not become active yet. So we need to let Handler send those commands to the queue of Main Thread with handler.post(...) like coded above.
And then we will override onActivityResult on Activity and add a following line to send the package to the bus once the result is received.
public class MainActivity extends ActionBarActivity {

    ...

    @Override
    protected void onActivityResult(int requestCode, int resultCode, Intent data) {
        super.onActivityResult(requestCode, resultCode, data);
        ActivityResultBus.getInstance().postQueue(
                    new ActivityResultEvent(requestCode, resultCode, data));
    }

    ...

}
In Fragment part, we need to listen to the package sent from Activity. We could do it easily in Otto way like this.
public class BodyFragment extends Fragment {

    ...

    @Override
    public void onStart() {
        super.onStart();
        ActivityResultBus.getInstance().register(mActivityResultSubscriber);
    }

    @Override
    public void onStop() {
        super.onStop();
        ActivityResultBus.getInstance().unregister(mActivityResultSubscriber);
    }

    private Object mActivityResultSubscriber = new Object() {
        @Subscribe
        public void onActivityResultReceived(ActivityResultEvent event) {
            int requestCode = event.getRequestCode();
            int resultCode = event.getResultCode();
            Intent data = event.getData();
            onActivityResult(requestCode, resultCode, data);
        }
    };

    ...

}
That's all. Fragment's onActivityResult will be called from now on ! You can now just simply override onActivityResult, check the requestCode and do what you want.
public class BodyFragment extends Fragment {

    ...

    @Override
    public void onActivityResult(int requestCode, int resultCode, Intent data) {
        super.onActivityResult(requestCode, resultCode, data);
        // Don't forget to check requestCode before continuing your job
        if (requestCode == 12345) {
            // Do your job
            tvResult.setText("Result Code = " + resultCode);
        }
    }

    ...

}
With this solution, it could be applied for any single fragment whether it is nested or not. And yes, it also covers all the case! Moreover, the codes are also nice and clean.
Limitation
There is just only one limitation. Don't use the same requestCode in different Fragment. As you can see, every single Fragment that is active at time will be receive the package. If you use the same requestCode in different Fragment, it may delivers the wrong outcome. Except that you intend to do it, you can.
Make it easy with StatedFragment
Good news! The code we described in this article are already included in our StatedFragment in version 0.9.3 and above. You could now use it easily like this:
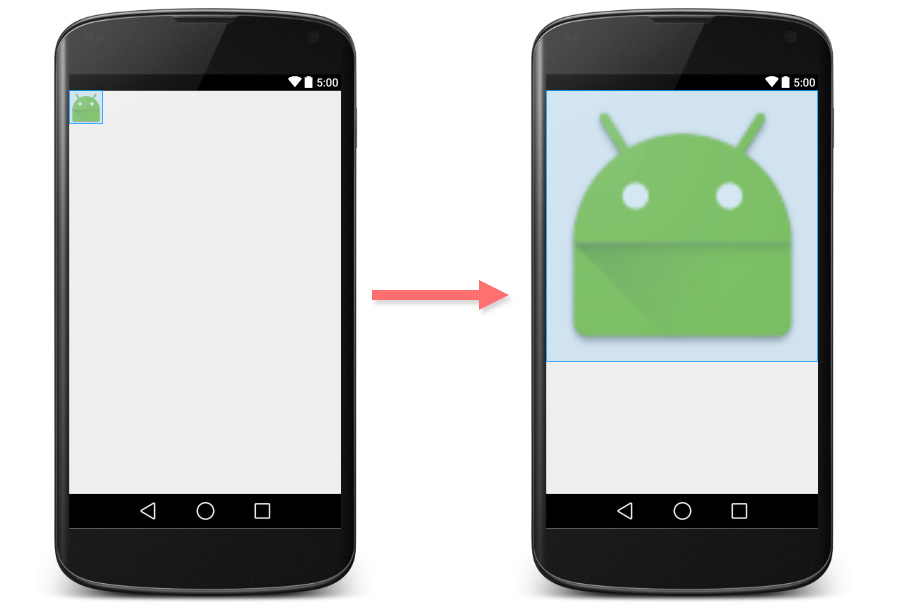
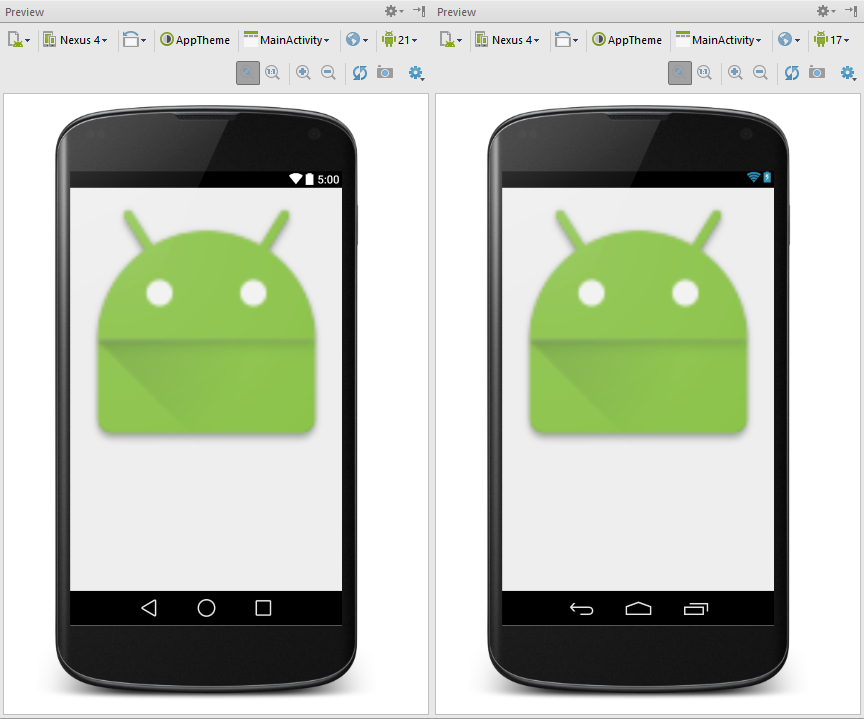
A requirement that almost every single application has is "I want to scale up an ImageView proportionally to fit its parent. How can I do that?" Like this:
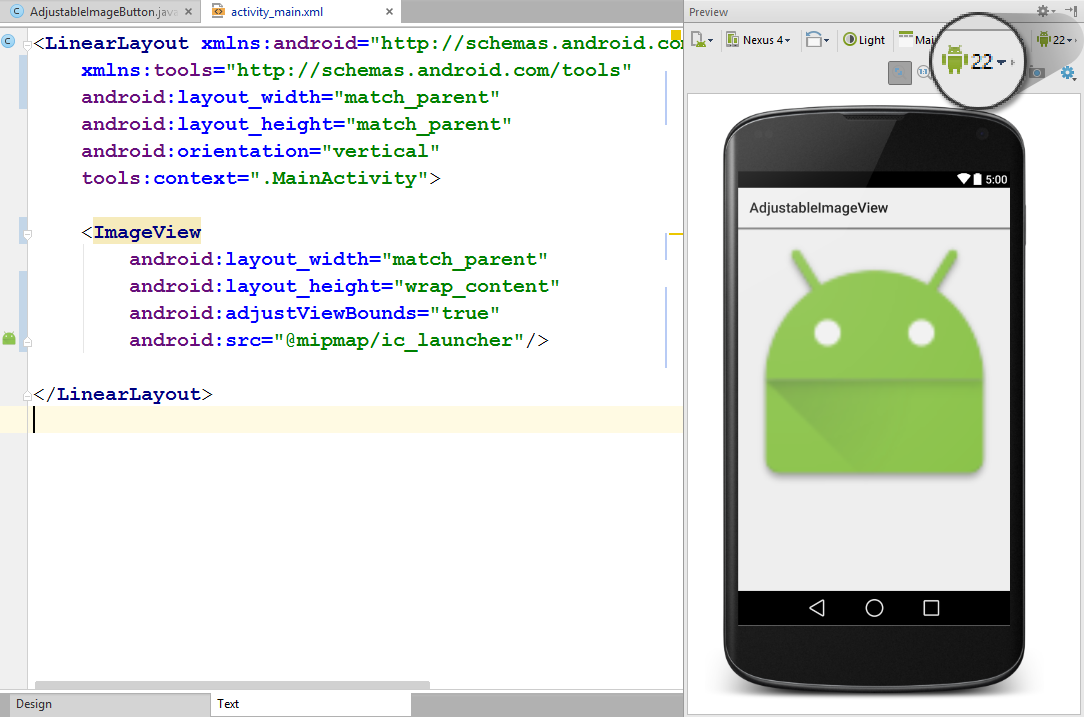
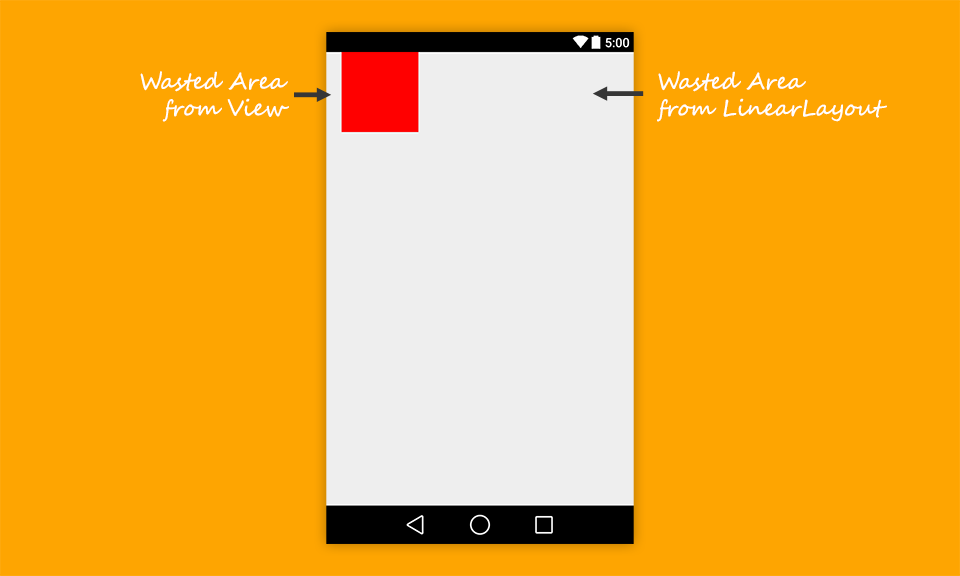
Actually ImageView has already come with this capability. You can just simply set android:adjustViewBounds to true and that's all.
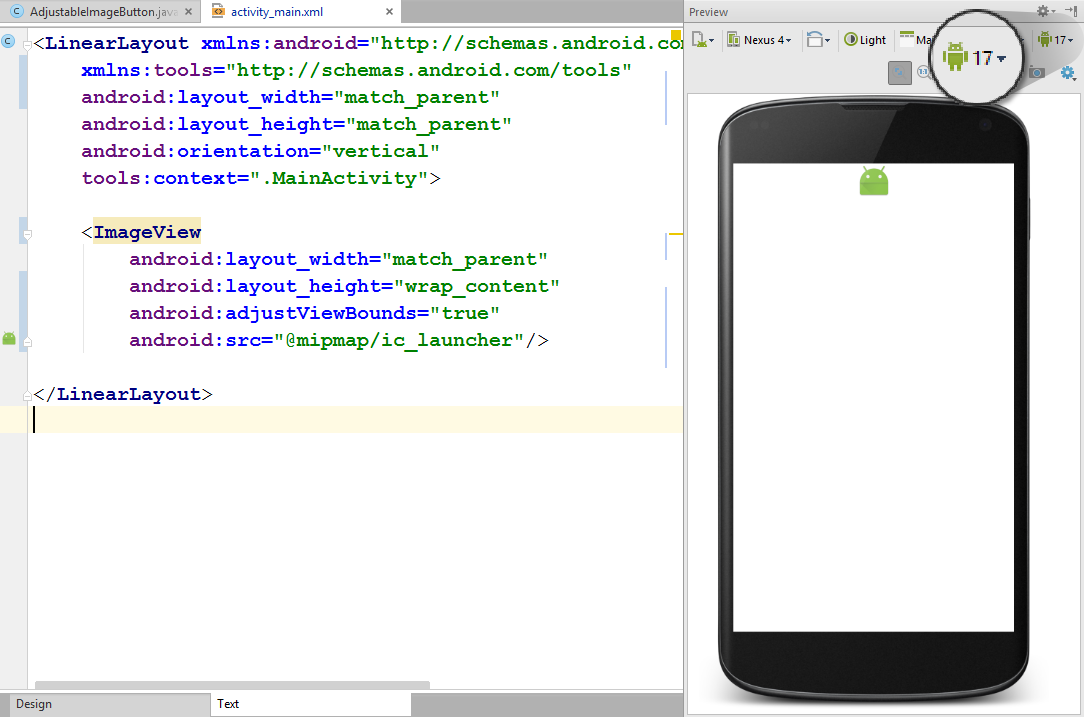
Everything looks fine? Actually not. If you switch your preview version to API Level 17 or below, you will see that ImageView doesn't scale up anymore.
It is not a bug but a correct behaviour that is officially noted in the documentation.
Note: If the application targets API level 17 or lower, adjustViewBounds will allow the drawable to shrink the view bounds, but not grow to fill available measured space in all cases. This is for compatibility with legacy MeasureSpec and RelativeLayout behavior.
It means that in API Level 17 and below, the maximum width and maximum height are bounded to the size of image defined in android:src. As a result, it happens like picture above.
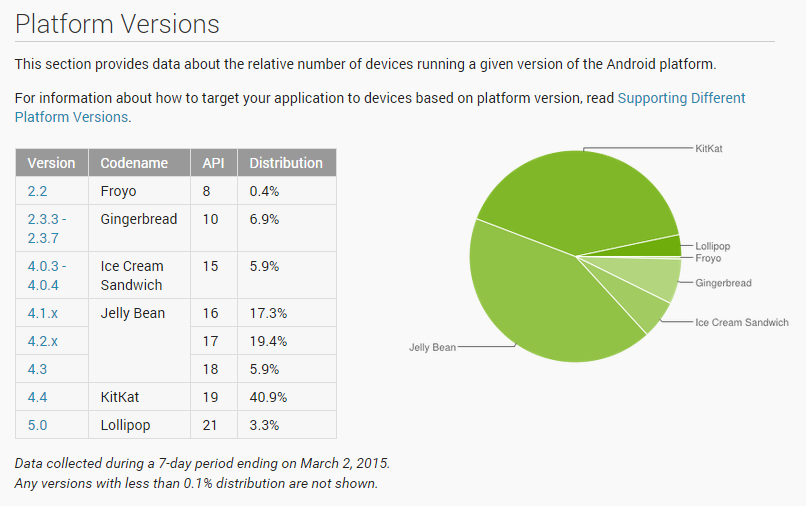
Have a small look at Market Share of Android Platform Versions. It appears that Android phone running API Level 17 and below takes almost 50% share.
It is not a good solution to set minSdkVersion to 18 just to avoid this problem.
It is far better to modify some ImageView's source code to give it an API Level 18+'s behavior and use it instead of a normal ImageView. Here it comes, a Custom ImageView that does the job !
import android.content.Context;
import android.graphics.drawable.Drawable;
import android.util.AttributeSet;
import android.view.ViewGroup;
import android.view.ViewParent;
import android.widget.ImageView;

/**
 * Created by nuuneoi on 2/17/15 AD.
 */
public class AdjustableImageView extends ImageView {

    boolean mAdjustViewBounds;

    public AdjustableImageView(Context context) {
        super(context);
    }

    public AdjustableImageView(Context context, AttributeSet attrs) {
        super(context, attrs);
    }

    public AdjustableImageView(Context context, AttributeSet attrs, int defStyleAttr) {
        super(context, attrs, defStyleAttr);
    }

    @Override
    public void setAdjustViewBounds(boolean adjustViewBounds) {
        mAdjustViewBounds = adjustViewBounds;
        super.setAdjustViewBounds(adjustViewBounds);
    }

    @Override
    protected void onMeasure(int widthMeasureSpec, int heightMeasureSpec) {
        Drawable mDrawable = getDrawable();
        if (mDrawable == null) {
            super.onMeasure(widthMeasureSpec, heightMeasureSpec);
            return;
        }

        if (mAdjustViewBounds) {
            int mDrawableWidth = mDrawable.getIntrinsicWidth();
            int mDrawableHeight = mDrawable.getIntrinsicHeight();
            int heightSize = MeasureSpec.getSize(heightMeasureSpec);
            int widthSize = MeasureSpec.getSize(widthMeasureSpec);
            int heightMode = MeasureSpec.getMode(heightMeasureSpec);
            int widthMode = MeasureSpec.getMode(widthMeasureSpec);

            if (heightMode == MeasureSpec.EXACTLY && widthMode != MeasureSpec.EXACTLY) {
                // Fixed Height & Adjustable Width
                int height = heightSize;
                int width = height * mDrawableWidth / mDrawableHeight;
                if (isInScrollingContainer())
                    setMeasuredDimension(width, height);
                else
                    setMeasuredDimension(Math.min(width, widthSize), Math.min(height, heightSize));
            } else if (widthMode == MeasureSpec.EXACTLY && heightMode != MeasureSpec.EXACTLY) {
                // Fixed Width & Adjustable Height
                int width = widthSize;
                int height = width * mDrawableHeight / mDrawableWidth;
                if (isInScrollingContainer())
                    setMeasuredDimension(width, height);
                else
                    setMeasuredDimension(Math.min(width, widthSize), Math.min(height, heightSize));
            } else {
                super.onMeasure(widthMeasureSpec, heightMeasureSpec);
            }
        } else {
            super.onMeasure(widthMeasureSpec, heightMeasureSpec);
        }
    }

    private boolean isInScrollingContainer() {
        ViewParent p = getParent();
        while (p != null && p instanceof ViewGroup) {
            if (((ViewGroup) p).shouldDelayChildPressedState()) {
                return true;
            }
            p = p.getParent();
        }
        return false;
    }
}
The way these codes work is straightforward. It would calculate the height proportionally in case the width is fixed and vice versa inside onMeasure. In case this AdjustableImageView object is placed inside non-scrollable container, width and height would be limited to the space left in parent. Otherwise, it would be scaled up without any restriction.
To use it, simply change ImageView to com.inthecheesefactory.thecheeselibrary.widget.AdjustableImageView in the layout xml.
We know that it is such a boring task creating a file, copy the code, paste it, reformat, check if everything is right, blah blah blah.
Your life is now 10 times easier with the library dependency we prepared for you. It is now live on jcenter. Once you add the dependency to your project, AdjustableImageView and AdjustableImageButton will be ready to make your day. Source codes of this library are hosted on GitHub. Please feel free to have a look.
Here is the gradle dependency. Just simply add this line to yourbuild.gradle
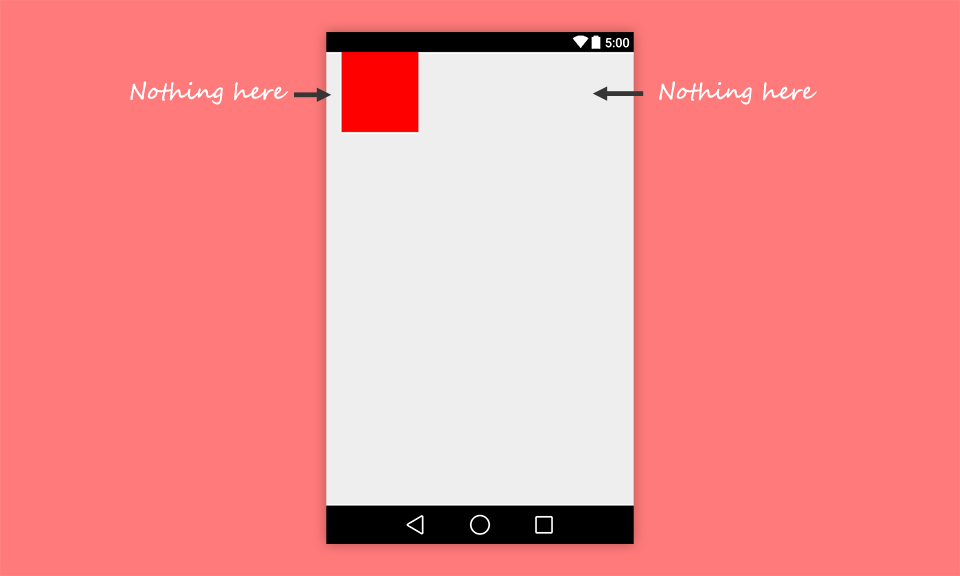
As a result, ImageView is now scaled up perfectly no matter which Android version the application is running on.
This is a good example why we should install multiple SDK Platforms in the machine and not just the latest one. Since if you want to let Android Studio preview your layout with specific Android version, you need to install SDK Platform for that version or it wouldn't be listed as a choice in preview pane. Per my suggestion, you should install every single SDK Platform from API Level 14 on. Loss some disk space but what that you get back is worthy.
In the passed Google Developer Summit Thailand, Google introduced us an Image Loader Library for Android developed by bumptech named Glide as a library that recommended by Google. It has been used in many Google open source projects till now including Google I/O 2014 official application.
It succeeded in making me interested. I spent a whole night playing with it and decided to share my experience in this blog post. As a begining, I must say that it looks 90% similar to Picasso. To be more precise, I think it is something like a Picasso-clone.
Anyway it is quite different in details. You will learn how.
Import to project
Both Picasso and Glide are on jcenter. You can simply import it to your project with dependency like this:
Anyway Glide also needs Android Support Library v4, please don't forget to import support-v4 to your project like above as well. But it is not kind of a problem since Android Support Library v4 is basically needed in every single new-age Android project.
Basic
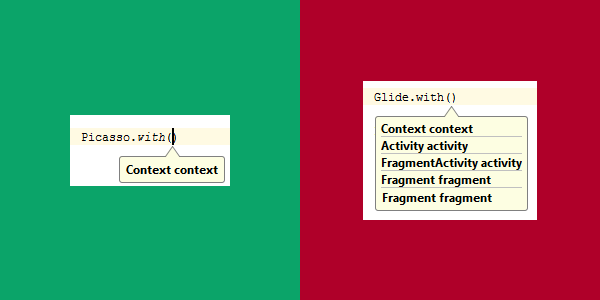
As I said, it is very similar to Picasso. The way to load an image to ImageView with Glide is quite the same as Picasso.
Although it looks quite the same but in details Glide is designed far better since with doesn't accept only Context but also Activity and Fragment. Context will be automatically extracted from those things you throw in.
And the brilliant benefit from passing Activity/Fragment to Glide is: image loading would be integrated with Activity/Fragment's lifecycle for example, pause loading in Paused state and automatically resume on Resumed state. So I encourage you to pass the Activity or Fragment to Glide not just a Context if possible.
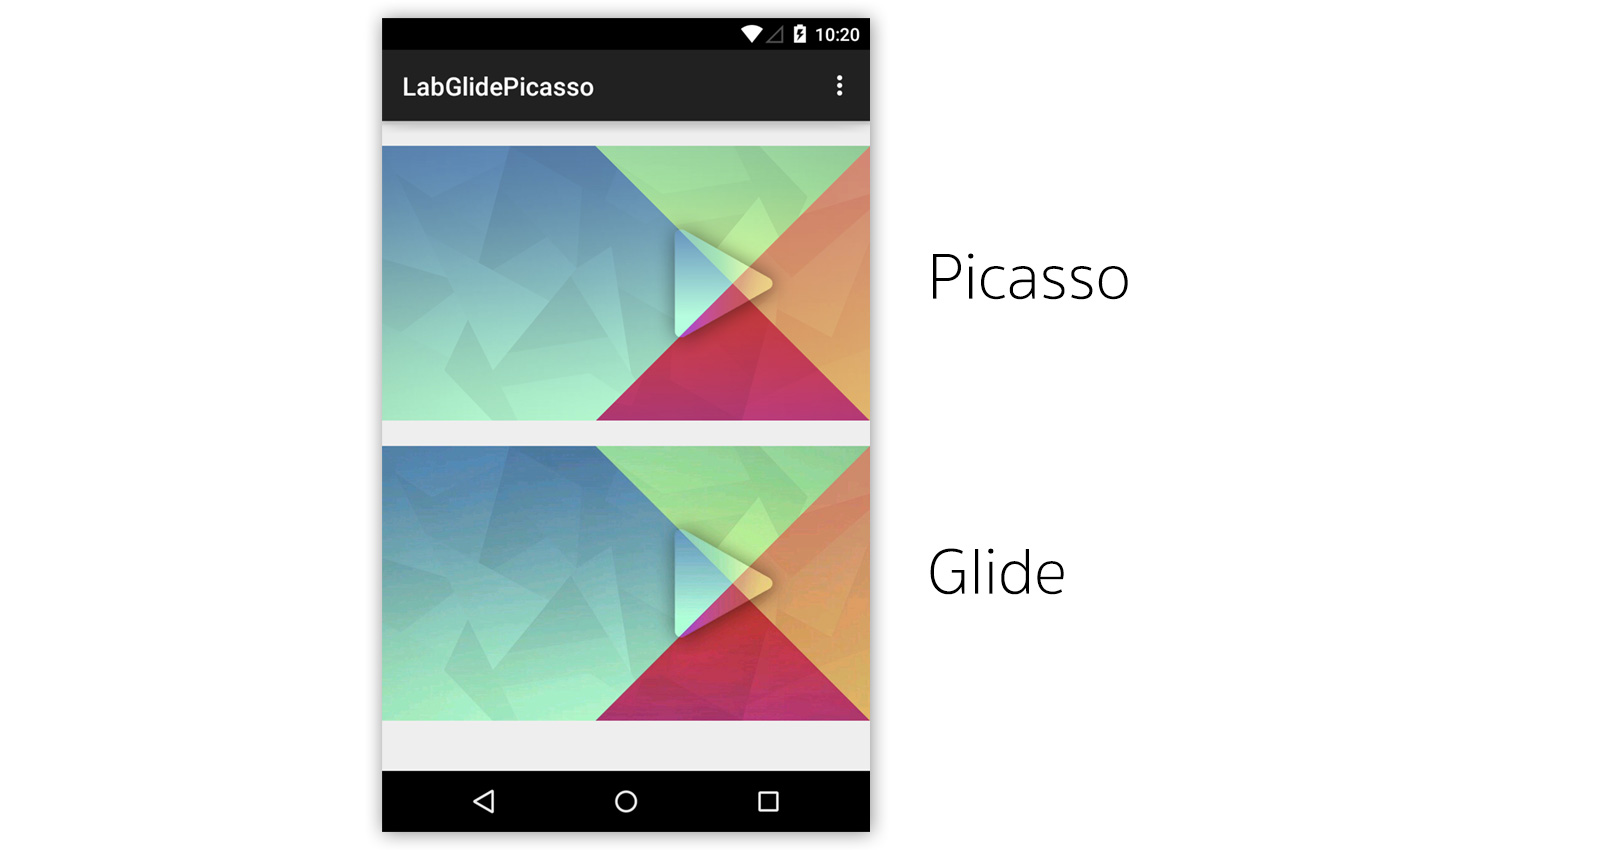
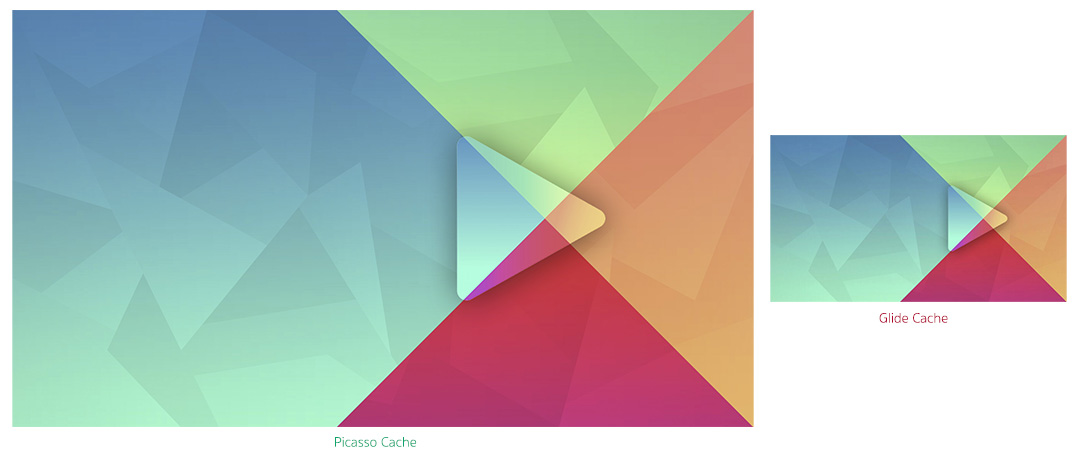
Default Bitmap Format is RGB_565
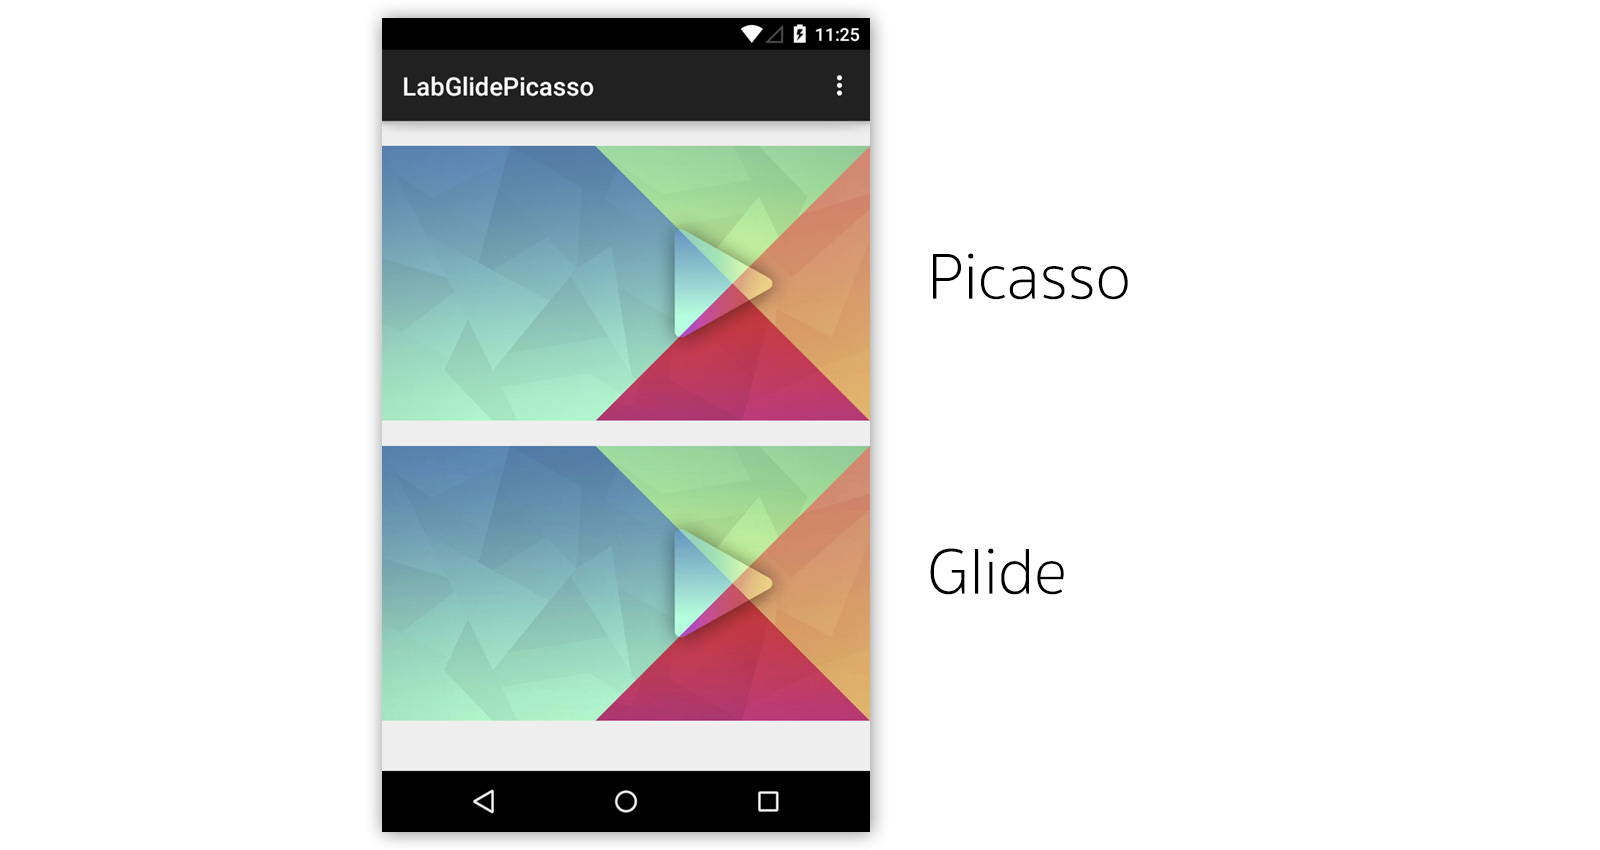
Here is the result of image loading comparing to Picasso. (1920x1080 pixels image is loaded into 768x432 pixels ImageView)
You can notice that image loaded by Glide has the worse quality compared to Picasso. Why? This is because Glide default Bitmap Format is set to RGB_565 since it consumed just 50% memory footprint compared to ARGB_8888.
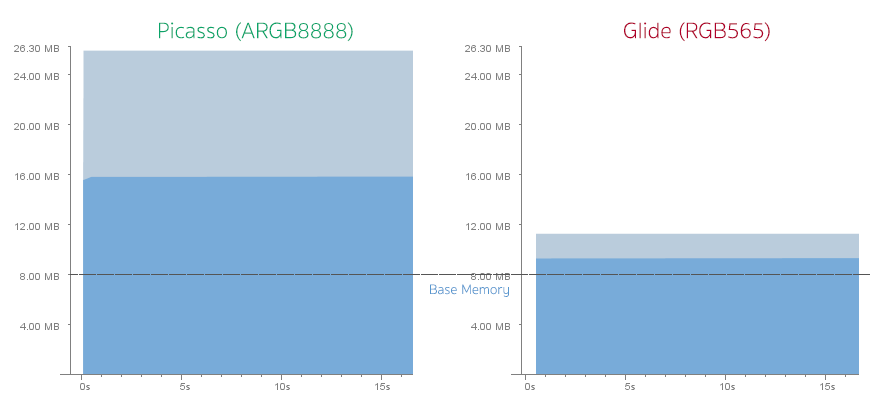
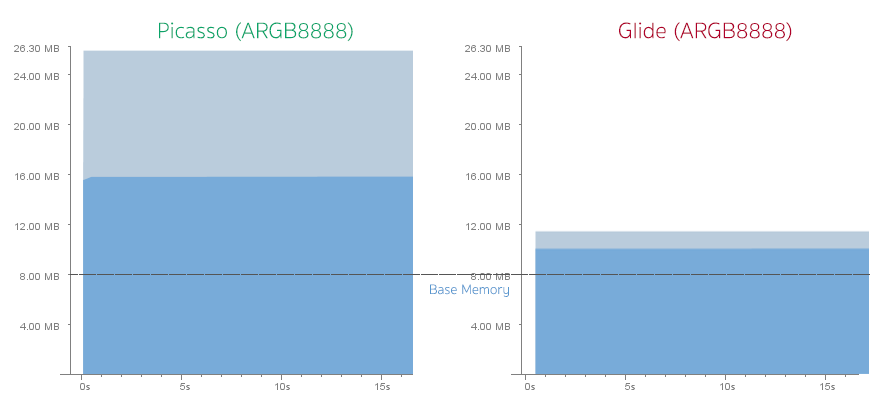
Here is the memory consumption graphs between Picasso at ARGB8888 and Glide at RGB565. (Base application consumes around 8MB)
You don't have to do anything if you are ok with the image's quality already. But if think it is unacceptable or just not good enough for you, you can switch Bitmap Format to ARGB_8888 by creating a new class which extended from GlideModule like this:
public class GlideConfiguration implements GlideModule {

    @Override
    public void applyOptions(Context context, GlideBuilder builder) {
        // Apply options to the builder here.
        builder.setDecodeFormat(DecodeFormat.PREFER_ARGB_8888);
    }

    @Override
    public void registerComponents(Context context, Glide glide) {
        // register ModelLoaders here.
    }
}
And then define it as meta-data inside AndroidManifest.xml
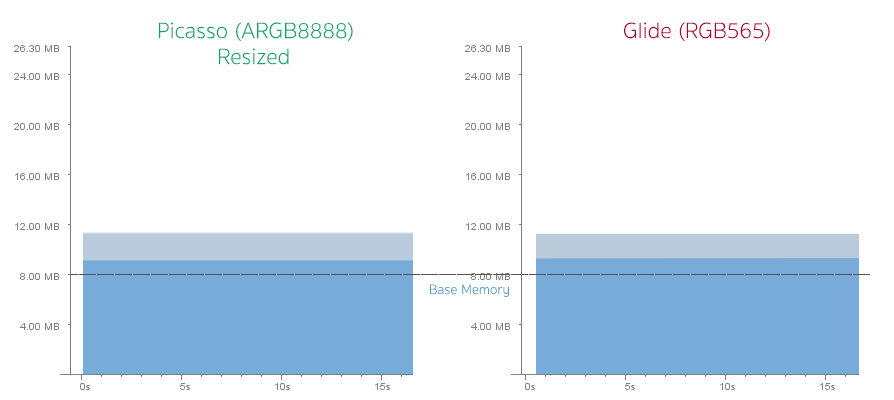
Let's take a look at memory consumption graphs once again. It appears that although Glide consumes almost 2 times than previous but Picasso still consumes a lot memory footprint more than Glide.
The reason is Picasso loads the full-size image (1920x1080 pixels) into the memory and let GPU does the real-time resizing when drawn. While Glide loads the exact ImageView-size (768x432 pixels) into the memory which is a best practice. Anyway you can change the behavior of Picasso to do the same with resize() command:
But the problem is you need to manually calculate the ImageView's size. Or if your ImageView has the exact size (not set to wrap_content), you can simply do like this.
Memory consumption graphs are now finally almost the same !
Although memory consumption are quite the same but I must say that Glide beats Picasso in term of functionality of this part since it could calculate the ImageView size automatically in every single case.
Image's quality in details
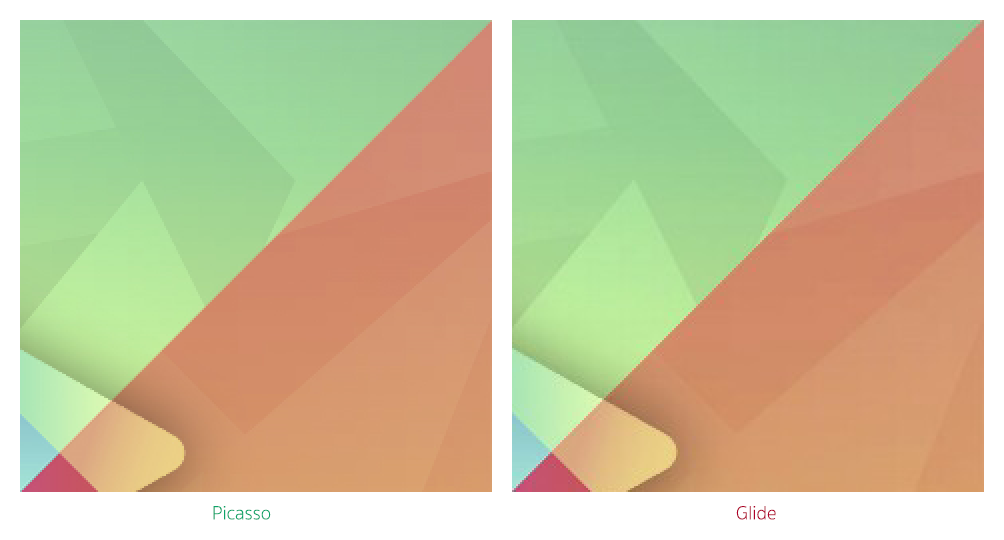
Here is the result when I tried to zoom an ImageView to the actual size.
It is noticeable that image loaded by Glide has some hard pixels and is not as smooth as the Picasso one. And till now, I still couldn't find the straight way to change image resizing algorithm.
But if you ask me is it bad? I would say that it is not that noticeable in real use. Quality is acceptable but you just need to set Bitmap Format to ARGB_8888, that's all.
Disk Caching
Default disk caching concept of Picasso and Glide are quite different. From the experiment, the same Full HD image is loaded into ImageView with Picasso and Glide. When I checked the cache folder, it appears that Glide cached the ImageView-size (768x432 pixels) while Picasso cached the full-size one (1920x1080 pixels).
And yes, hard pixels described above is also there. In addition, if image is loaded in RGB565 mode, the cached image will be also in RGB565.
When I tried to adjust ImageView to the different sizes. The result is whatever the size is, Picasso will cache only single size of image, the full-size one. Glide acts differently, caches separate file for each size of ImageView. Although an image has already been loaded once but if you need to load another size the same image, it needs to be downloaded once again before be resized to the right resolution and then be cached.
To be more clear, if there is an ImageView in the first page with 200x200 pixels dimension and there is the another one in the second page with 100x100 pixels that are needed to show the same image. You have to download the same image twice.
Anyway you could adjust its behavior by let Glide cache both the full-size image and the resized one with this command.
The next time image is requested to show on any ImageView, the full-size image would be loaded from cache, resized and then cached.
An advantage of the way Glide was designed is image could be loaded and showed very fast. While the Picasso way causes some delay on loading since it needs to be resized first before is set to an ImageView even you add this command to make it showed immediately.
//Picasso
.noFade();
There is some trade off between Picasso's and Glide's way of disk caching. You can choose the way fit your app's requirement best.
For me, I prefer Glide to Picasso since it is far faster although it needs more space to cache the image.
Features
You can do almost all the same things just like Picasso can do with the same style of coding for example, Image Resizing
As I said, if you are familiar with Picasso, moving to Glide would be just like chewing a candy for you. =)
What that Glide has but Picasso doesn't
An ability to load GIF Animation to a simple ImageView might be the most interesting feature of Glide. And yes, you can't do that with Picasso.
And since Glide is designed to work perfectly with Activity/Fragment's lifecycle so the animation would be automatically paused and resumed along with Activity/Fragment's state.
The way Glide caches is still be the same, resized first and then cached.
Anyway from an measurement I found that GIF Animation consumes quite a lot of memory. Please use it wisely.
Besides GIF Animation loading, Glide is also able to decode any local video file to a still image.
Another feature that might be useful is you can configure the way image appears with an Animator (R.animator) while Picasso could do only one animation, fading in.
The last one if you could generate a thumbnail file of an image you loaded with thumbnail().
Actually there are some other features you can play with but most of them are not that important for general use for example, transcode an image into Byte Array, etc.
Configurations
You can adjust so many configurations for example, size and location of disk caching, maximum limit of memory caching, Bitmap Format and many more. You can read more about this at Configuration page.
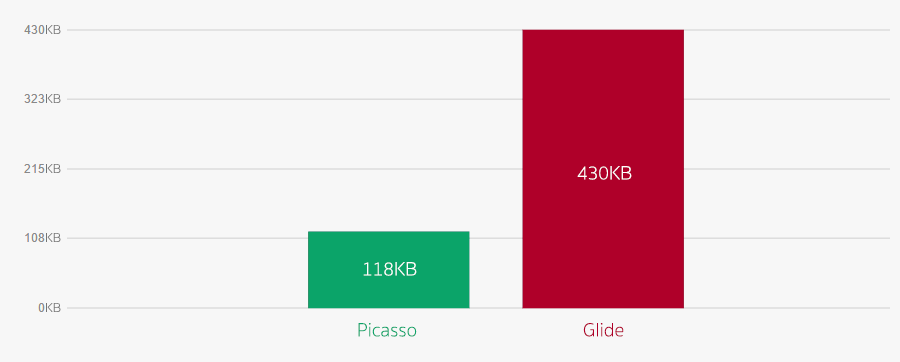
Library's size
Picasso (v2.5.1)'s size is around 118KB while Glide (v3.5.2)'s is around 430KB.
Anyway 312KB difference might not be that significant.
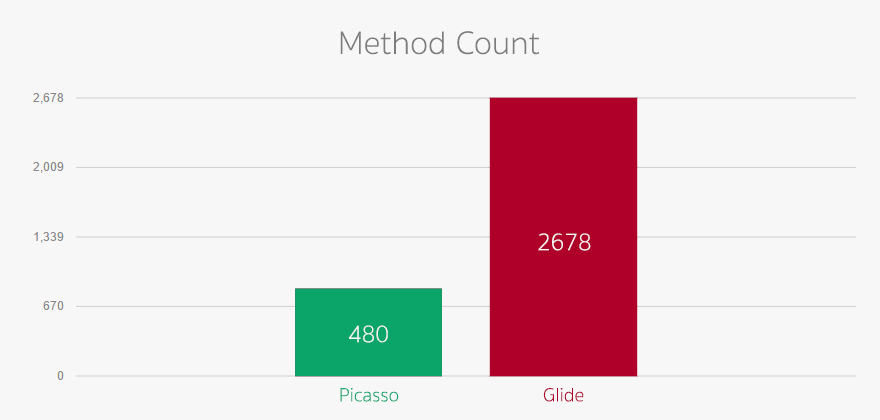
Method count of Picasso and Glide are at 840 and 2678 respectively.
I must say 2678 is quite a lot for 65535 methods limit of Android DEX file. ProGuard is recommended to turn on if you choose Glide. (And you should turn it on anyway for production release).
Conclusion
Neither Glide nor Picasso is perfect. The way Glide loads an image to memory and do the caching is better than Picasso which let an image loaded far faster. In addition, it also helps preventing an app from popular OutOfMemoryError. GIF Animation loading is a killing feature provided by Glide. Anyway Picasso decodes an image with better quality than Glide.
Which one do I prefer? Although I use Picasso for such a very long time, I must admit that I now prefer Glide. But I would recommend you to change Bitmap Format to ARGB_8888 and let Glide cache both full-size image and resized one first. The rest would do your job great!
Resources
There are not so many online resources related to Glide. But here are what I found. Please take a look on links below.
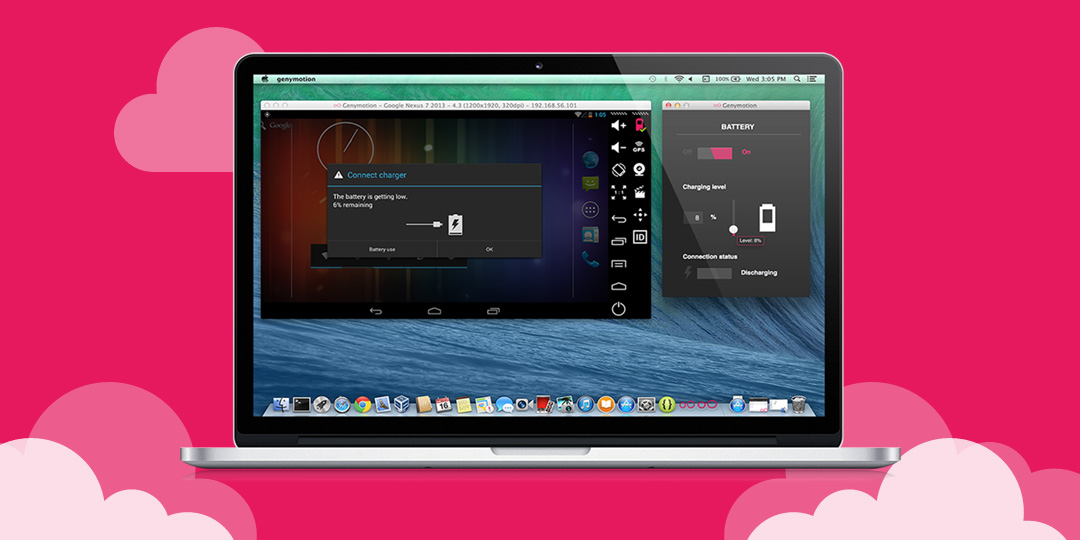
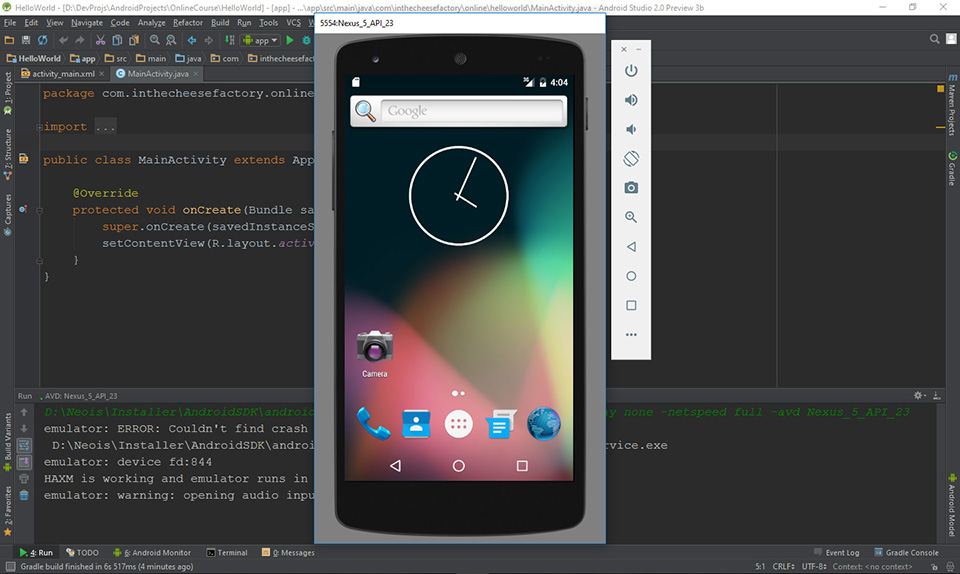
Due to Genymotion's fluidness and ease of use, it now becomes the most popular android emulator allows android developers to test their app directly on their computer.
However, it still lacks of Google Services just like Google Play Store, Google Maps, etc. on Genymotion emulator which makes us developer not be able to test those functionalities that use Google Services for example GCM Push Notifications or Google Maps.
Anyway it is not a problem anymore since there is some simple steps to do to make Google Services be avaiable on Genymotion with some help from CyanogenMod's gapps.
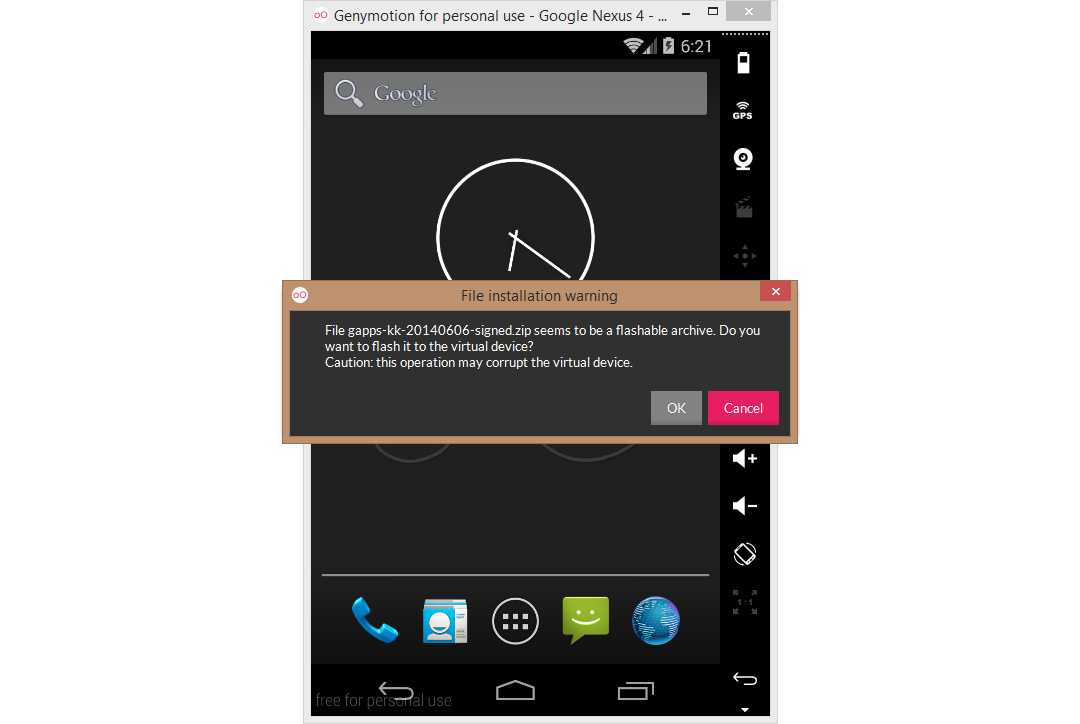
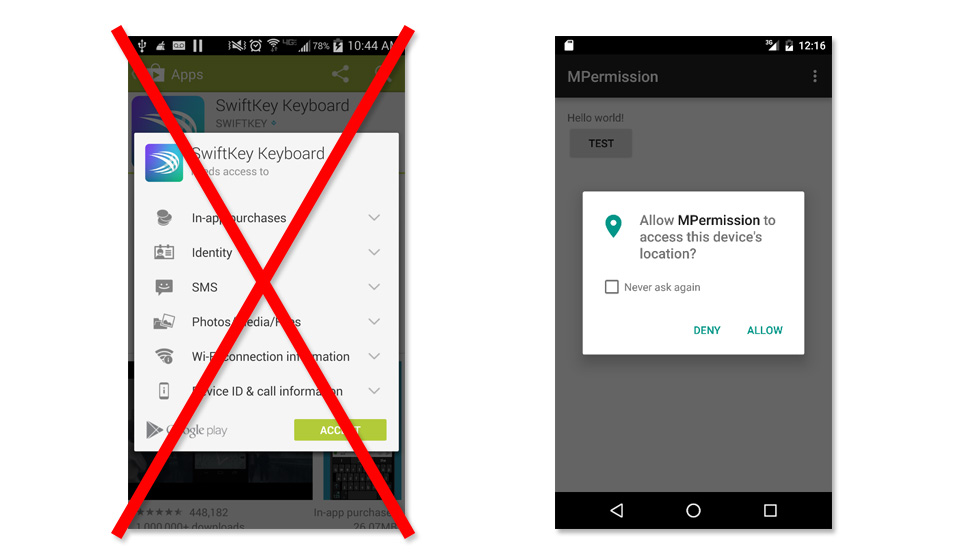
Step 1: Install ARM Translation - The secret behind Genymotion's fluidness is its ROM is compiled to x86 to match the most popular computer's CPU Architecture. But CyanogenMod's gapps is compiled in ARM. That's the reason why we can't just simply install gapps on Genymotion. To make it works, we need to install an ARM Translation which will let those ARM apps be able to run on this x86 virtual device.
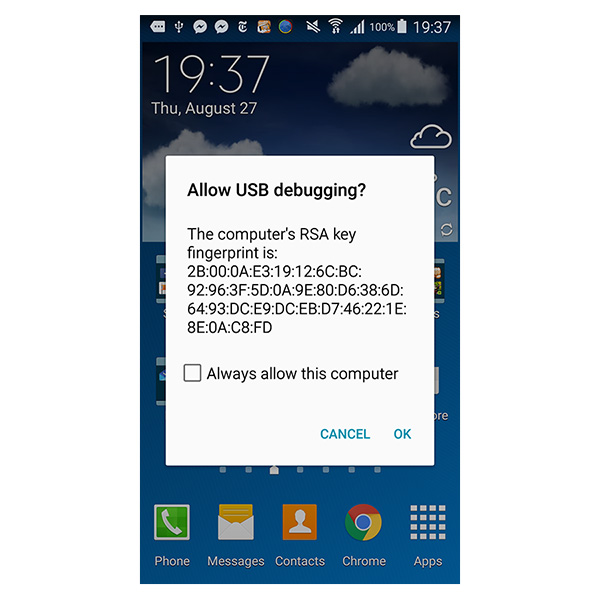
To install, download Genymotion-ARM-Translation_v1.1zip and then drop&drop the downloaded file to an opened Genymotion virtual device. After file transfering is done, there will be a confirmation dialog like below. Just simple click OK to flash it on virtual device.
There will be an another dialog to let you know that the flashing process is done.
You need to reboot the virtual device now but we don't suggest to just close the virtual device and relaunch it once again since it may leads to some weird behaviour. To make it done completely find, you need to reboot the device through command line like this:
adb reboot
In case you accidentally close the virtual device, don't be panic. You might need to relaunch for a few times before it can boot up.
Step 2: Install gapps - Before we go on to the next step, you need to download the flashable zip of gapps by your virtual device's Android version:
And then drop&drop the downloaded file to a virtual device like previous and go through the flashing process.
Reboot the virtual device once again.
adb reboot
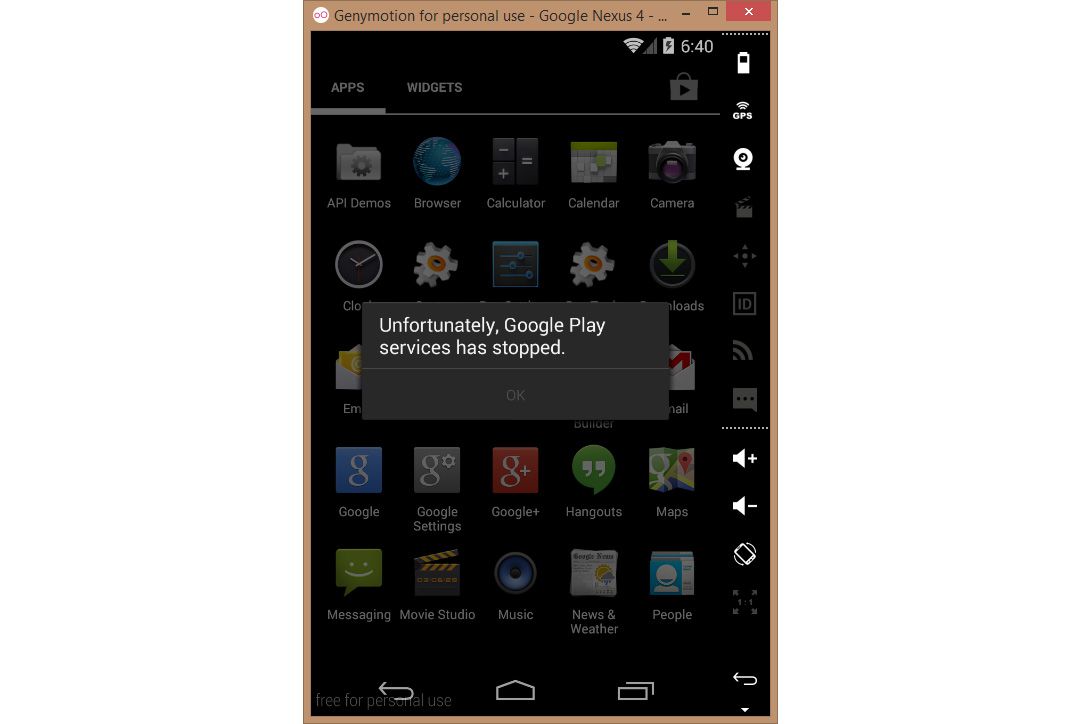
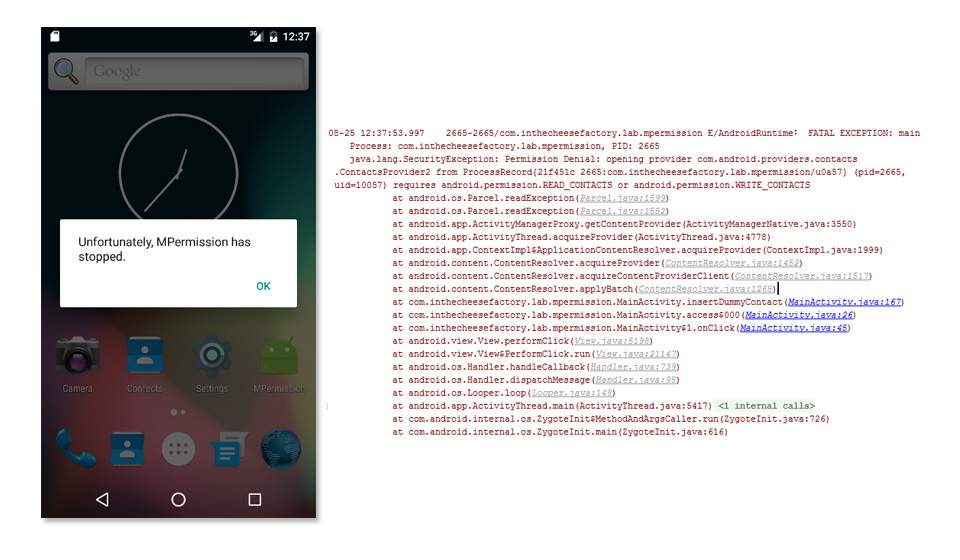
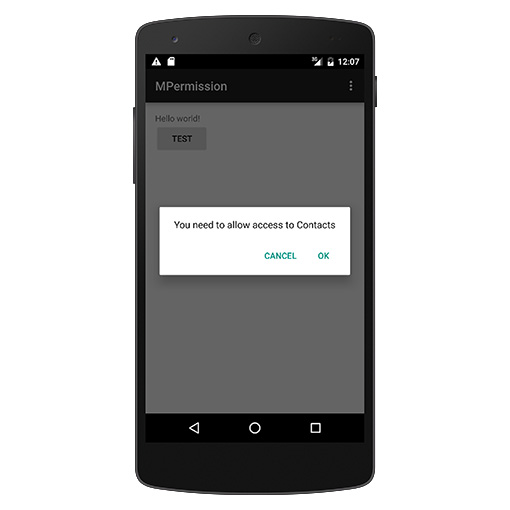
After the virtual device is booted up, you will notice that Google Play services has stopped problem will keep popping up like this:
Don't be surprised and don't panic. You did it all right. This error happens because the installed gapps is just too old and didn't match the latest ROM Genymotion provided. All you need to do is be patient and login to Google Play Store and update all of installed app.
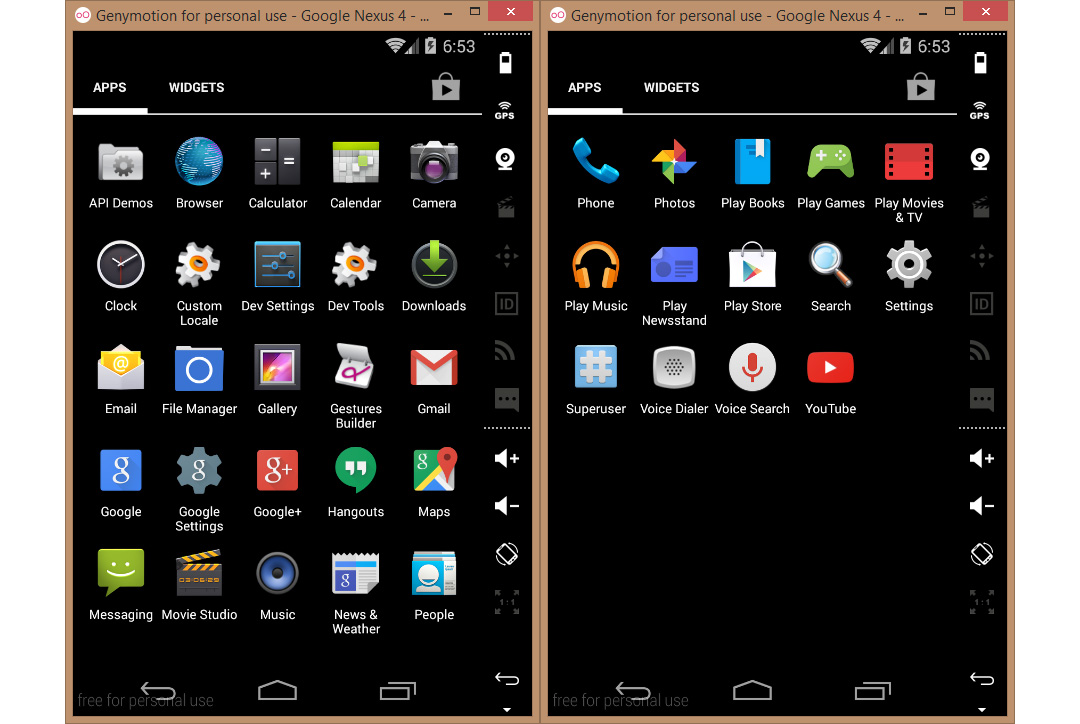
And also don't forget to update Google Play Services as well. It should be notified through the device's notification area after your pressed the Update All button in Google Play Store.
Congratulations, Google Play Services are now available on your Genymotion virtual device. A by-product of this installation is you are also able to run the app compiled in ARM on Genymotion as well.
Activity is one of the most brilliant concept on Android from its well-design architecture on memory management which lets Multitasking works perfectly on this most popular mobile operating system.
Anyway, Activity is not just to be launched on the screen. The way it is launched is also concerned. There are so many details in this topic. One of those that is really important is launchMode, which is the one that we are going to talk about in this blog.
Since each Activity is made to work in different purpose. Some is designed to work separately with each Intent sent for example an Activity for email composing in email client. While some is designed to work as a singleton for example an email's inbox Activity.
That's why it does matter to specify whether Activity is needed to be created a new one or to use the existed one, or it may leads to the bad UX or malfunctional. Thanks to Android's core engineer. It is the way easy to make it done with some help of launchMode which is designed for this especially.
Assign a launchMode
Basically we could assign a launchMode directly as an attribute of <activity> tag inside AndroidManifest.xml file list this:
There are 4 types of launchMode available. Let's see it one by one.
standard
This is the default mode.
The behavior of Activity set to this mode is a new Activity will always be created to work separately with each Intent sent. Imagine, if there are 10 Intents sent to compose an email, there should be 10 Activities launch to serve each Intent separately. As a result, there could be an unlimited number of this kind of Activity launched in a device.
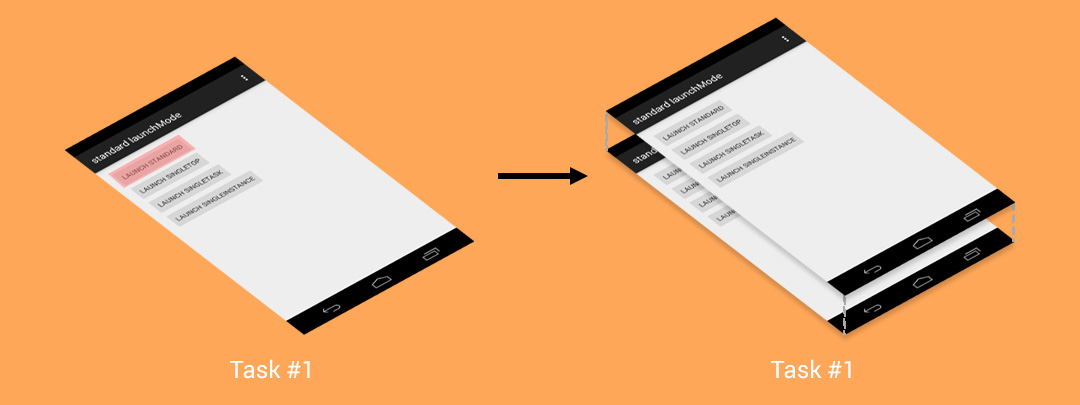
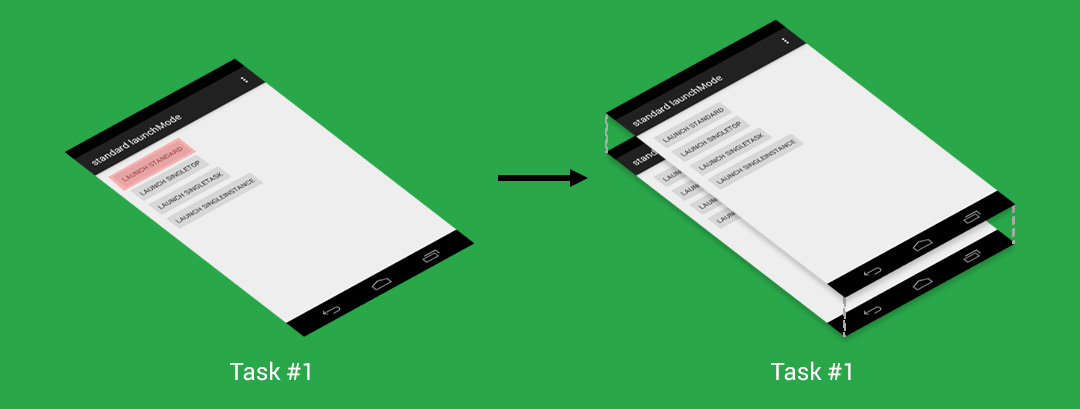
Behavior on Android pre-Lollipop
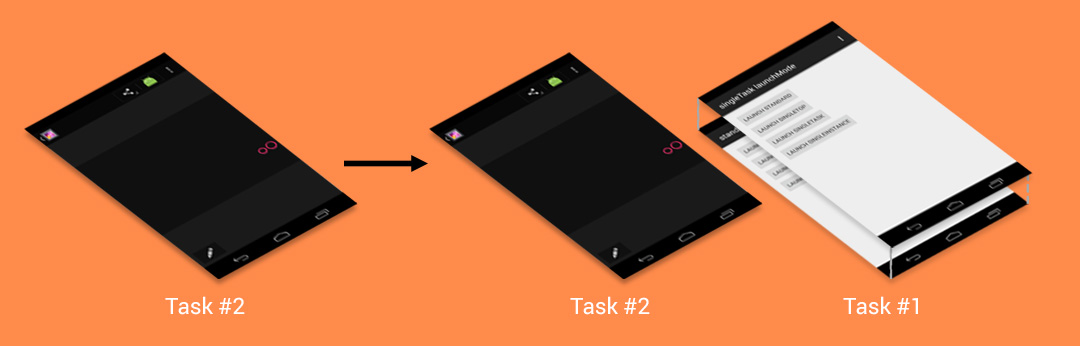
This kind of Activity would be created and placed on top of stack in the same task as one that sent an Intent.
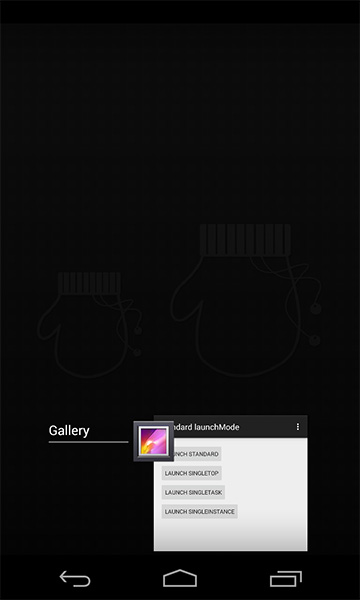
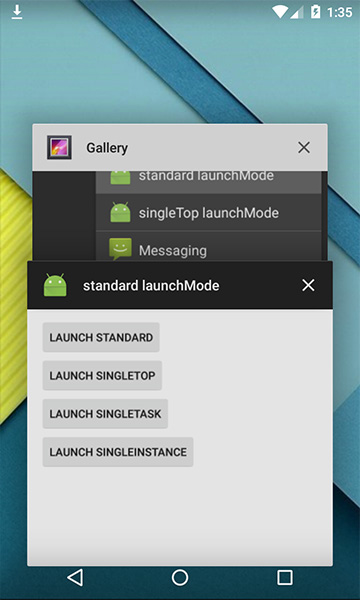
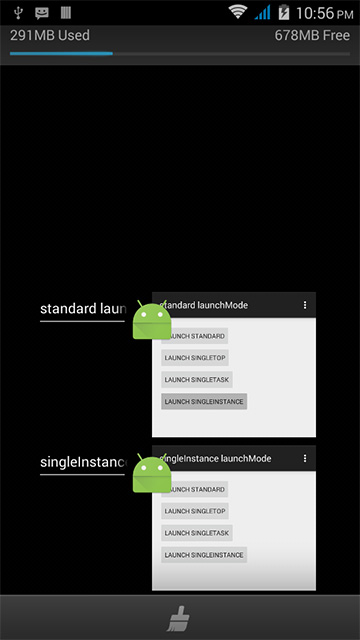
An image below shows what will happen when we share an image to a standard Activity. It will be stacked in the same task as described although they are from the different application.
And this is what you will see in the Task Manager. (A little bit weird may be)
If we switch the application to the another one and then switch back to Gallery, we will still see that standard launchMode place on top of Gallery's task. As a result, if we need to do anything with Gallery, we have to finish our job in that additional Activity first.
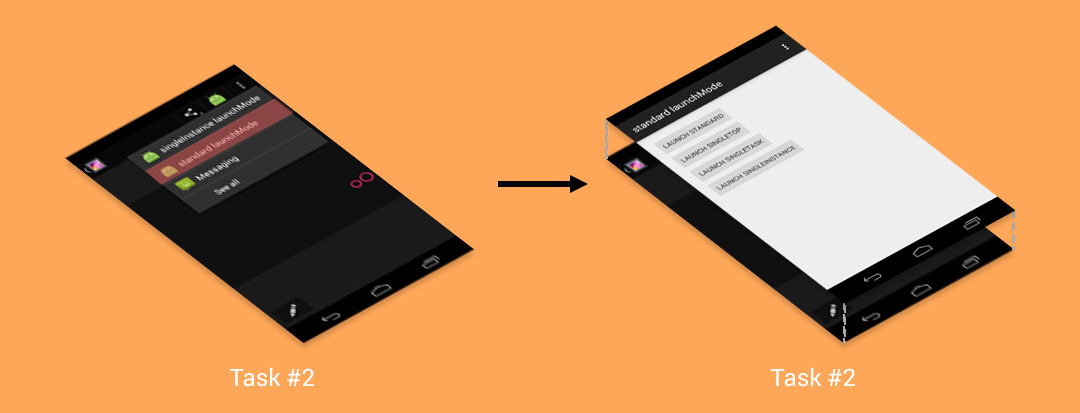
Behavior on Android Lollipop
If those Activities are from the same application, it will work just like on pre-Lollipop, stacked on top of the task.
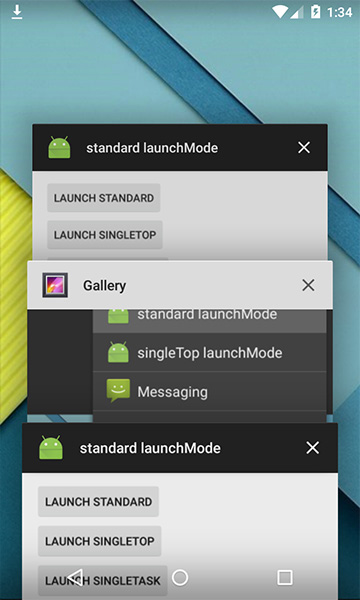
But in case that an Intent is sent from a different application. New task will be created and the newly created Activity will be placed as a root Activity like below.
And this is what you will see in Task Manager.
This happens because Task Management system is modified in Lollipop to make it better and more make sense. In Lollipop, you can just switch back to Gallery since they are in the different Task. You can fire another Intent, a new Task will be created to serve an Intent as same as the previous one.
An example of this kind of Activity is a Compose Email Activity or a Social Network's Status Posting Activity. If you think about an Activity that can work separately to serve an separate Intent, think about standard one.
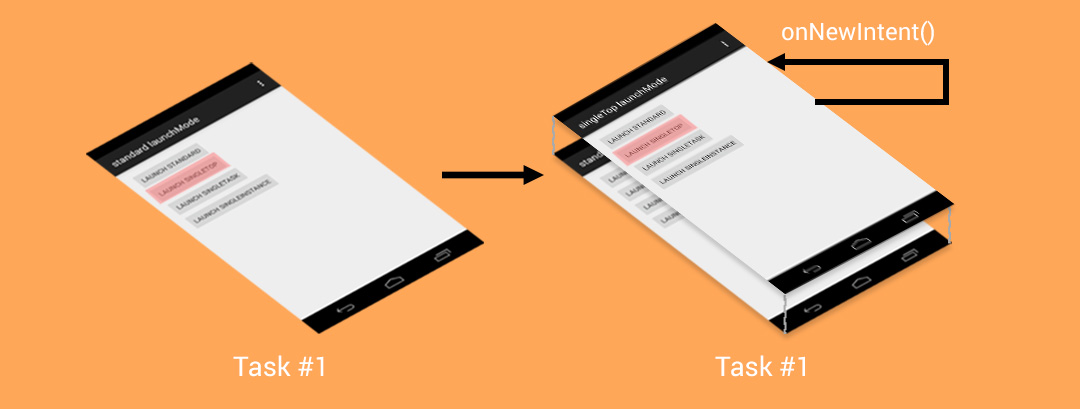
singleTop
The next mode is singleTop. It acts almost the same as standard one which means that singleTop Activity instance could be created as many as we want. Only difference is if there already is an Activity instance with the same type at the top of stack in the caller Task, there would not be any new Activity created, instead an Intent will be sent to an existed Activity instance through onNewIntent() method.
In singleTop mode, you have to handle an incoming Intent in both onCreate() and onNewIntent() to make it works for all the cases.
A sample use case of this mode is a Search function. Let's think about creating a search box which will lead you to a SearchActivity to see the search result. For better UX, normally we always put a search box in the search result page as well to enable user to do another search without pressing back.
Now imagine, if we always launch a new SearchActivity to serve new search result, 10 new Activities for 10 searching. It would be extremely weird when you press back since you have to press back for 10 times to pass through those search result Activities to get back to your root Activity.
Instead, if there is SearchActivity on top of stack, we better send an Intent to an existed Activity instance and let it update the search result. Now there will be only one SearchActivity placed on top of stack and you can simply press just back button for a single time to get back to previous Activity. Makes a lot more sense now.
Anyway singleTop works with the same task as caller only. If you expect an Intent to be sent to an existed Activity placed on top of any other Task, I have to disappoint you by saying that it doesn't work that way. In case Intent is sent from another application to an singleTop Activity, a new Activity would be launched in the same aspect as standard launchMode (pre-Lollipop: placed on top of the caller Task, Lollipop: a new Task would be created).
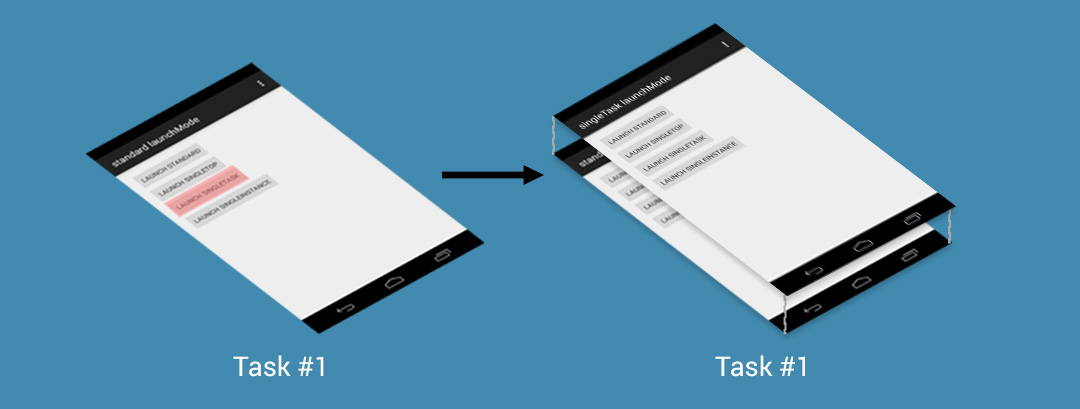
singleTask
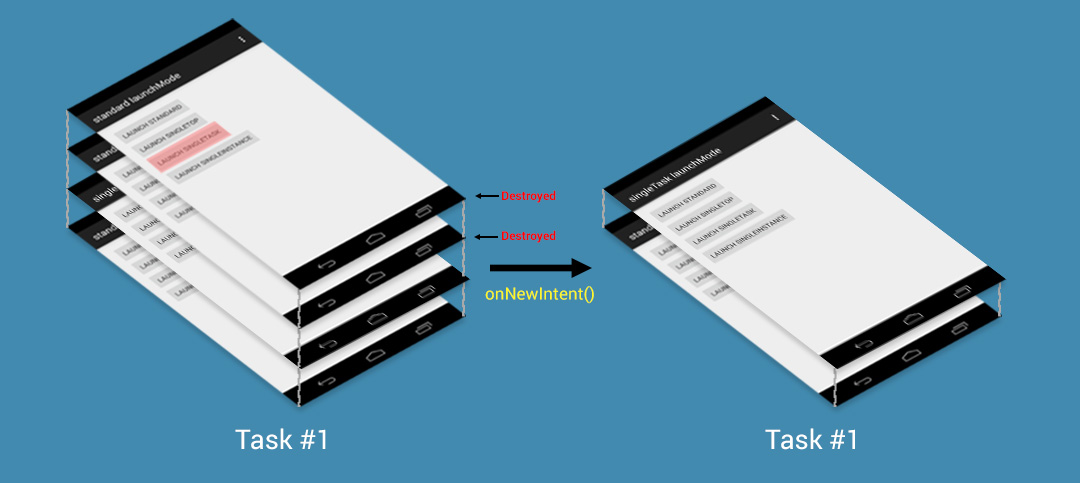
This mode is quite different from standard and singleTop. An Activity with singleTask launchMode is allowed to have only one instance in the system (a.k.a. Singleton). If there is an existed Activity instance in the system, the whole Task hold the instance would be moved to top while Intent would be delivered through onNewIntent() method. Otherwise, new Activity would be created and placed in the proper Task.
Working in the same application
If there is no that singleTask Activity instance existed in the system yet, new one would be created and simply placed on top of stack in the same Task.
But if there is an existed one, all of Activities placed above that singleTask Activity would be automatically and cruelly destroyed in the proper way (lifecycle trigged) to make that an Activity we want to appear on top of stack. In the mean time, an Intent would be sent to the singleTask Activity through the lovely onNewIntent() method.
Doesn't make a good sense in term of user experience but it is designed this way ...
You may notice one thing that it is mentioned in document that
The system creates a new task and instantiates the activity at the root of the new task.
But from the experiment, it doesn't seem to work as described. A singleTask Activity still stack up on top of the Task's Activity stack as we can see from what dumpsys activity command shows up.
If you wish to to let a singleTask Activity acts like described in document: create a new Task and put an Activity as a root Activity. You need to assign taskAffinity attribute to the singleTask Activity like this.
This is a result when we try to launch SingleTaskActivity.
It's your job to consider whether to use taskAffinity or not by the behavior of the Activity.
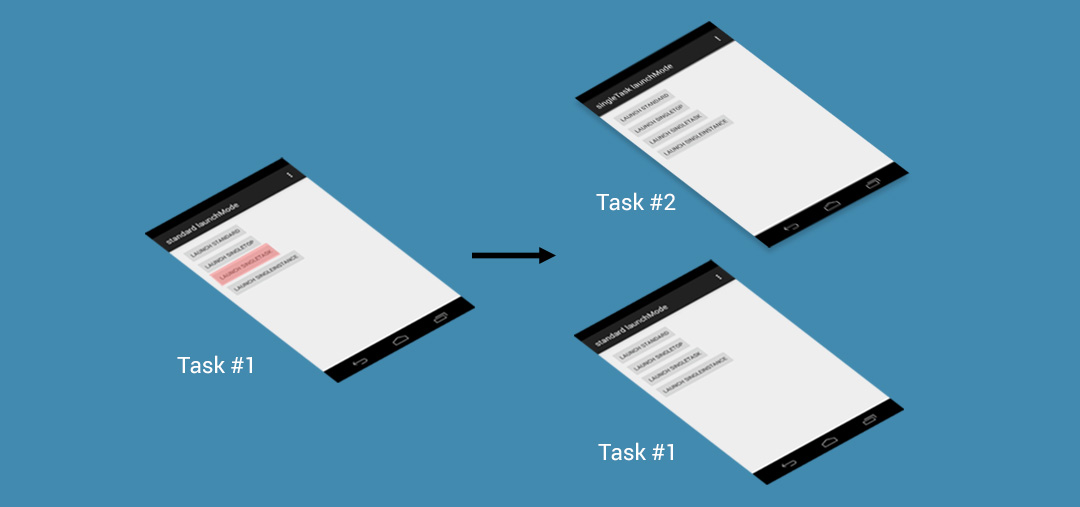
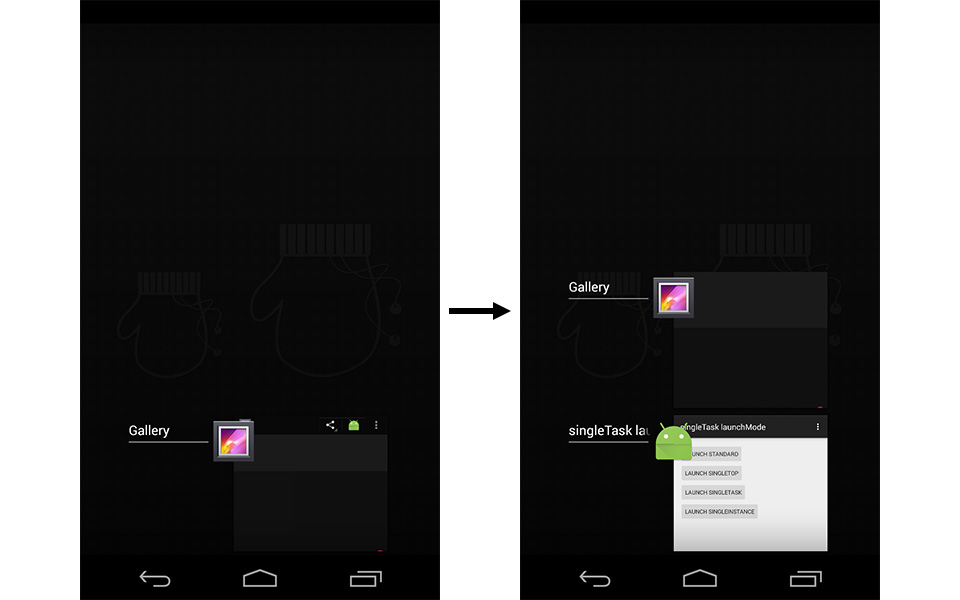
Collaborate with another application
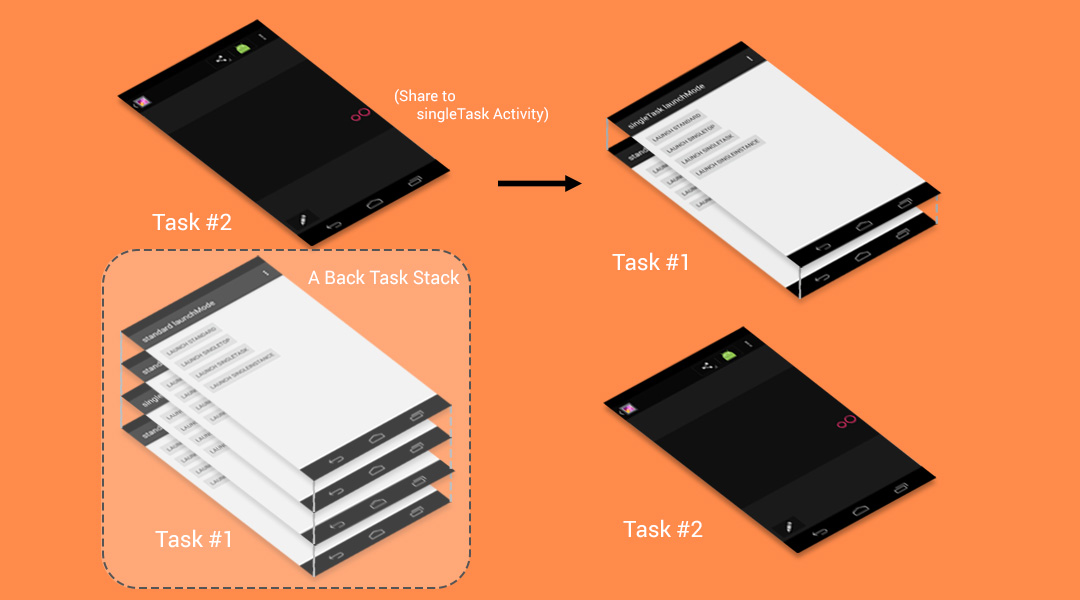
Once an Intent is sent from another application and there is no any Activity instance created in the system yet, new Task would be created with a newly created Activity placed as a root Activity.
Unless there is a Task of the application that is an owner of the calling singleTask Activity existed, a newly created Activity would be placed on top of it instead.
In case that there is an Activity instance existed in any Task, the whole Task would be moved to top and every single Activity placed above the singleTask Activity will be destroyed with lifecycle. If back button is pressed, user has to travel through the Activities in the stack before going back to the caller Task.
A sample use case of this mode is any Entry Point Activity for example Email Client's Inbox page or Social Network's Timeline. Those Activities are not designed to have more than one instance so singleTask would do a job perfectly. Anyway you have to use this mode wisely since Activities could be destroyed without user's acknowledgement in this mode like described above.
singleInstance
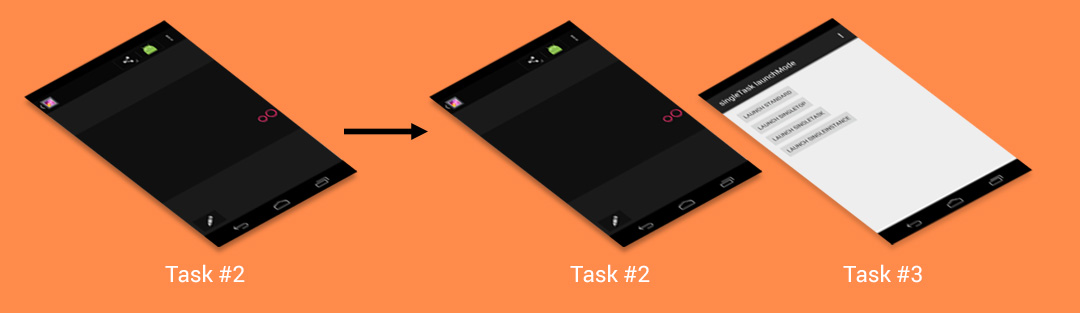
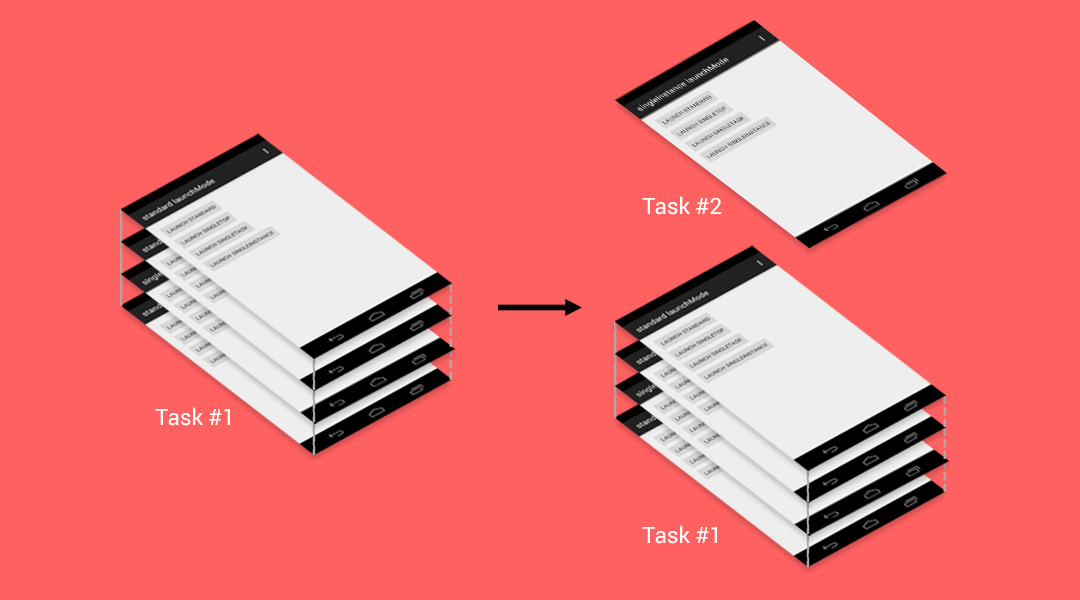
This mode is quite close to singleTask, only single instance of Activity could be existed in the system. The difference is Task hold this Activity could have only one Activity, the singleInstance one. If another Activity is called from this kind of Activity, a new Task would be automatically created to place that new Activity. Likewise, if singleInstance Activity is called, new Task would be created to place the Activity.
Anyway the result is quite weird. From the information provided by dumpsys, it appears that there are two Tasks in the system but there is only one appeared in Task Manager depends on which is latest one that is moved to top. As a result, although there is a Task that is still working in the background but we couldn't switch it back to foreground. Doesn't make any sense at all.
This is what that happened when singleInstance Activity is called while there already is some Activity existed in the stack.
But this is what we see from Task Manager.
Since this Task could has only one Activity, we couldn't switch back to Task #1 anymore. Only way to do so is to relaunch the application from launcher but it appears that the singleInstance Task would be hidden in the background instead.
Anyway there is some workaround for the issue. Just like we did with singleTask Acvity, simply assign a taskAffinity attribute to the singleInstance Activity to enable multiple Tasks on Task Manager.
This mode is rarely used. Some of the real use case is an Activity for Launcher or the application that you are 100% sure there is only one Activity. Anyway I suggest you not to use this mode unless it is really necessary.
Intent Flags
Beside from assigning the launch mode directly in AndroidManifest.xml, we are also able to assign more behavior through thing called Intent Flags, for example:
Intent intent = new Intent(StandardActivity.this, StandardActivity.class);
intent.addFlags(Intent.FLAG_ACTIVITY_SINGLE_TOP);
startActivity(intent);
would launch a StandardActivity with singleTop launchMode condition.
There are quite a lot of Flags you can play with. You could find more about it at Intent.
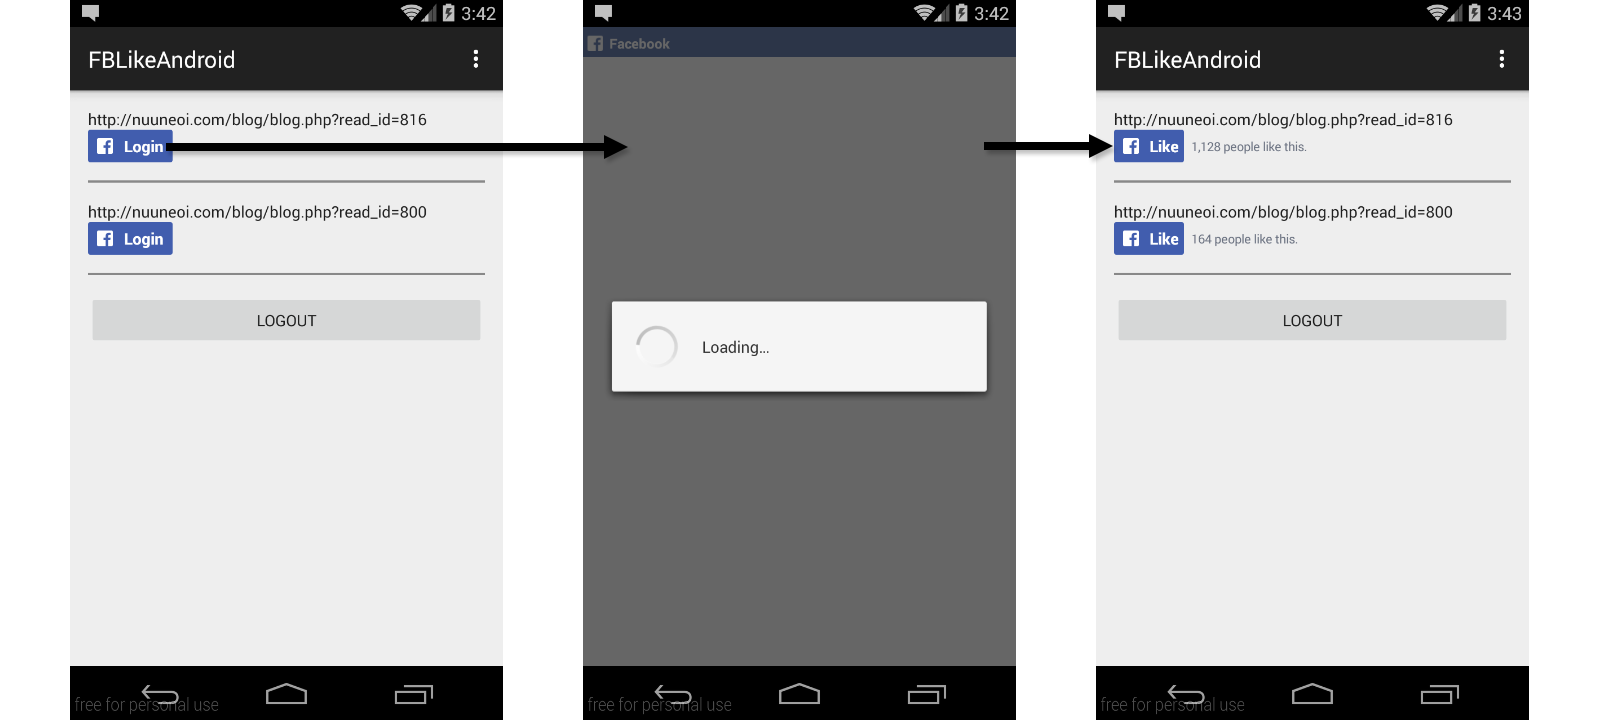
Like button is one of the most important strategy to increase traffic to your website. No surprise why Facebook introduced a Native Like Button, LikeView, allowed developer to add Like button natively to their Android/iOS apps.
Anyway although it sounds easy as we do on website but it is not like that. If we just place LikeView on application's layout, it works but with limited functionality for example like count and like status aren't showed, doesn't work on device without Facebook app installed, etc.
After digging through Facebook SDK's source code. I found that LikeView is designed to work full functionally when application is connected to Facebook app only. And well ... AFAIK there is no any document mentioned about this.
After a couple of experiments, finally I found the sustainable way to make LikeView works full functionally and still be a good user experience practice. Let's go through it step-by-step.
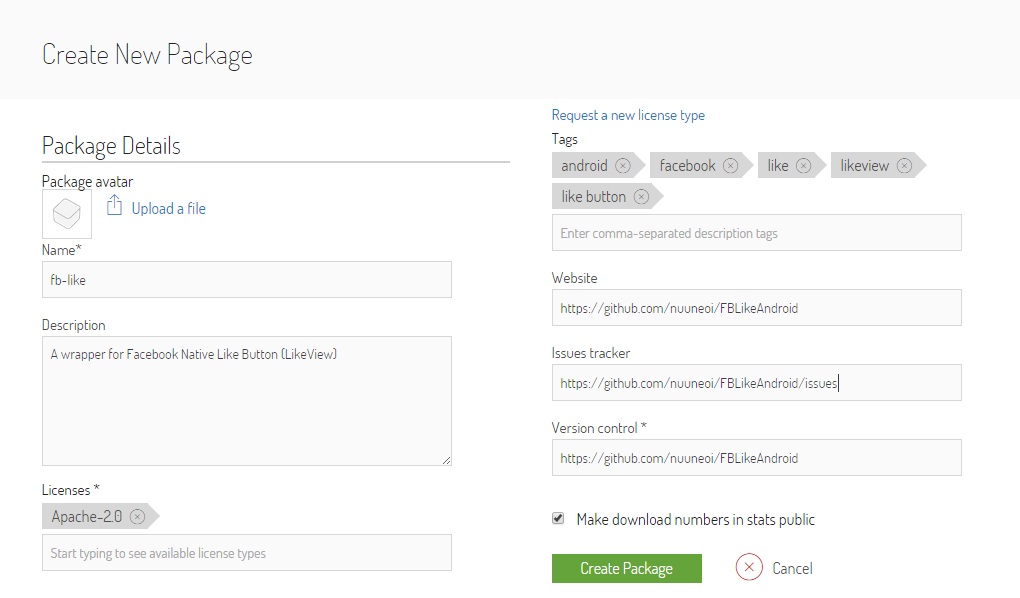
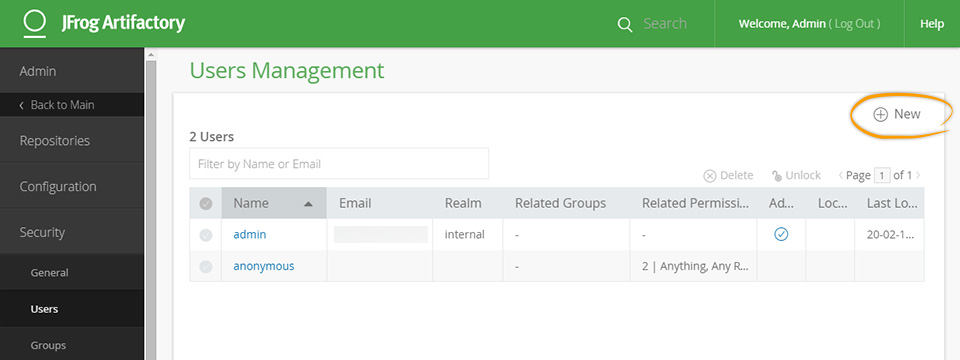
Create a Facebook App
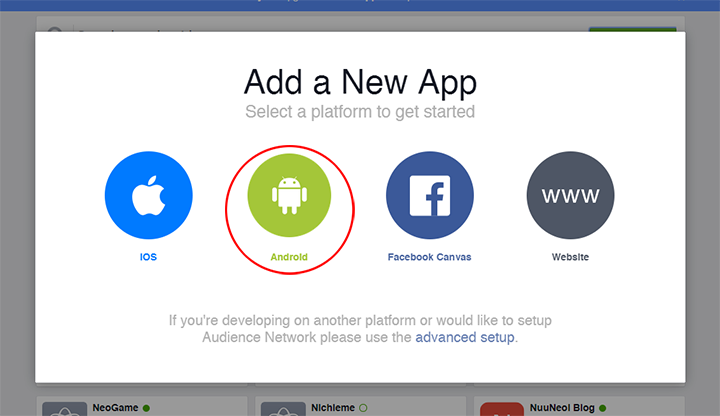
As mentioned above, application is needed to be connected with Facebook app to make LikeView works full functionally. So the first step is to create a Facebook app.
Enter your preferred Facebook App and then press Create New Facebook App ID
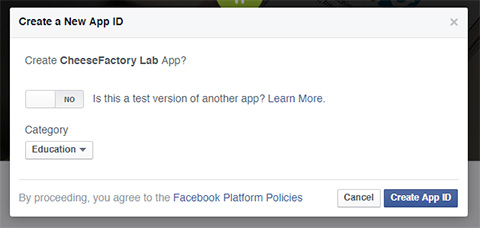
Choose a Category and press Create App ID
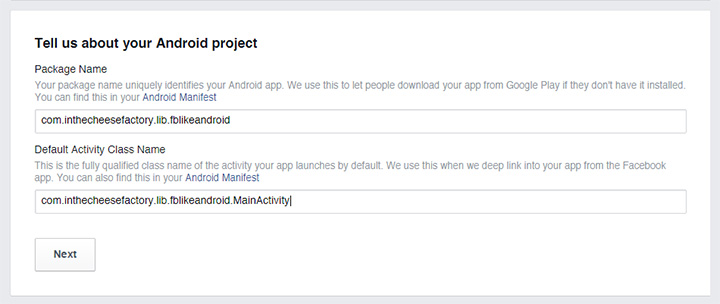
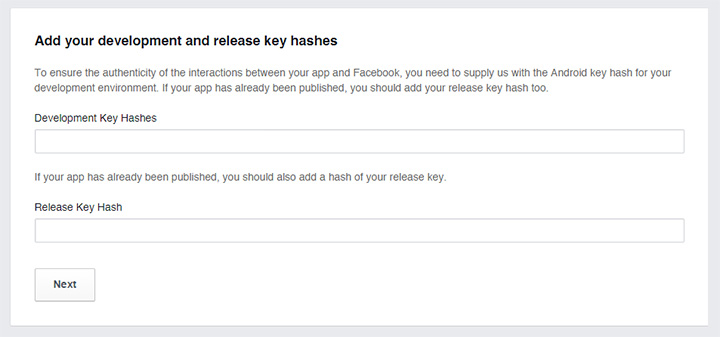
You will now be redirected into Facebook App settings page. Please scroll to bottom and fill in those fields about your Android project: Package Name and Default Activity Class Name. Press Next.
Here comes a little bit complicated part. To make your android app works flawlessly with Facebook App in debug and production mode, you have to fill in Debug Key Hash and Release Key Hash respectively.
There are two ways to generate those key hashes: through command line and through Java code.
Method 1 - Through Command Line
In case you use Mac or Linux and you already install keytool (comes along with JDK) and openssl. You could simple do the following through Command Line:
In case you didn't install keytool and openssl yet and you don't want to. You could generate those key hashes through Java code with the code snippet below. Please don't forget to change the package name to your app's.
To generate Development Key Hash, you could simply run your app directly from your IDE and copy the generated key hash sent back in logcat, put it in both Development Key Hashes and Release Key Hash fields.
To generate Release Key Hash, you need to sign your application with keystore you plan to use in production apk. Run the signed apk in your device or emulator and put generated Key Hash to Release Key Hash field.
Please note that Key Hash for production release could be filled in later. The important one for now is Development Key Hash which you need to put in both Development Key Hashes and Release Key Hash fields.
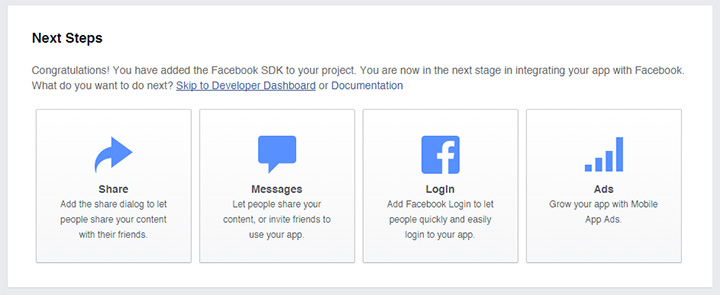
Press Next and scroll to the bottom of the page and then press Skip to Developer Dashboard to enter your just-created app's Dashboard.
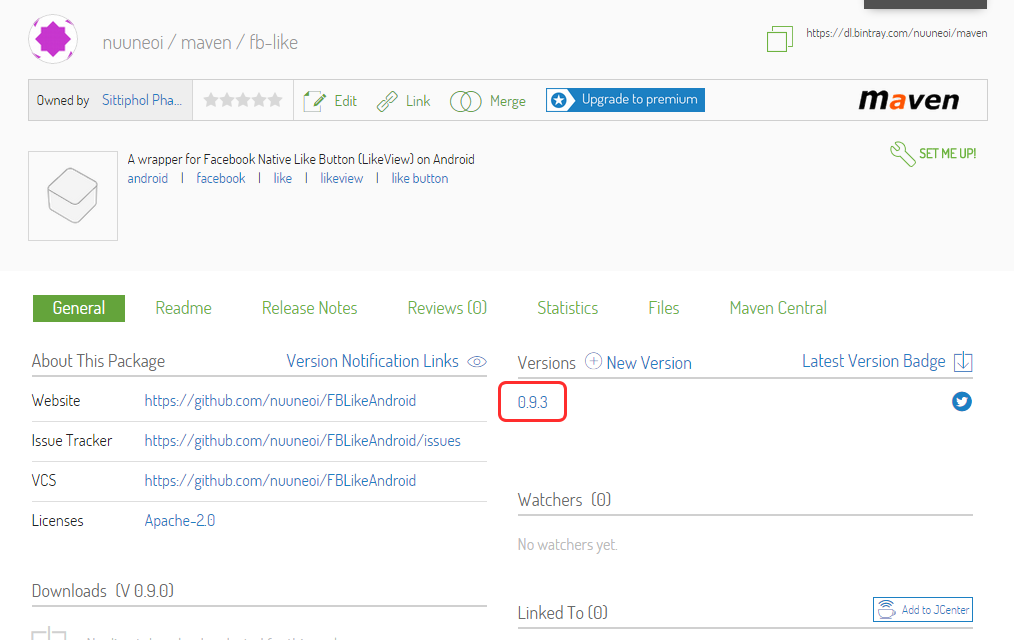
Copy App ID for future use.
You are now done creating a Facebook App !
Setup Facebook SDK in your project
Now let's switch to client part. First of all, simply add a dependency for Facebook SDK v4 which is now (finally) available over mavenCentral and jcenter.
Add a string resource for Facebook Application ID like code below. (Change the number to your Facebook app's ID)
<string name="app_id">1459806660978042</string>
Place the code below into AndroidManifest.xml right before </application> and it's important to change the number after FacebookContentProvider to your Facebook app's ID.
If you haven't done making a Custom Application class yet, do it and add line of codes below to initialize Facebook SDK in v4 way.
public class MainApplication extends Application {

    @Override
    public void onCreate() {
        super.onCreate();

        FacebookSdk.sdkInitialize(getApplicationContext());
   }
}
Give a check that Custom Application is already defined in AndroidManifest.xml.
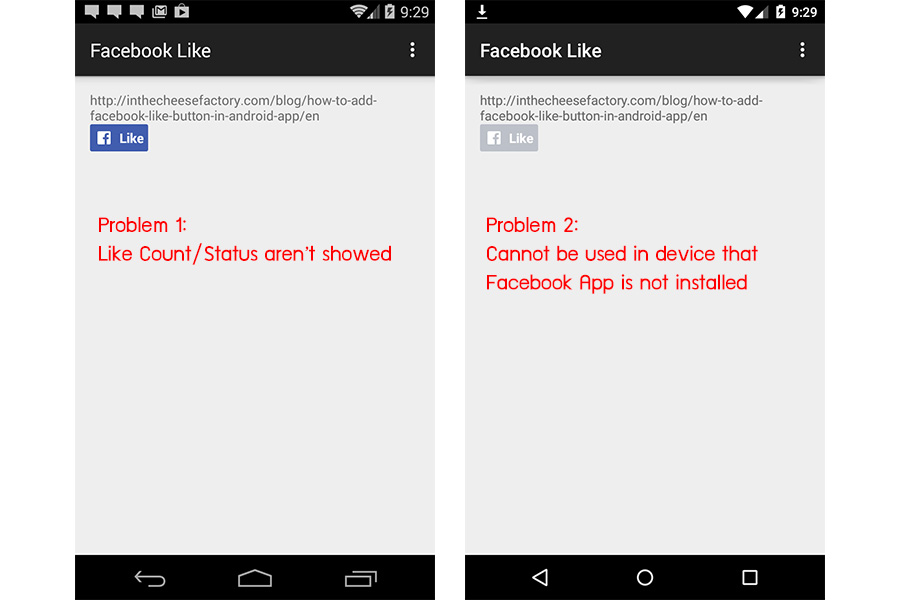
Anyway it appears that it doesn't work perfectly just yet. Here are the two big concerns.
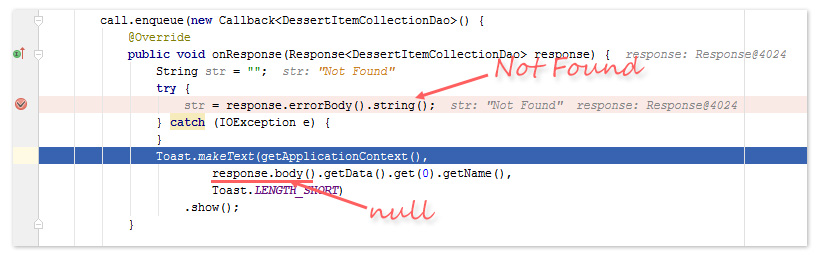
Problem 1: Like count and status aren't showed until you press Like button.
Problem 2: Doesn't work in device that Facebook App is not installed.
The reason is already described above. LikeView works full functionally only in app that has already connected with Facebook App. Totally different with one in website which works perfectly without login required. (And yes, it is by designed. And also yes, I am curious why Facebook has designed it this way ...)
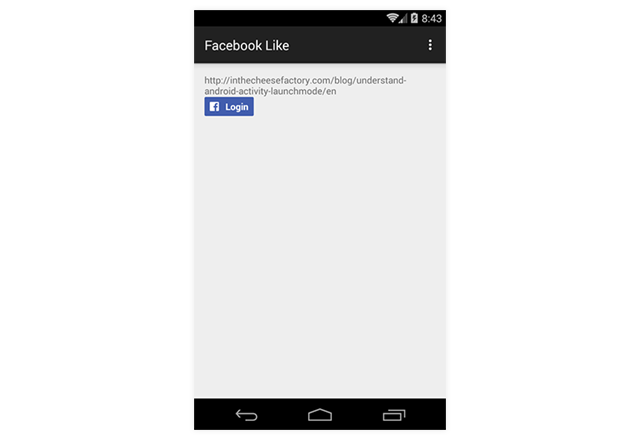
Some workaround is needed. Facebook Login is required to make LikeView showed otherwise Login button with the same appearance as LikeView will come up instead.
There is nothing complicated. I just simply create a Login button using LinearLayout and let it be together with LikeView in RelativeLayout.
...<RelativeLayout
    android:layout_width="wrap_content"
    android:layout_height="wrap_content"><!-- Login Button in the same style as LikeView --><LinearLayout
        android:id="@+id/btnLoginToLike"
        android:background="@drawable/com_facebook_button_like_background"
        android:layout_width="wrap_content"
        android:layout_height="wrap_content"
        android:orientation="horizontal"
        android:clickable="true"><ImageView
            android:src="@drawable/com_facebook_button_icon"
            android:layout_width="wrap_content"
            android:layout_height="wrap_content"
            android:layout_marginLeft="8dp"
            android:layout_marginRight="8dp"
            android:layout_marginTop="7.5dp"
            android:layout_marginBottom="7.5dp"/><TextView
            android:id="@+id/tvLogin"
            android:text="Login"
            android:layout_marginLeft="2dp"
            android:layout_marginRight="8dp"
            android:textColor="@android:color/white"
            android:textStyle="bold"
            android:layout_gravity="center_vertical"
            android:layout_width="wrap_content"
            android:layout_height="wrap_content"/></LinearLayout><com.facebook.share.widget.LikeView
        android:id="@+id/likeView"
        android:layout_width="wrap_content"
        android:layout_height="wrap_content"/></RelativeLayout>
...
And then do the logic in Java code with some help of LoginManager, CallbackManager and AccessToken provided in Facebook SDK for Android v4 to manage a Login flow and status checking.
If the application isn't connected to Facebook app yet. Our custom Login Button would be showed instead of LikeView as designed.
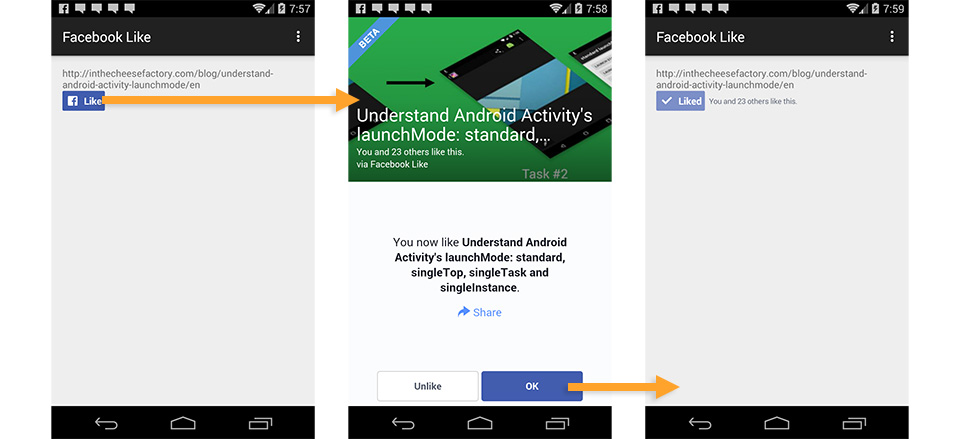
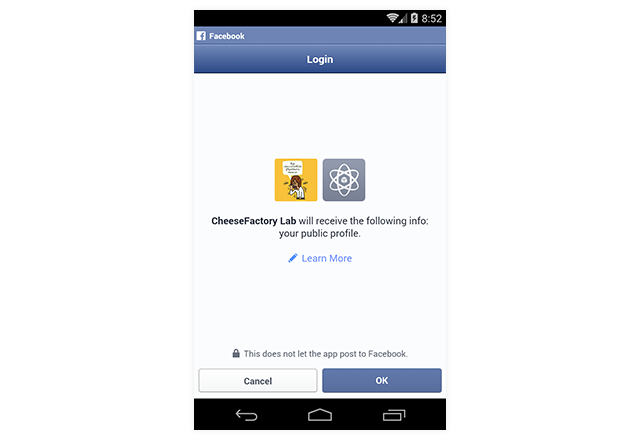
Once Login Button is clicked, it will redirect user to Login process.
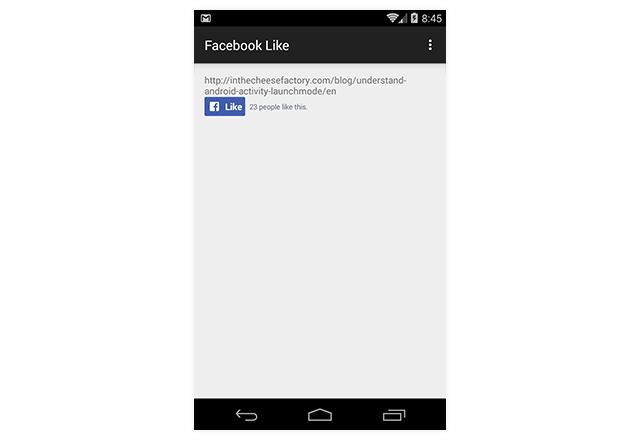
After user is logged in, Login Button will be hidden and replaced with LikeView. You will see that Like count and Like status are also showed up perfectly just like one on website. Yah ! If a url is changed, those number and status are also automatically changed to match the information associated to an entered url.
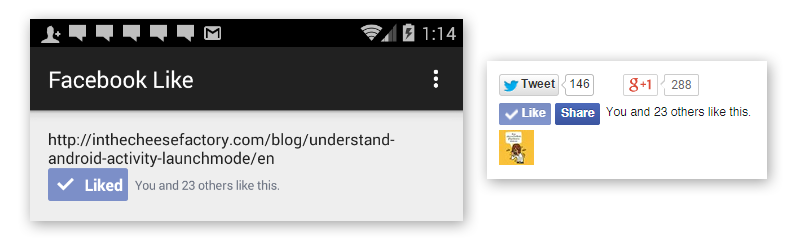
If user press Like, it will affect the button embedded on website as well.
A by-product of this method is LikeView button also works on the device without Facebook application installed. It means that it works even on Chrome or on ARC Welder !
Known bug
Although it is close enough to perfect but there is still some known bug. If like is done on website, like status on application will not be updated. And we couldn't do anything but wait for Facebook engineer to fix this issue.
FBLikeAndroid Library
To make it as easy as possible to use. I made a library to do a job for you. FBLikeAndroid is a library comes up with Login Button that will change to Native Like Button automatically when application is connected to Facebook app.
To use it, you have to create a Facebook app and setup your project as written above. And then simply add the following dependency to your app's build.gradle. Please note that Facebook SDK v4 is already included in this dependency so you have no need to add any additional dependency.
LikeView inside FBLikeView is already set the appearance to STANDARD so you have no need to set it again unless you need to change its style. To access LikeView attached inside, you could do it through a getter function, getLikeView(). The following code is used to set a url for LikeView.
The final step, you have to call FBLikeView.onActivityResult in every single Activity's onActivityResult to connect FBLikeView buttons to Facebook Login flow.
If you want to disconnect your android app to Facebook app, simply call the following command. The button will be automatically changed to Login state.
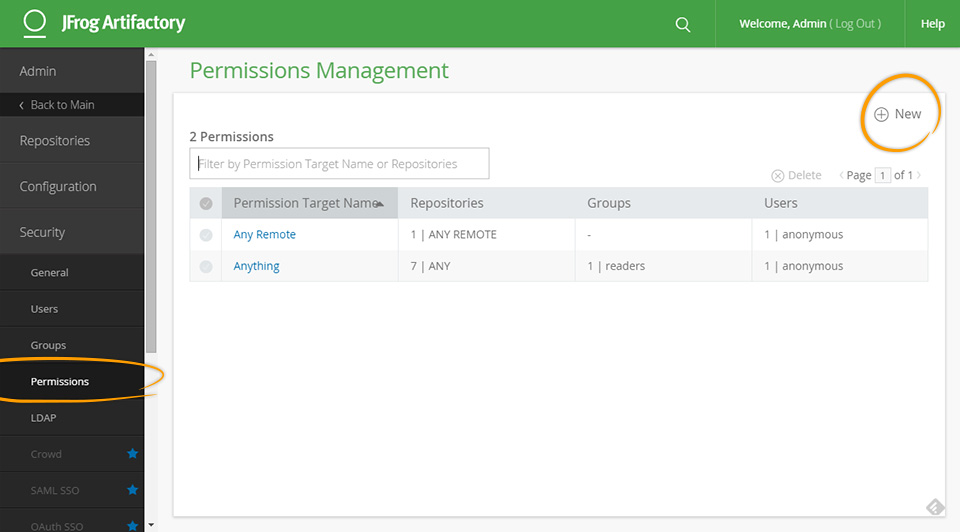
Right now LikeView works only with Facebook app's administrator, you. To make LikeView works for everyone, you need to send a submission to Facebook team. Here is the steps to do so:
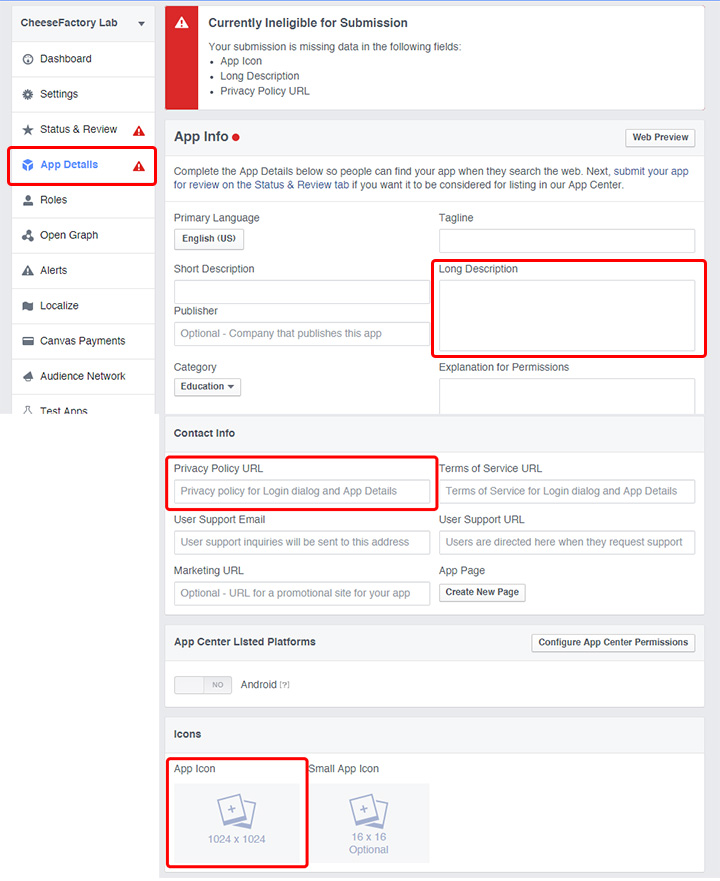
1) Enter your Facebook App's App Details page. Enter Long Description, Privacy Policy URL and also upload App Icon you desired.
2) Enter Status & Review page and press Start a Submission
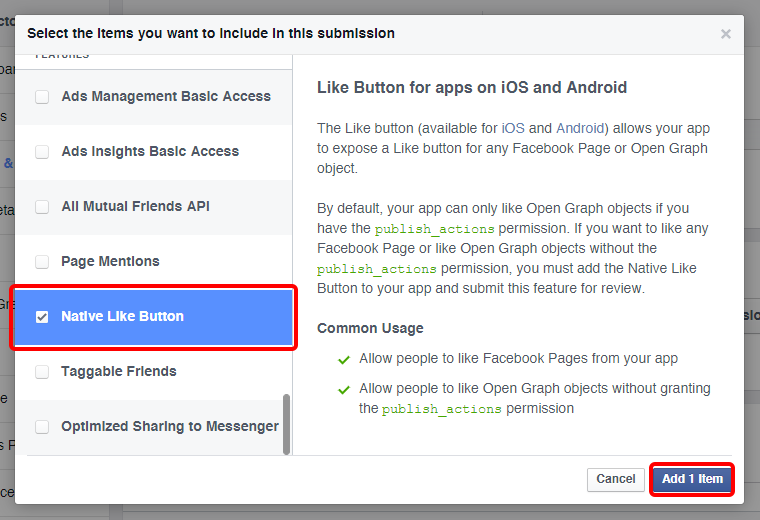
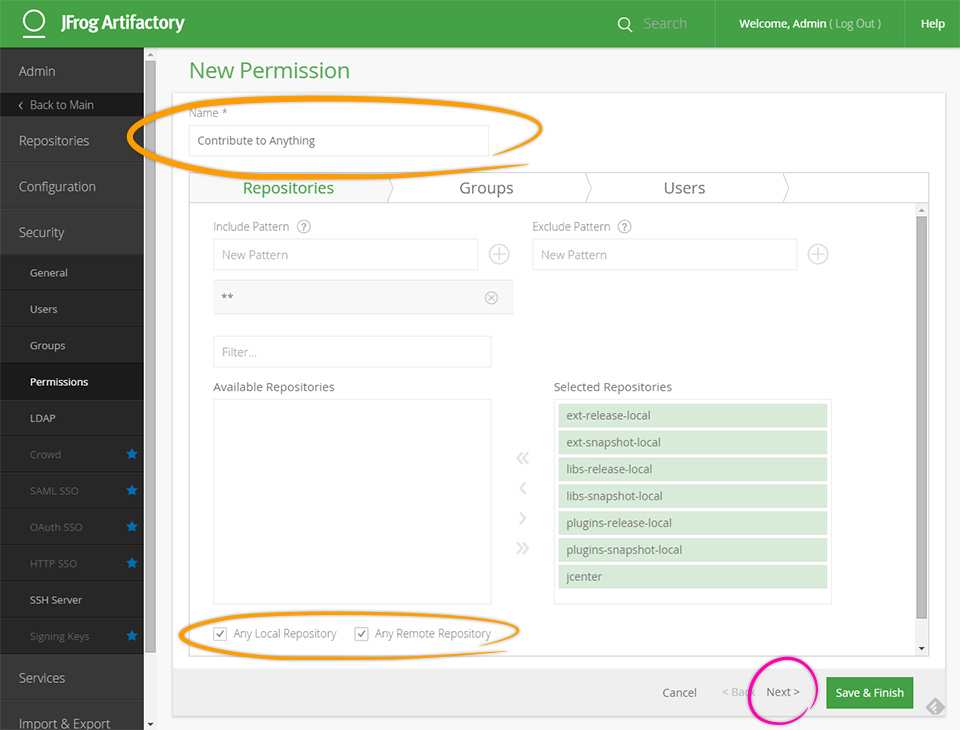
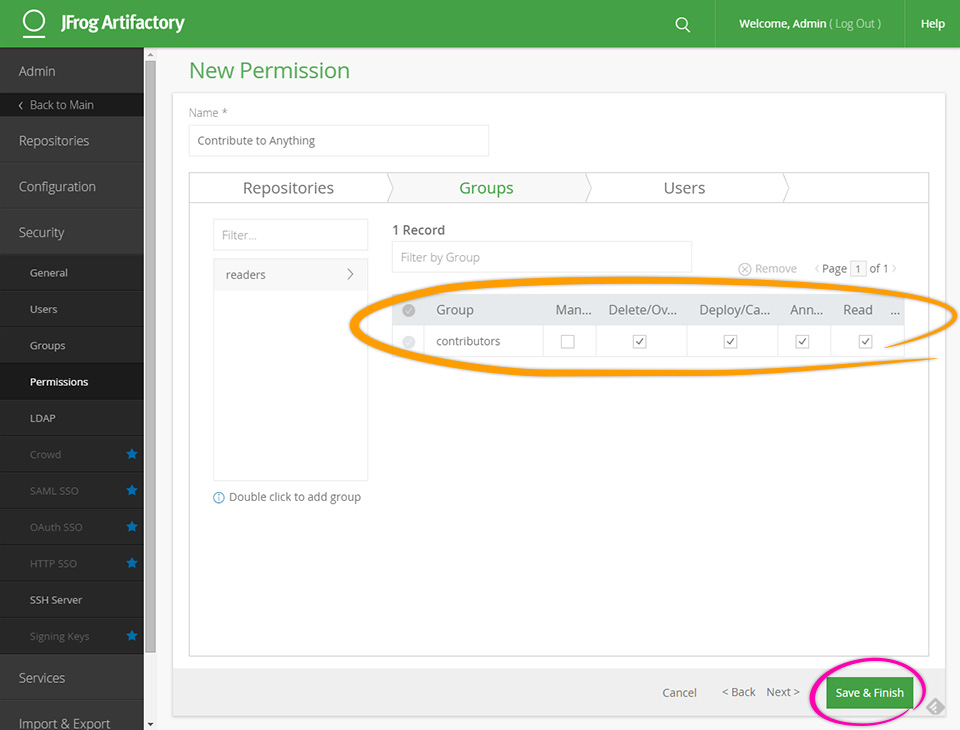
3) Check a Native Like Button box and press Add 1 Item
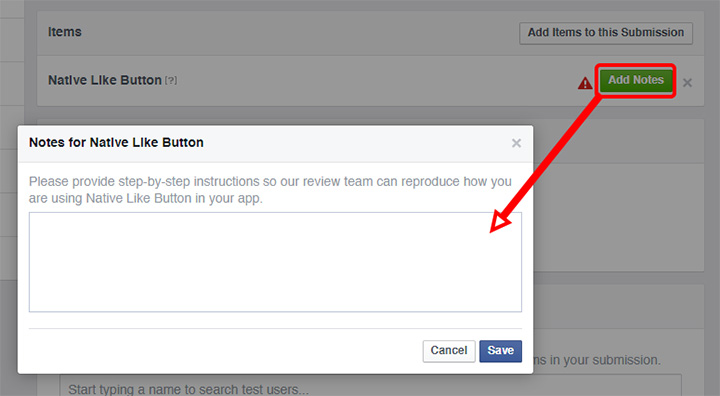
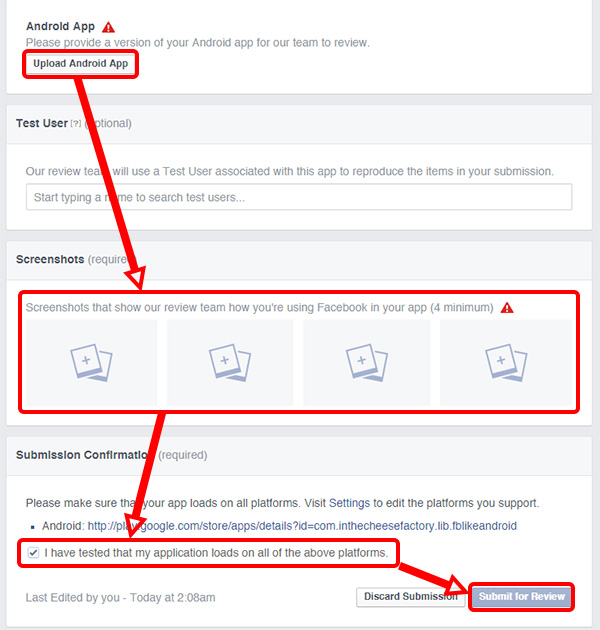
4) Press Add Notes placed next to Native Like Button item and provide step-by-step instructions how Native Like Button works in your app. From my experience, provide a link of visual image works far better than just typing some texts.
5) Upload apk file, upload your app's Screenshots (4 minimum), check at I have tested that my application loads on all of the above platforms box and then press Submit for Review
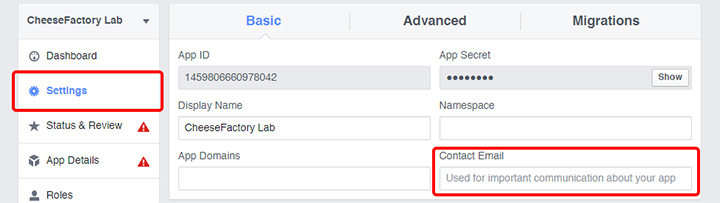
6) Enter Contact Email in Settings page
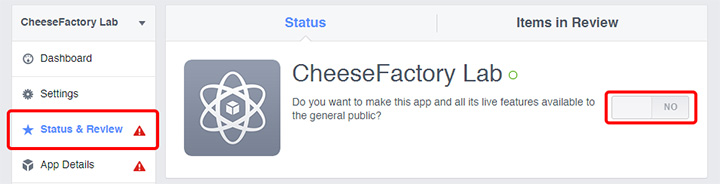
7) The final step is to make created Facebook app be available to public by set the following button to On in Status & Review page
Do some hiking, fishing, snoggle diving and wait for a day or two to get a result from Facebook team. By average, it takes 2-3 times to let the it approved so please do it at least a week before your application is publicly launched.
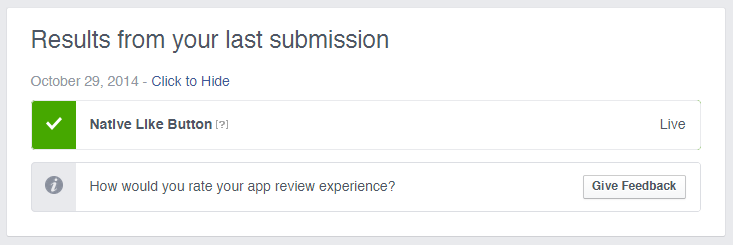
This is what it looks like in Status & Review page when the submission is approved.
Once you got something like above, your LikeView will work for anyone !
Hope you find this article useful and ... don't forget to give a like or some +1 to this article ! =)
Anyway StatedFragment causes a pattern breaking since it was designed to do the different way as Android is designed with an assumption that it might be easier for Android developer to understand Fragment's state saving/restoring if it acts just like Activity does (View's state and Instance state are handled at the same time). So I did an experiment by developed StatedFragment and see how is it going. Is it easier to understand? Is its pattern is more developer-friendly?
Right now, after 2 months of experiment, I think I got a result already. Although StatedFragment is a little bit easier to understand but it also comes with a pretty big problem. It breaks a pattern design of Android's View architecture. So I think it may causes a long time problem which is totally not good. Actually I also feel weird with my codes myself already...
With this reason, I decide to mark StatedFragment as deprecated from now on. And as an apology for the mistake, I wrote this blog to show the real best practices visually how to save and restore Fragment's state in the way Android is designed. =)
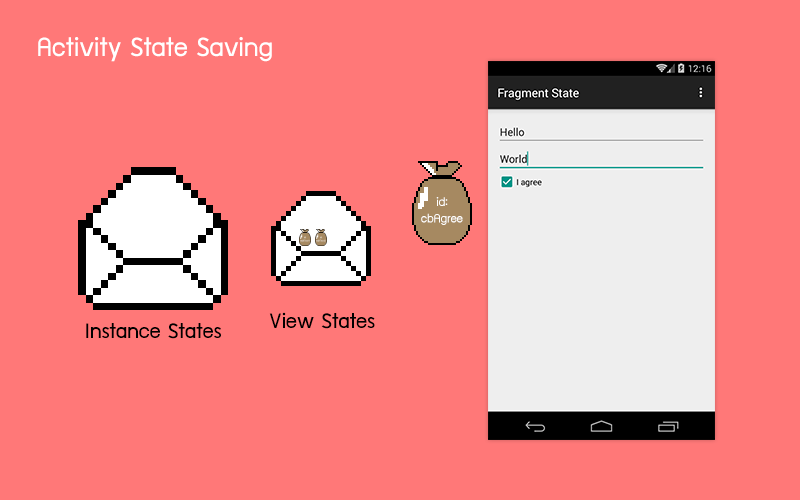
Understand what happens while Activity's State is being Saved/Restored
When Activity's onSaveInstanceState is called. Activity will automatically collect View's State from every single View in the View hierachy. Please note that only View that is implemented View State Saving/Restoring internally that could be collected the data from. Once onRestoreInstanceState is called. Activity will send those collected data back to the View in the View hierachy that provides the same android:id as it is collected from one by one.
Let's see it in visualization.
This is the reason why text typed inside EditText still persisted even though Activity is already destroyed and we didn't do anything special. There is no magic. Those View State are automatically collected and restored back.
And this is also the reason why those View without android:id defined isn't able to restore its View's state.
Although those View's state are automatically saved but the Activity's member variables are not. They will be destroyed along with Activity. You have to manually save and restore them through onSaveInstanceState and onRestoreInstanceState method.
public class MainActivity extends AppCompatActivity {

    // These variable are destroyed along with Activity
    private int someVarA;
    private String someVarB;

    ...

    @Override
    protected void onSaveInstanceState(Bundle outState) {
        super.onSaveInstanceState(outState);
        outState.putInt("someVarA", someVarA);
        outState.putString("someVarB", someVarB);
    }

    @Override
    protected void onRestoreInstanceState(Bundle savedInstanceState) {
        super.onRestoreInstanceState(savedInstanceState);
        someVarA = savedInstanceState.getInt("someVarA");
        someVarB = savedInstanceState.getString("someVarB");
    }

}
That's all what you have to do to restore Activity's Instance state and View state.
Understand what happens while Fragment's State is being Saved/Restored
In case that Fragment is destroyed by the system. Everything will just happen exactly the same as Activity.
It means that every single member variables are also destroyed. You have to manually save and restore those variables through onSaveInstanceState and onActivityCreated method respectively. Please note that there is no onRestoreInstanceState method inside Fragment.
public class MainFragment extends Fragment {

    // These variable are destroyed along with Activity
    private int someVarA;
    private String someVarB;

    ...

    @Override
    public void onSaveInstanceState(Bundle outState) {
        super.onSaveInstanceState(outState);
        outState.putInt("someVarA", someVarA);
        outState.putString("someVarB", someVarB);
    }

    @Override
    public void onActivityCreated(@Nullable Bundle savedInstanceState) {
        super.onActivityCreated(savedInstanceState);
        someVarA = savedInstanceState.getInt("someVarA");
        someVarB = savedInstanceState.getString("someVarB");
    }

}
For Fragment, there is some special case that is different from Activity and I think that you need to know about it. Once Fragment is returned from backstack, its View would be destroyed and recreated.
In this case, Fragment is not destroyed. Only View inside Fragment does. As a result, there is no any Instance State saving happens. But what happens to those View that is newly created by Fragment's lifecycle showed above?
Not a problem. Android is designed this way. View State Saving/Restoring are internally called inside Fragment in this case. As a result, every single View that is implemented a View State Saving/Restoring internally, for example EditText or TextView with android:freezeText="true", will be automatically saved and restored the state. Causes it to display just perfectly the same as previous.
Please note that only View is destroyed (and recreated) in this case. Fragment is still there, just like those member variables inside. So you don't have to do anything with them. No any additional code is required.
public class MainFragment extends Fragment {

    // These variable still persist in this case
    private int someVarA;
    private String someVarB;

    ...

}
You might already notice that if every single View used in this Fragment are internally implemented a View Saving/Restoring. You have no need to do anything in this case since View's state will be automatically restored and member variables inside Fragment also still persist.
So the first condition of Fragment's State Saving/Restoring Best Practices is ...
Every single View used in your application must be internally implemented State Saving/Restoring
Android provides a mechanic to View to save and restore View State internally through onSaveInstanceState and onRestoreInstanceState method. It is developer's task to implement it.
public class CustomView extends View {

    ...

    @Override
    public Parcelable onSaveInstanceState() {
        Bundle bundle = new Bundle();
        // Save current View's state here
        return bundle;
    }

    @Override
    public void onRestoreInstanceState(Parcelable state) {
        super.onRestoreInstanceState(state);
        // Restore View's state here
    }

    ...

}
Basically every single standard View such as EditText, TextView, Checkbox and etc. are all already internally implemented those things. Anyway you may need to enable it for some View for example you have to set android:freezeText to true for TextView to use the feature.
But if we talk about 3rd Party Custom View distributed all over the internet. I must say that many of them aren't implemented this part of code yet which may cause a big problem in real use.
If you decide to use any of 3rd Party Custom View, you have to be sure that it is already implemented View State Saving/Restoring internally or you have to create a subclass derived from that Custom View and implement onSaveInstanceState/onRestoreInstanceState yourself.
//
// Assumes that SomeSmartButton is a 3rd Party view that
// View State Saving/Restoring are not implemented internally
//
public class SomeBetterSmartButton extends SomeSmartButton {

    ...

    @Override
    public Parcelable onSaveInstanceState() {
        Bundle bundle = new Bundle();
        // Save current View's state here
        return bundle;
    }

    @Override
    public void onRestoreInstanceState(Parcelable state) {
        super.onRestoreInstanceState(state);
        // Restore View's state here
    }

    ...

}
And if you create your own Custom View or Custom Viewgroup, don't forget to implement those two methods as well. It is really important that every single type of View used in the application is implemented this part.
And also don't forget to assign android:id attribute to every single View placed in the layout that you need to enable View State Saving and Restoring or it will not be able to restore the state at all.
To make your code be clean and scalable, you have to seperate Fragment State and View State from each other. If any property is belonged to View, do the state saving/restoring inside View. If any property is belonged to Fragment, do it inside Fragment. Here is an example:
public class MainFragment extends Fragment {

    ...

    private String dataGotFromServer;

    @Override
    public void onSaveInstanceState(Bundle outState) {
        super.onSaveInstanceState(outState);
        outState.putString("dataGotFromServer", dataGotFromServer);
    }

    @Override
    public void onActivityCreated(Bundle savedInstanceState) {
        super.onActivityCreated(savedInstanceState);
        dataGotFromServer = savedInstanceState.getString("dataGotFromServer");
    }

    ...

}
Let me repeat again. Don't save View's State inside Fragment's onSaveInstanceState and vice versa.
That's all. It is the Best Practices on how to Save/Restore Activity's, Fragment's and View's State. Hope you find this piece of information useful =)
Goodbye StatedFragment, say Hi to NestedActivityResultFragment
Please do the way described above to Save/Restore Activity's, Fragment's and View's State. And let me mark StatedFragment as deprecated now.
However StatedFragment's functionality to retrieve onActivityResult in Nested Fragment is still good to go. To prevent any confusion in the future, I decide to seperate that functionality to a new class NestedActivityResultFragment available from v0.10.0 onwards.
Hope that the visualization in this blog helps you understand about the way to restore Activity's, Fragment's and View's State clearly. So sorry for the confusion in the previous article. ^^"
In Android Studio, if you wish to include any library to your application. You could just simply add a following line of dependency in module's build.gradle file.
It is completely cool. But you might be curious where does Android Studio fetch the library from? This blog will describe in details how this thing work including how to publish your own library and share it to developers in the rest of the world which does not only make this world a better place but also make you look more cool !
Where does Android Studio fetch the library from?
Start with this first simple question which I believe that not all of you completely knows that from where Android Studio fetch the library. Does it just search google for us and download the proper library to our project?
Well. It is not that complicated. Android Studio downloads the library from Maven Repository Server we defined in build.gradle. (Apache Maven is a tools developed by Apache provides a file server to distribute the libraries). Basically there are just 2 standard servers used for host the libraries for Android such as jcenter and Maven Central
jcenter
jcenter is a Maven Repository hosted by bintray.com. You could find the whole repository here.
To use jcenter in your project, you have to define the repository like below in project's build.gradle file.
allprojects {
    repositories {
        jcenter()
    }
}
Maven Central
Maven Central is a Maven Repository hosted by sonatype.org. You could find the whole repository here.
To use Maven Central in your project, you have to define the repository like below in project's build.gradle file.
allprojects {
    repositories {
        mavenCentral()
    }
}
Please note that although both jcenter and Maven Central are standard android library repositories but they are hosted at completely different place, provided by different provider and there is nothing related to each other. What that is available in jcenter might not be found in Maven Central and vice versa.
Apart from those two standard servers, we are also able to define the specific Maven Repository Server ourselves in case we use a library from some developers who want to host their libraries on their own server. Twitter's Fabric.io falls in this case by hosting their own Maven Repository at https://maven.fabric.io/public. If you want to use any Fabric.io's library, you have to define the repository's url yourselve like below.
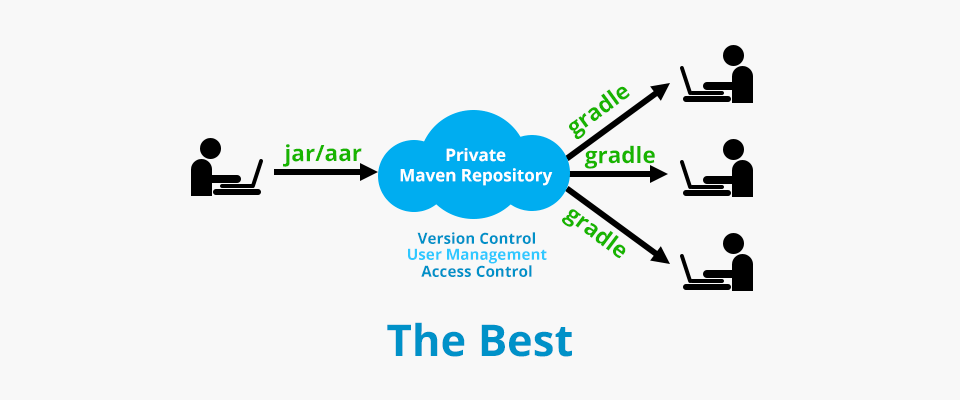
But which one is the better: to upload library to standard server or to host our own server? The former is. To make our own library be available to public. Another developer should not has to define anything but a line of code defining dependency's name. So in this article, we will focus on just jcenter and Maven Central which provide far better experience for developer.
FYI actually there is another type of repository besides Maven Repository that works with gradle on Android Studio. It is called Ivy Repository but from my own experience, I have never seen anyone using it before including me so I will just simply ignore this type of repository in this article.
Understand jcenter and Maven Central
Wonder why is there not only just one but two standard repositories out there?
Actually both of them are the repositories having the same duty: hosting Java/Android libraries. It is a developers' choice to upload their libraries to which one or may be both.
At first, Android Studio chose Maven Central as a default repository. Once you create a new project from old version of Android Studio, mavenCentral() would be automatically defined in build.gradle.
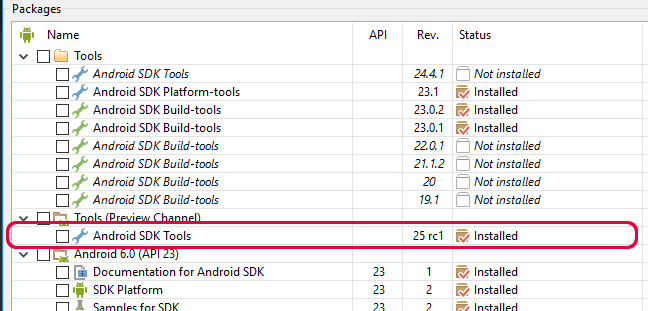
But the big problem of Maven Central is it is not developer-friendly. It is surprisingly hard to upload the library to. To be able to do so, developer has to be at some level of geeky. And with some more reason for example a security concern and etc, Android Studio team decided to switch the default repository to jcenter instead as you can see that once you create a new project from latest version of Android Studio, jcenter() would be automatically defined instead of mavenCentral().
There are load of good reasons why they decided to switch from Maven Central to jcenter. Here are some of the major one.
- jcenter delivers library through CDN which means that developer could enjoy the faster loading experience.
- jcenter is the largest Java Repository on earth. So whatever that is available on Maven Central could be implied that it would be available on jcenter as well. In the other words, jcenter is superset of Maven Central.
- It is incredibly easy to upload our own library to the repository. No need to sign or do any complex thing like we have to on Maven Central.
- Friendly-UI
- If you want to upload your library to Maven Central you could do it easily with a single click on bintray site (and with some step of one-time setup).
With above reasons and from my own experiences, I must say that it is the brilliant decision switching default repository to jcenter.
So this article will focus on just jcenter since once you successfully upload your library to jcenter, it could be forwarded to Maven Central easily after that.
How does gradle pull a library from Repository?
Before we start talking about how to upload a library to jcenter. We should start with how gradle fetch a library from repository. For example, when we type like below in build.gradle, how are those library files magically downloaded to your project.
Basically we have to know the form of library string first. It consists of 3 parts:
GROUP_ID:ARTIFACT_ID:VERSION
In the above case, GROUP_ID is com.inthecheesefactory.thecheeselibrary while ARTIFACT_ID is fb-like and VERSION is 0.9.3
For the meaning, GROUP_ID defines the name of library's group. It is possible that there would be more than one library that work the different job in the same context. If library are in the same group, it would share the same GROUP_ID. Generally we name it with developer's package name and then follow with the name of library's group, for example, com.squareup.picasso. And then defines the real name of the library in ARTIFACT_ID. For VERSION, there is nothing but a version number. Although it could be any text but I suggest to set it in x.y.z format and might follow with -beta if you want.
Here is the real example of library from Square. You will notice that each one could be easily recognised the library's and developer's name.
And then Android Studio would download those files to our machine and compile with our project per your request. That's all. Nothing complicated !
I believe that you should know understand clearly that library pulled from repository is nothing special but jar or aar files hosted on repository server. It could be compared just like to download those files yourselve, copy and compile everything along with your project. But the big benefits you get from dependency system available on gradle is you don't have to do anything but just type some texts and that's all. The library would suddenly be useable in your project also with versioning system.
Knowing an aar file format
Wait ... I said that there are two types of library files that could be hosted on the repository, jar and aar. jar file is nothing, I believe that all of you know about it. But what is aar file exactly?
aar file is developed on top of jar file. It was invented because something Android Library needs to be embedded with some Android-specific files like AndroidManifest.xml, Resources, Assets or JNI which are out of jar file's standard. So aar was invented to cover all of those things. Basically it is a normal zip file just like jar one but with different file structure. jar file is embedded inside aar file with classes.jar name. And the rest are listed below:
As you can see. aar file is designed for Android especially. So this article will teach you how to create and upload a library in aar format.
How to upload your library to jcenter
Right now I believe that you already have all of the basic knowledge on how the repository system works. Now let's begin the most important part: uploading processes. The objective is as simple as how to upload our library files to http://jcenter.bintray.com. Once we could do it, the library is published. Well ... two things to concern: how to create an aar file and how to upload built files to the repository?
Although it requires a bunch of steps but I must say that it is totally not hard thing to do since bintray has prepared for everything quite well. You could find the whole process in the below diagram.
And since there are quite a lot of details so let me split the process to 7 parts so I could describe everything clearly in step-by-step.
Part 1 : Create a package on Bintray
First of all. You need to create a package on bintray. To do so, you need a bintray account and create a package on website.
Step 1: Register for an account on bintray.com. (The sign up process is quite simple so please do it yourself)
Step 2: Once registration is done, login to the website and click at maven
Step 3: Click at Add New Package to start creating a new package for our library.
Step 4: Enter all of those required information
Although there is no rule on how to name the Package Name but there is some name convention. Just set all of the characters to lowercase and separate each word with hyphen (-), for example, fb-like.
Once every required fields are done, click at Create Package to finish.
Step 5: Website will redirect you to Edit Package page. Click at package's name under Edit Package text to enter package's details page.
Done! You now have your own Maven Repository on Bintray which is ready to be uploaded the library to.
Bintray account registration is now done. Next one to work with is Sonatype, the Maven Central provider.
Part 2 : Create a Sonatype account for Maven Central
Note: You could skip Part 2 and 3 if you don't have a plan to upload your library to Maven Central. Anyway I suggest you not to skip since there are a lot of developers out there who still use this repository.
Just like jcenter, if you want to distribute your library through Maven Central, you need to register an account at its provider site, Sonatype.
What you need to know is the account that you have to create one is the JIRA Issue Tracker account on Sonatype site. To do so, please go to Sonatype Dashboard and simply sign up for an account.
Once you're done. You have to request a permission to distribute your library to Maven Central. Anyway the process doesn't make any sense at all (at least for me) since what you have to do is to create an issue in JIRA to let them allow you to upload your library that match the GROUP_ID provided to Maven Central.
To create an issue like described, go to Sonatype Dashboard and login with account created. And then click at Create placed at the top menu.
Fill in the following information:
Project: Community Support - Open Source Project Repository Hosting
Issue Type: New Project
Summary: Your library's name in summary, for example, The Cheese Library
Group Id: Put the root GROUP_ID, for example, com.inthecheeselibrary . After you got an approval, every single library starts with com.inthecheeselibrary will be allowed to upload to repository, for example, com.inthecheeselibrary.somelib
Project URL: Put a URL of any library you plan to distribute, for example, https://github.com/nuuneoi/FBLikeAndroid
SCM URL: URL of Source Control, for example, https://github.com/nuuneoi/FBLikeAndroid.git
Keep the rest unmodified and click at Create. That's all. Now it is the hardest part ... wait patiently ... which will take around 1 week or a little bit more by average. And you will be granted an access to distribute your library to Maven Central after that.
The last thing to do is to give bintray your Sonatype OSS username in Accounts tab of Bintray Profile.
Click at Update and we're done.
Part 3 : Enable Auto Signing in Bintray
As mentioned above, we could upload a library to Maven Central through jcenter but to do that we need to sign that library first. bintray provides a mechanic to do that easily through web interface that allows library to be signed automatically once uploaded.
First step is to generate a key via command line with the command below. (In case you use Windows, please do it under cygwin)
gpg --gen-key
There are some mandatory fields to be filled in. Default value could be applied in most of the parts but for some field you need to enter the proper value by yourself, for example, your real name, passpharse and etc.
Once key is created. Call the following command to see the created key's information.
gpg --list-keys
If there is nothing wrong, the information will be shown as below
pub   2048R/01ABCDEF 2015-03-07
uid                  Sittiphol Phanvilai <yourmail@email.com>
sub   2048R/98765432 2015-03-07
Now we have to upload the public key to keyservers to make it useful. To do so, please call the following command and replace PUBLIC_KEY_ID with 8-digits hexadecimal value after 2048R/ in the pub line which is 01ABCDEF in this example.
And then, export both public and private key as ASCII armor format with the following command and please replace yourmail@email.com to the email you used to create your own key in the previous step.
gpg -a --export yourmail@email.com > public_key_sender.asc
gpg -a --export-secret-key yourmail@email.com > private_key_sender.asc
Open Bintray's Edit Profile page and click at GPG Signing. Fill in both Public Key and Private Key using content in public_key_sender.asc and private_key_sender.asc files exported in previous step respectively.
Click at Update to save the keys
The final step is to enable auto signing. Go to main page of Bintray and then click at maven.
Click Edit
Check the GPG Sign uploaed files automatically box to enable auto signing.
Click Update to save the progress. That's all. From now on, every single library uploaded to our Maven Repository will be automatically signed and is ready to be forwarded to Maven Central in a single click.
Please note that this is a one-time action and would be also applied to every single library created after this.
Bintray and Maven Central are now prepared. Now let's switch to Android Studio part.
Part 4 : Prepare an Android Studio project
In many cases, we might need more than 1 library to be uploaded to repository in the single project and at the same time, we might not need to upload something as well. So the best structure I would recommend is to split each part as Module. Basically I suggest you to split to at least 2 modules, one Application Module for library usage example and another one is a Library Module contains the source code of library that you wish to upload to repository. Please note that if you want to have more than 1 library in your project, please feel free to create another module: 1 module per 1 library.
I believe that all of you know how to create a library module so I will not talk to deep in this part. It is just as simply as creating an Android Library module and it's done.
Next is to apply bintray's plugin to your project. To do that, we need to modify project'sbuild.gradle file in dependencies part like this.
It is important to set gradle build tools' version to 1.1.2 or upper since there is a critical bug in the prior versions. In this example, we will use the latest version, 1.2.3.
Next we will define the username and api key used for bintray authentication and also the password of created key by modifying local.properties. The reason that we need to put those things in this file is those information are sensitive and should not be shared to anywhere including version control. Fortunate that local.properties file is already added to .gitignore since project was created. So these sensitive data would not be uploaded to git server unintentionally.
Leave bintrayRepo as it currently is, maven. Change bintrayName to your package name created above. And also change the rest to match your library's information. From the above script, everyone would be able to use this library with a following line of gradle script.
Finally apply two scripts used for building library files and uploading the built files to bintray by appending file with the following script. (I use the direct link to file hosted on github for convenience)
Done! Your project is now set and is ready to be uploaded to bintray. Yah !
Part 5 : Upload library to your bintray space
Now it's time to upload your library to your own repository on bintray. To do that, please go to Terminal tab on Android Studio.
First step is to check the correctness of code and build the library files (aar, pom, etc.). Type the below command to do so.
> gradlew install
If these is nothing wrong, it would show something like:
BUILD SUCCESSFUL
We are now halfway there. Next step is to upload the built files to bintray with following command.
> gradlew bintrayUpload
Say eureka loudly if it shows like below !
SUCCESSFUL
Check your package in the bintray web interface. You will see a change in Versions area.
Click into it and look into Files tab and you will see the of uploaded library files placed right there.
Congratulations, your library is now online and is ready for anyone to use it !
However don't too happy ... just yet. The library is still on your own Maven Repository not on jcenter yet. If anyone want to use your library, they have to define the repository's url first like below.
You could find the url of your own Maven Repository from bintray web interface or just simply replace nuuneoi with your bintray username. I encourage you to try browsing into that link as well and you will see what exactly is going on.
As mentioned above, it is not the best practices for shared library to let developer defines the complex things like this. Imagine, we have to add 10 urls to use 10 libraries? ... Nightmare ... So let's pass our library from our own repository to jcenter for the better life quality !
Part 6 : Sync bintray user repository to jcenter
It is pretty easy to sync your library to jcenter. Just go to the web interface and simply click at Add to JCenter
Nothing to do but click Send
Nothing we can do now but wait for 2-3 hours to let bintray team approves our request. Once sync request is approved, you will receive an email informing you the change. Now let's check the web interface, you will see some change in Linked To section.
From now on, any developer that use jcenter() repository will be able to use our library with a single line of gradle script.
Want to check the existence of your library binary in jcenter? You could do that by go to http://jcenter.bintray.com and browse into the directory matched your library's group id and artifact id. In this example, it would be com -> inthecheesefactory -> thecheeselibrary -> fb-like -> 0.9.3
Please note that linking to jcenter is a one-time action. From now on, if you do any modification in your package, for example, upload new version binary, delete old version binary, etc. The change would affect to jcenter as well. Anyway since your own repository and jcenter are at the different place so you may need to wait for around 2-3 minutes to let jcenter sync the change.
And please be careful. If you decide to remove the whole package, library files placed on jcenter repository would not be deleted in this case. And they will be left just like zombie files which nobody could delete it anymore. So I suggest you that if you want to delete the whole package, please delete every single version from web interface first before removing the package.
Part 7 : Forward library to Maven Central
Not all of android developers use jcenter. There are still a number of developers who still use mavenCentral() so let's upload our library to Maven Central as well.
To forward library from jcenter to Maven Central, there are two missions that you need to achieve first:
1) Bintray package must be already linked to jcenter
2) Repository on Maven Central has already been approved to open
If you have already passed those qualifications. The way to forward your library package to Maven Central is incredibly easy. Just simply click at Maven Central link on package's details page.
Enter your Sonatype username/password and click Sync.
Successfully synced and closed repo would be shown in Last Sync Status once it's done successfully. But if there is any problem, it would be shown in Last Sync Errors. You have to fix the problem case by case since the condition of library that could be uploaded to Maven Central is quite strict, for example, + sign couldn't be used in the version of library's dependency definition.
Once done. You could find your library binaries in Maven Central Repository at the directory matched your library's group/artifact id. In this example, it is com -> inthecheesefactory -> thecheeselibrary -> fb-like -> 0.9.3
Congratulations ! That's all. Although it requires quite a lot of steps but steps are quite straightforward. And most of them are one-time action. Once things are set, you almost have to do any additional step after that.
Such a long article but hope that you find it useful. My English might be a little bit weird right now. But at least, I expect that contents are apprehensible.
Wish to see your great library up there ! Cheers. =)
At the moment I believe that there is no any Android Developer who doesn't know about Material Design anymore since it officially becomes a design philosophy by shaking the world of design in passed year.
Surprisingly that it was not easy to implement Material Design in android application because those Material Design's UI Component like Floating Action Button (FAB) wasn't available in Android pre-Lollipop. Only choice we had was to use 3rd party library published by indie android developer out there.
Here comes a good news. Last week during Google I/O 2015 event, Google announced the most excited support library within year named Android Design Support Library providing a bunch of useful Material Design UI Components in a single library. Let me use this chance to describe to you one by one how to use each of them through this article.
Please check the video below as the final of result of this tutorial.
And this is the starting point. A blank Activity with DrawerLayout equipped.
Activity is also already adjusted the theme in Material Design's way.
I have prepared source code for this codelab. You could simply clone it from GitHub. MainActivity is the final result shown above. Please do your codelab in CodeLabActivity prepared in the same project.
First task that you have to do it yourself is ... to successfully run it which it supposes to be done by simply clicking on Run button.
Step 2: Add Android Design Support Library Dependency
First thing to do to include Android Design Support Library in our project is to add a line of dependency code in app's build.gradle file.
compile 'com.android.support:design:22.2.0'
Please note that Design Support Library depends on Support v4 and AppCompat v7. Once you include this library in your project, you will also gain an access to those libraries' components.
By the way, source code cloned from Github has already been added above line of code. But if you create your own project, you need to add it by yourself.
Step 3: Add FAB
Floating Action Button (FAB) is simply a circle button with some drop shadow that unbelieveably could change the world of design. No surprise why it becomes a signature of Material Design. So let's start with this thing. Add FAB in layout file with FloatingActionButton and wrap it with FrameLayout since it needs some parent to make it aligned at bottom right position of the screen. Place those things as DrawerLayout's content by replacing an existed TextView in activity_code_lab.xml file like below.
android:src is used to define a Resource ID of icon you want (40dp transparent png file is recommended) while app:fabSize="normal" is used to define FAB's size. normal means the standard 56dp button used in most of the case but in case you want to use the smaller one, mini is an another choice that will change its width to 40dp.
That's all. FAB is now ready to use! Here is the result when we run the code on Android 4.4.
But when we run on Android 5.0, the result turn into this ...
There is nothing fancy but just a bug. Fortunate that design library's developer team has already known the issue and will release a fixed version in the near future. But if you want to use it now, we could do some workaround by setting FAB's margin right and margin bottom to 16dp for API Level 21+ and to 0dp for Android pre-Lollipop. Thanks Configuration Qualifier that allows us to do it extremely easy.
Another bug is here. Where are you, shadow? This bug is related to the prior one. You could do a quick fix by defining app:borderWidth="0" as FAB's attribute.
Welcome back, shadow! Its depth is automatically set to the best practices one, 6dp at idle state and 12dp at pressed state. Anyway you are able to override these values by defining app:elevation for idle state's shadow depth andapp:pressedTranslationZ for press state's.
Regard to button's color, basically FAB uses the accent color but you could override with app:backgroundTint attribute.
Just like a traditional Button, you could handle click with setOnClickListener(). Add the following line of codes in initInstances in CodeLabActivity.java file.
Snackbar, a tiny black bar showing a brief message at the bottom of the screen, is also available in this library. Snackbar shares the same concept as Toast but unlike Toast, it shows as a part of UI instead of overlaying on screen.
Not just a concept but also coding style that it is inspired from Toast. You could summon Snackbar by the code below.
Snackbar.make(someView, "Hello. I am Snackbar!", Snackbar.LENGTH_SHORT)
        .setAction("Undo", new View.OnClickListener() {
            @Override
            public void onClick(View v) {

            }
        })
        .show();
The first parameter of make() is a View or Layout that you want to show a Snackbar at it's bottom position. In this example, a FrameLayout that wrapped a FAB is the one. setAction() method is used to set the action displayed on the right of Snackbar with a listener corresponded. This method is not required and could be removed.
Now let's give a try by adding the following code.
    FrameLayout rootLayout;

    ...

    private void initInstances() {
        ...

        rootLayout = (FrameLayout) findViewById(R.id.rootLayout);

        fabBtn = (FloatingActionButton) findViewById(R.id.fabBtn);
        fabBtn.setOnClickListener(new View.OnClickListener() {
            @Override
            public void onClick(View v) {
                Snackbar.make(rootLayout, "Hello. I am Snackbar!", Snackbar.LENGTH_SHORT)
                        .setAction("Undo", new View.OnClickListener() {
                            @Override
                            public void onClick(View v) {

                            }
                        })
                        .show();
            }
        });
    }
Click at FAB and see the result.
It works ! but ... not perfectly yet. It is appeared that Snackbar is placed on top of FAB which is totally bad in term of UX. Anyway the behavior is already correct since there is no any relation between Snackbar and FAB defined.
A special Layout is invented for this purpose especially, make child Views work coordinated. No surprise why its name is CoordinatorLayout
Step 5: Make them collaborated with CoordinatorLayout
CoordinatorLayout is a Layout let child Views work coordinated. Anyway there is no magic. Each View inside must be designed and implemented to work with CoordinatorLayout as well. FAB and Snackbar are two of those.
So ... let's change FrameLayout wrapped a FAB to CoordinatorLayout now.
Result: FAB now moves along with Snackbar's appearance and disappearance. Some feature is also added. Snackbar is now able to Swipe-to-dismiss ! Please give a try.
But bug is all around ... It appears that on Android pre-Lollipop, FAB just forgets to move down when Snackbar is swiped-to-dismiss...
It is obviously a bug but I don't know the exact reason. Thanks god, there is some workaround. From my own experiment, I found that when we set FAB's margin bottom and margin right to some non-zero positive value, thing will magically back to work. So ... just change those margin values to 0.1dp for Android pre-Lollipop.
From now on, if you plan to use Android Design Support Library. Please think about CoordinatorLayout first since it is something like a core of this library.
Step 6: Goodbye ActionBar, Hail Toolbar
Toolbar is not part of Android Design Support Library but is needed to be used together with the rest of components in this library.
Toolbar is a replacement of traditional Action Bar with far more flexible behavior. I encourage you guys to hiding an Action Bar and switch to Toolbar from now on since new libraries with wonderful features are all designed to work together with Toolbar not Action Bar including components in this Design Support Library.
It is easy to switch to Toolbar. Just start with hiding an Action Bar from an Activity by defining these attributes in AppTheme's style.
Although it could run fine by now but from I said previously. Things placed inside CoordinatorLayout must be designed and implemented to work with it or it will not coordinate with any other sibling views. But well ... Toolbar is not designed for that. Don't worry, there is no any new special Toolbar here, just an component that is prepared to make Toolbar works perfectly with CoordinatorLayout. An easy task, just simply wrap Toolbar with AppBarLayout. That's all !
Now run and test. If you do it all right, you will see that Drawer Menu will overlay on top of the App Bar area. The outgrowth of applying AppBarLayout is the drop shadow below App Bar area is now returned ! Yah !
This step is now done. From now on I suggest you to always wrap ToolBar element with AppBarLayout. Just its ability to bring back drop shadow is convinced enough.
Step 7: Place something in content area
We got FAB, we got Toolbar. Now it's time to place something in content area of an Activity.
Umm. How about two simple buttons? Well, let's place them between AppBarLayout and FAB.
It is appeared that those buttons are unexpectedly placed under Toolbar. Guess why...
Yah, same old reason, LinearLayout is not designed to work with CoordinatorLayout. In this case, there is no any layout to wrap it like Toolbar's case. It is for more easy, you just need to add an attribute to the LinearLayout telling its scroll behavior like below.
Tab is a part of UX best practices in Android Application. Previously if we want to use new Material Design Tab, we need to download source code of SlidingTabLayout and SlidingTabStrip to our project ourselves. Right now we could just use TabLayout provided in this library, also with some more tweak options.
Where should we place this TabLayout? According to Android Application UX Guideline, Tab should be placed on top of the screen not the bottom. And well, it should be above the drop shadow part. So we will place it inside AppBarLayout along with Toolbar. It could be done like this because AppBarLayout is inherited from a vertical LinearLayout.
Background color is automatically set to primary color while the indicator line's color is the accent one. But you will notice that Tab's font is still black but we expect it to be white. This happens because we didn't provide it any theme yet. Simply define TabLayout a theme like this.
You have a choice to manually control TabLayout like above or let it work with ViewPager automatically by calling setupWithViewPager(...). I believe that it will be used quite frequent for this case.
There are two attributes we could adjust the display in TabLayout.
app:tabMode - set it as fixed if you want to display every single tab on the screen. Good for a small number of tabs but totally a bad choice if there are so many tabs. In the case you are not sure that all of them could be displayed nicely at a time, you could set this attribute as scrollable to let user scroll through tabs instead just like Google Play Store's.
app:tabGravity - set it as fill if you want distribute all available space to each tab or set it as center if you want to place all of the tabs at the center of the screen. Please note that this attribute will be ignored if tabMode is set to scrollable.
Here is what it looks like in each mode.
Done with TabLayout =)
Step 9: Make AppBarLayout exit the screen along with content when scroll
One nice Android UX Guideline announced is the App Bar could be scrolled out of the screen along with content to get some more additional space to display content and it is already proved that this UX is good. Previously there were some application that was already implemented this behavior but developer had to do it by themselves. Right now it could be done easily with just a line of code.
First of all, we need to make the content scrollable first by adding some amount of Buttons to LinearLayout. How about 20?
<Button
                    android:layout_width="wrap_content"
                    android:layout_height="wrap_content"
                    android:text="Yo Yo"
                    />
                ...<!-- Add 20 more buttons here -->
                ...<Button
                    android:layout_width="wrap_content"
                    android:layout_height="wrap_content"
                    android:text="Yo Yo"
                    />
And then wrap the LinearLayout with ScrollView and don't forget to move layout_behavior from LinearLayout to ScrollView since ScrollView is now a direct child of CoordinatorLayout.
Hmm ... Toolbar supposes to scroll out of the screen along with the content but why it appears that nothing happened?
The same old reason ... ScrollView was not designed to work with CoordinatorLayout (again). You need to use the another one, NestedScrollView, provided in Android Support Library v4, which is designed to work with CoordinatorLayout since born.
And with the same reason, please note that the classic ListView doesn't work with CoordinatorLayout as well. Only RecyclerView works. Time to change, may be?
Here is the result after changing ScrollView to NestedScrollView.
Works like a charm! You will notice that Toolbar scroll out of the screen but TabLayout still stay. This is because we didn't set any scroll flags to TabLayout. If you want TabLayout to disappear from the screen as well, just simply define the same attribute to TabLayout.
There is some gesture bug here. I found that it is quite hard to pull things back to the screen. It seems like we have to wait for the next release.
Now let's look at it in details. Curious what are the meaning of those flags actually: scroll and enterAlways? Actually there are 4 attribute values that we could set as.
scroll- If you want the view to scroll along the content. You need to apply this flag.
enterAlwaysCollapsed - This flag defines how View enter back into the screen. When your view has declared a minHeight and you use this flag, your View will only enter at its minimum height (i.e., ‘collapsed’), only re-expanding to its full height when the scrolling view has reached it’s top. Use it with scroll flag like this: scroll|enterAlwaysCollapsed
Anyway it seems like it doesn't work as described in minHeight part. Another issue is there is a problem with TabLayout. Pretty hard to pull those Views back to the screen.
enterAlways - this flag ensures that any downward scroll will cause this view to become visible, enabling the ‘quick return’ pattern. Use it with scroll flag as well: scroll|enterAlways
exitUntilCollapsed - View will scroll off until it is collapsed (its minHeight) and stay like that, for example,
This mode is frequently used in the component I will talk about in next part.
That's all for this step. Easy, huh?
Step 10: Remove TabLayout
From the experiment, there is some obvious bug when we use TabLayout along with scrolling thing described above. I believe that it is just a bug that will be fixed in the near future. For now, let's remove TabLayout from the code first to make the next steps run smoothly.
Like an example shown in exitUntilCollapsed part, Toolbar could be expanded and collapsed but you will see that it isn't perfect yet. Toolbar still leave the screen in spite of the best practice that those icons (Hamburger, etc.) should stay on the screen.
Design Support Library has already been prepared for this as well. You could make Toolbar collapsable like a magic with CollapsingToolbarLayout which is very easy to use just like other components. Here are the steps:
- Wrap Toolbar with CollapsingToolbarLayout but still be under AppBarLayout
- Remove layout_scrollFlags from Toolbar
- Declare layout_scrollFlags for CollapsingToolbarLayout and change it to scroll|exitUntilCollapsed
- Change AppBarLayout's layout height to the size of expanded state. In this example, I use 256dp
Looks good but those Toolbar icons still scroll off the screen. We could pin it to let it be always on top of the screen by declare this attribute to Toolbar.
But wait ... where is the title text?! Unfornate that it's gone in the wind after wrapping Toolbar with CollapsingToolbarLayout. We have to set it manually through setTitle(String) in Java code.
Title's font color is still black. This is because we didn't set any theme to the App Bar yet. To do so, just simply declare android:theme for AppBarLayout like this.
With CollapsingToolbarLayout's feature, transition is automatically applied to the title text between collapsed and expanded state. In case you want to change the position of title text in expanded state, you could do so by apply margin through 4 attributes such as app:expandedTitleMargin, app:expandedTitleMarginBottom, app:expandedTitleMarginEnd and app:expandedTitleMarginStart
Or if you want to change text's appearance in collapsed and expanded state. You could simply do that by applying TextAppearance through app:collapsedTitleTextAppearance and app:expandedTitleTextAppearance respectively.
In many cases, we want to have a beautiful image as an App Bar's background not just a plain color like currently is. Fortunate that CollapsingToolbarLayout is inherited from FrameLayout so we could simply add an ImageView as a background layer behind Toolbar like this.
Image appears already but there is an unexpected blue bar appears as well. It is nothing fancy but just a Toolbar's background. Simply remove this line from Toolbar.
android:background="?attr/colorPrimary"
Result
Image now just moves along with content scrolling which is a little bit too wooden. We could make it more elegant with parallax mode by declaring collapse mode like this.
You also could apply a parallax multiplier between 0.0-1.0.
app:layout_collapseParallaxMultiplier="0.7"
Please give a try yourself =)
Lastly you will notice that App Bar's background is always shown as image. You could let it automatically changed into plain color in collapsed mode by declaring attribute app:contentScrim like below:
App Bar is now beautiful with just some line of codes =)
Step 13: Plat with Navigation Drawer
Right now Drawer Menu pulled from the left side is still just a blank white panel. Previously it is quite a hard task to implement this menu since we have to do it manually with LinearLayout or ListView.
With NavigationView provided in Android Design Support Library, things would be 15.84321 times easier !
First of all, create a header view layout file for Drawer Menu. (It is already there in Github project.)
NavigationView is designed for Drawer Menu especially. So everything would be created and measured automatically including width of the menu which we have to define ourselves case by case with Configuration Qualifier previously.
To handle those menu items click event, you could simply declare a listener with setNavigationItemSelectedListener like below:
    NavigationView navigation;

    private void initInstances() {
        ...

        navigation = (NavigationView) findViewById(R.id.navigation);
        navigation.setNavigationItemSelectedListener(new NavigationView.OnNavigationItemSelectedListener() {
            @Override
            public boolean onNavigationItemSelected(MenuItem menuItem) {
                int id = menuItem.getItemId();
                switch (id) {
                    case R.id.navItem1:
                        break;
                    case R.id.navItem2:
                        break;
                    case R.id.navItem3:
                        break;
                }
                return false;
            }
        });
    }
In the real use, please feel free to declare your own header view and modify menu items as you wanted.
Step 14: Modernize EditText with TextInputLayout
The last part of this Codelab is here. You could change an old style EditText to a modern one that always show Hint and Error Message.
To do so, just simply wrap an EditText with TextInputLayout. That's all !
Put two of them inside NestedScrollView and see the result.
Incredibly easy, huh? =)
Conclusion
Android Design Support Library is very promising support library. It is totally recommended for your production. Anyway it still contains a lot of bugs, I suggest you to wait for a little bit until every single bug is fixed.
Android Studio 1.3's stage is closed to the stable release. New features are keep coming including full NDK support. And it seems like some major change is also being waited for its good time to hatch such as a new Gradle Build Tools with the newly designed DSL (gradle script code structure).
I found it is very interesting after an hour of playing. So I decide to write this blog to introduce you guys the upcoming changes of the build tools to let you prepare.
What is Android Gradle Build Tools?
In case you don't know yet. Android Gradle Build Tools is a runtime used for processing module's build.gradle file before passing it forward to Gradle for the furthur step.
Gradle Build Tools' version is declared in project's build.gradle like below:
Each version of Gradle Build Tools can work with the supported Gradle version listed below.
Android Gradle Plugin
Gradle
1.0.0 - 1.1.3
2.2.1 - 2.3
1.2+
2.2.1+
And the syntax we use these days to write Gradle Script in build.gradle file is defined in Android Gradle Build Tools. We call it DSL (Domain-Specific Language).
The new Android Gradle Build Tools
After DSL hasn't been touched since the launch of Gradle Build Tools 1.0, Android Studio team has decided to do the major change with the new Gradle Build Tools which is still in the experimental stage by change its base to Gradle's new component model mechanism allows significant reduction in configuration time. However development teams are working hard trying to remove these current changes to minimize the migration process from the traditional plugin in the future.
Anyway IMHO the new DSL looks pretty good. I must say that I am convinced to change since the new DSL structure and naming is more meaningful than it currently is.
To try the new Gradle Build Tools, just simply change the build tools' version in project'sbuild.gradle to
Please note that this new version of build tools works with just-released Gradle 2.5 only so you need to install it first by modify distributionUrl line in gradle/gradle-wrapper.properties file placed in your project.
You can notice that structure are quite different. com.android.application is now changed to com.android.model.application. = operator is required for the most properties as well as += operator which is used to add element(s) to the collection. Some property's name that are not so clear in the term of meaning are also adjusted, for example, minSdkVersion is now changed to minSdkVersion.apiLevel
Well, let's sync project with gradle files to apply the change.
And then simply run it. Everything works fine as expected with the more meaningful syntax, built with new-fresh Gradle 2.5.
Give NDK support a try
Android Studio 1.3 was proudly announced with full NDK Support. So let's give a try with some very simple native codes. First of all, you need to define a NDK's directiory to project's local.properties file. Please note that you can use both NDK r10e available in Android NDK Downloads Page and NDK Bundle available in SDK Manager.
ndk.dir=PATH_TO_NDK_ROOT
Create HelloJni.java somewhere in your java package.
public class HelloJni {
    public native String stringFromJNI();
}
Make a jni folder inside src/main and create hello-jni.c file with the content shown below.
hello-jni.c
#include <string.h>
#include <jni.h>

jstring
Java_com_inthecheesefactory_hellojni25_HelloJni_stringFromJNI( JNIEnv* env,
                                                  jobject thiz )
{
#if defined(__arm__)
  #if defined(__ARM_ARCH_7A__)
    #if defined(__ARM_NEON__)
      #if defined(__ARM_PCS_VFP)
        #define ABI "armeabi-v7a/NEON (hard-float)"
      #else
        #define ABI "armeabi-v7a/NEON"
      #endif
    #else
      #if defined(__ARM_PCS_VFP)
        #define ABI "armeabi-v7a (hard-float)"
      #else
        #define ABI "armeabi-v7a"
      #endif
    #endif
  #else
   #define ABI "armeabi"
  #endif
#elif defined(__i386__)
   #define ABI "x86"
#elif defined(__x86_64__)
   #define ABI "x86_64"
#elif defined(__mips64)  /* mips64el-* toolchain defines __mips__ too */
   #define ABI "mips64"
#elif defined(__mips__)
   #define ABI "mips"
#elif defined(__aarch64__)
   #define ABI "arm64-v8a"
#else
   #define ABI "unknown"
#endif

    return (*env)->NewStringUTF(env, "Hello from JNI !!  Compiled with ABI " ABI ".");
}
Please don't forget to change com_inthecheesefactory_hellojni25 to match HelloJni.java's package name or it will just simply not working.
For those who are familiar with NDK, you might notice that Makefiles aren't needed anymore.
And here is the final file structure.
Now let's test the JNI code in MainActivity.java by placing code below at the very last line of MainActivity class.
public class MainActivity extends AppCompatActivity {

    ...

    static {
        System.loadLibrary("hello-jni");
    }
}
Done! You can now use the native code through Java code. Run to try it.
And with the awesome full support of NDK on Android Studio, Java code and Native code can now work seemlessly. If you inspect code in Java, it will jump you to the right place in native code.
Anyway it is still in the experimental stage. Some features are still under development. Better wait for the final release for serious use.
Conclusion
I must say that the new Gradle Build Tools is very interesting. Major change to DSL looks really promising and far more meaningful than the current one. The great code should be able to tell what it does, agree?
However it is still in the experimental stage. The DSL is not final yet. We better just study and know its existence rather than switching to the new one right now. Anyway I believe that it would not be so long until the stable release available for real use. Be prepared !
Although there are quite a lot of Layout that can be used in Android Application Development world but at last we always end up with just these three: LinearLayout, RelativeLayout and FrameLayout
Anyway there is some problem with those RelativeLayout and FrameLayout since you cannot set Child View's dimension in percentage. Only two ways possible are to put LinearLayout inside and use advantage from its layout_weight LayoutParams and to do it in Java code by overriding onMeasure or so.
For example if I want to place a simple red rectangle on the top-left corner with 5% margin left and 25% width inside RelativeLayout. We have to code like this.
You will notice that code is more complicated that it should be. In the mean time, those spaces are also filled with View and LinearLayout which we could treat them as wasted.
It is not a problem anymore since the few days ago on the day Android M is officially announced its name: Marshmallow, Android team launched many Support Library to help developer fighting with fragmentation. One of those is Percent Support Library which add an capbility to set RelativeLayout's and FrameLayout's dimension in % !
Hello Percent Support Library
This library is pretty easy to use since it is just the same RelativeLayout and FrameLayout we are familiar with, just with some additional functionalities.
First of all, since Percent Support Library comes along with Android Support Library 23 so please make sure that you update Android Support Library in SDK Manager to the latest version already. And then add a dependency like below in build.gradle file:
compile 'com.android.support:percent:23.0.0'
Now instead of using old RelativeLayout and FrameLayout, just simple switch to android.support.percent.PercentRelativeLayout and android.support.percent.PercentFrameLayout respectively. There are 9 Layout Params that can be used:
- layout_widthPercent : Width in %, for example, app:layout_widthPercent="25%"
- layout_heightPercent : Height in %
- layout_marginPercent : Margin in %
The rest are margin for each side in %: layout_marginLeftPercent, layout_marginRightPercent, layout_marginTopPercent, layout_marginBottomPercent, layout_marginStartPercent, layout_marginEndPercent
With PercentRelativeLayout, the code example above could be rewritten as below:
You could see that the result is exactly the same but with much shorter and clearer code. Moreover, the space now are not filled with anything anymore which could lead to the better perfomance as well.
Actually this should be a part of Android quite for a while but unfortunate that it didn't. It is too late to add this capability to native Android's RelativeLayout/FrameLayout since user who use the device with old OS version will not be able to use this feature. That's why Android team decided to release this as Support Library and I support the idea.
Please give a try. It helps a lot making your code cleaner and better =)
Android M's name was just announced officially days ago. The final version is almost there and would be released not so long.
Although Android is being keep developed but the latest update to Android M is totally different since there is some major change that would change everything like new Runtime Permission. Surprisingly it is not much talked about in Android Developer community even though it is extremely important and may cause some big trouble in the near future.
That's the reason why I decide to blog about this topic today. Everything you need to know about this new Runtime Permission including how to implement it in your code. Let's do it before it's too late.
The New Runtime Permission
Android's permission system is one of the biggest security concern all along since those permissions are asked for at install time. Once installed, the application will be able to access all of things granted without any user's acknowledgement what exactly application does with the permission.
No surprise why there are so many bad guys trying to collect user's personal data through this security weakness and use it in the bad way.
Android team also know this concern. 7 year passed, finally permission system is redesigned. In Android 6.0 Marshmallow, application will not be granted any permission at installation time. Instead, application has to ask user for a permission one-by-one at runtime.
Please note that permission request dialog shown above will not launch automatically. Developer has to call for it manually. In the case that developer try to call some function that requires a permission which user has not granted yet, the function will suddenly throw an Exception which will lead to the application crashing.
Besides, user is also able to revoke the granted permission anytime through phone's Settings application.
You might already feel like there is some cold wind blowing through your arms ... If you are an Android Developer, you will suddenly know that programming logic is totally changed. You cannot just call a function to do the job like previous but you have to check for the permission for every single feature or your application will just simply crash !
Correct. I would not spoil you that it is easy. Although it is a great thing for user but it is truly nightmare for us developer. We have to take coding to the next level or it will surely have a problem in both short-term and long-term.
Anyway this new Runtime Permission will work like described only when we set the application's targetSdkVersion to 23 which mean it is declared that application has already been tested on API Level 23. And this feature will work only on Android 6.0 Marshmallow. The same app will run with same old behavior on pre-Marshmallow device.
What happened to the application that has already been launched?
This new permission system may cause you some panic right now. "Hey ! What's about my application that launched 3 years ago. If it is installed on Android 6.0 device, does this behavior also applied? Will my application also crash?!?"
Don't worry. Android team has already thought about it. If the application's targetSdkVersion is set to less than 23. It will be assumed that application is not tested with new permission system yet and will switch to the same old behavior: user has to accept every single permission at install time and they will be all granted once installed !
As a result, application will run perfectly like previous. Anyway please note that user still can revoke a permission after that ! Although Android 6.0 warn the user when they try to do that but they can revoke anyway.
Next question in your head right now. So will my application crash?
Such a kindness sent from god delivered through the Android team. When we call a function that requires a permission user revoked on application with targetSdkVersion less than 23, no any Exception will be thrown. Instead it will just simply do nothing. For the function that return value, it will return either null or 0 depends on the case.
But don't be too happy. Although application would not be crashed from calling a function. It may still can crash from what that application does next with those returned value.
Good news (at least for now) is these cases may rarely occur since this permission revoking feature is quite new and I believe that just few user will do it. In case they do, they have to accept the result.
But in the long run, I believe that there will be millions of users who turn some permission off. Letting our application not to work perfectly on new device is not acceptable.
To make it work perfectly, you better modify your application to support this new permission system and I suggest you to start doing it right now !
For that application which source code is not successfully modified to support Runtime Permission, DO NOT release it with targetSdkVersion 23 or it will cause you a trouble. Move the targetSdkVersion to 23 only when you pass all the test.
Warning: Right now when you create a new project in Android Studio. targetSdkVersion will be automatically set to the latest version, 23. If you are not ready to make your application fully support the Runtime Permission, I suggest you to step down the targetSdkVersion to 22 first.
Automatically granted permissions
There is some permission that will be automatically granted at install time and will not be able to revoke. We call it Normal Permission (PROTECTION_NORMAL). Here is the full list of them:
Just simply declare those permissions in AndroidManifest.xml and it will work just fine. No need to check for the permission listed above since it couldn't be revoked.
Make your application support new Runtime Permission
Now it's time to make our application support new Runtime Permission perfectly. Start with setting compileSdkVersion and targetSdkVersion to 23.
In this example, we try to add a contact with a function below.
    private static final String TAG = "Contacts";
    private void insertDummyContact() {
        // Two operations are needed to insert a new contact.
        ArrayList<ContentProviderOperation> operations = new ArrayList<ContentProviderOperation>(2);

        // First, set up a new raw contact.
        ContentProviderOperation.Builder op =
                ContentProviderOperation.newInsert(ContactsContract.RawContacts.CONTENT_URI)
                        .withValue(ContactsContract.RawContacts.ACCOUNT_TYPE, null)
                        .withValue(ContactsContract.RawContacts.ACCOUNT_NAME, null);
        operations.add(op.build());

        // Next, set the name for the contact.
        op = ContentProviderOperation.newInsert(ContactsContract.Data.CONTENT_URI)
                .withValueBackReference(ContactsContract.Data.RAW_CONTACT_ID, 0)
                .withValue(ContactsContract.Data.MIMETYPE,
                        ContactsContract.CommonDataKinds.StructuredName.CONTENT_ITEM_TYPE)
                .withValue(ContactsContract.CommonDataKinds.StructuredName.DISPLAY_NAME,
                        "__DUMMY CONTACT from runtime permissions sample");
        operations.add(op.build());

        // Apply the operations.
        ContentResolver resolver = getContentResolver();
        try {
            resolver.applyBatch(ContactsContract.AUTHORITY, operations);
        } catch (RemoteException e) {
            Log.d(TAG, "Could not add a new contact: " + e.getMessage());
        } catch (OperationApplicationException e) {
            Log.d(TAG, "Could not add a new contact: " + e.getMessage());
        }
    }
The above code requires WRITE_CONTACTS permission. If it is called without this permission granted, application will suddenly crash.
Next step is to add a permission into AndroidManifest.xml with same old method.
Next step is we have to create another function to check that permission is granted or not. If it isn't then call a dialog to ask user for a permission. Otherwise, you can go on the next step, creating a new contact.
Permissions are grouped into Permission Group like table below.
If any permission in a Permission Group is granted. Another permission in the same group will be automatically granted as well. In this case, once WRITE_CONTACTS is granted, application will also grant READ_CONTACTS and GET_ACCOUNTS.
Source code used to check and ask for permission is Activity'scheckSelfPermission and requestPermissions respectively. These methods are added in API Level 23.
    final private int REQUEST_CODE_ASK_PERMISSIONS = 123;

    private void insertDummyContactWrapper() {
        int hasWriteContactsPermission = checkSelfPermission(Manifest.permission.WRITE_CONTACTS);
        if (hasWriteContactsPermission != PackageManager.PERMISSION_GRANTED) {
            requestPermissions(new String[] {Manifest.permission.WRITE_CONTACTS},
                    REQUEST_CODE_ASK_PERMISSIONS);
            return;
        }
        insertDummyContact();
    }
If permission has already been granted, insertDummyContact() will be suddenly called. Otherwise, requestPermissions will be called to launch a permission request dialog like below.
No matter Allow or Deny is chosen, Activity's onRequestPermissionsResult will always be called to inform a result which we can check from the 3rd parameter, grantResults, like this:
This is how Runtime Permission works. Code is quite complicated but be used to it ... To make you application works perfectly with Runtime Permission, you have to handle all the case with the same method shown above.
If you want to punch some wall, it is a good time now ...
Handle "Never Ask Again"
If user denied a permission. In the second launch, user will get a "Never ask again" option to prevent application from asking this permission in the future.
If this option is checked before denying. Next time we call requestPermissions, this dialog will not be appeared for this kind of permission anymore. Instead, it just does nothing.
However it is quite bad in term of UX if user does something but there is nothing interact back. This case has to be handled as well. Before calling requestPermissions, we need to check that should we show a rationale about why application needs the being-requested permission through Activity's shouldShowRequestPermissionRationale method. Source code will now look like this:
    final private int REQUEST_CODE_ASK_PERMISSIONS = 123;

    private void insertDummyContactWrapper() {
        int hasWriteContactsPermission = checkSelfPermission(Manifest.permission.WRITE_CONTACTS);
        if (hasWriteContactsPermission != PackageManager.PERMISSION_GRANTED) {
                if (!shouldShowRequestPermissionRationale(Manifest.permission.WRITE_CONTACTS)) {
                    showMessageOKCancel("You need to allow access to Contacts",
                            new DialogInterface.OnClickListener() {
                                @Override
                                public void onClick(DialogInterface dialog, int which) {
                                    requestPermissions(new String[] {Manifest.permission.WRITE_CONTACTS},
                                            REQUEST_CODE_ASK_PERMISSIONS);
                                }
                            });
                    return;
                }
            requestPermissions(new String[] {Manifest.permission.WRITE_CONTACTS},
                    REQUEST_CODE_ASK_PERMISSIONS);
            return;
        }
        insertDummyContact();
    }

    private void showMessageOKCancel(String message, DialogInterface.OnClickListener okListener) {
        new AlertDialog.Builder(MainActivity.this)
                .setMessage(message)
                .setPositiveButton("OK", okListener)
                .setNegativeButton("Cancel", null)
                .create()
                .show();
    }
The result are rational dialog will be shown when this permission is requested for the first time and also be shown if user has ever marked that permission as Never ask again. For the latter case, onRequestPermissionsResult will be called with PERMISSION_DENIED without any permission grant dialog.
Done !
Asking for multiple permissions at a time
There is definitely some feature that requires more than one permission. You could request for multiple permissions at a time with same method as above. Anyway don't forget to check the 'Never ask again' case for every single permission as well.
Here is the revised code.
    final private int REQUEST_CODE_ASK_MULTIPLE_PERMISSIONS = 124;

    private void insertDummyContactWrapper() {
        List<String> permissionsNeeded = new ArrayList<String>();

        final List<String> permissionsList = new ArrayList<String>();
        if (!addPermission(permissionsList, Manifest.permission.ACCESS_FINE_LOCATION))
            permissionsNeeded.add("GPS");
        if (!addPermission(permissionsList, Manifest.permission.READ_CONTACTS))
            permissionsNeeded.add("Read Contacts");
        if (!addPermission(permissionsList, Manifest.permission.WRITE_CONTACTS))
            permissionsNeeded.add("Write Contacts");

        if (permissionsList.size() > 0) {
            if (permissionsNeeded.size() > 0) {
                // Need Rationale
                String message = "You need to grant access to " + permissionsNeeded.get(0);
                for (int i = 1; i < permissionsNeeded.size(); i++)
                    message = message + ", " + permissionsNeeded.get(i);
                showMessageOKCancel(message,
                        new DialogInterface.OnClickListener() {
                            @Override
                            public void onClick(DialogInterface dialog, int which) {
                                requestPermissions(permissionsList.toArray(new String[permissionsList.size()]),
                                        REQUEST_CODE_ASK_MULTIPLE_PERMISSIONS);
                            }
                        });
                return;
            }
            requestPermissions(permissionsList.toArray(new String[permissionsList.size()]),
                    REQUEST_CODE_ASK_MULTIPLE_PERMISSIONS);
            return;
        }

        insertDummyContact();
    }

    private boolean addPermission(List<String> permissionsList, String permission) {
        if (checkSelfPermission(permission) != PackageManager.PERMISSION_GRANTED) {
            permissionsList.add(permission);
            // Check for Rationale Option
            if (!shouldShowRequestPermissionRationale(permission))
                return false;
        }
        return true;
    }
When every single permission got its grant result, the result will be sent to the same callback method, onRequestPermissionsResult. I use HashMap to make source code looks cleaner and more readable.
    @Override
    public void onRequestPermissionsResult(int requestCode, String[] permissions, int[] grantResults) {
        switch (requestCode) {
            case REQUEST_CODE_ASK_MULTIPLE_PERMISSIONS:
                {
                Map<String, Integer> perms = new HashMap<String, Integer>();
                // Initial
                perms.put(Manifest.permission.ACCESS_FINE_LOCATION, PackageManager.PERMISSION_GRANTED);
                perms.put(Manifest.permission.READ_CONTACTS, PackageManager.PERMISSION_GRANTED);
                perms.put(Manifest.permission.WRITE_CONTACTS, PackageManager.PERMISSION_GRANTED);
                // Fill with results
                for (int i = 0; i < permissions.length; i++)
                    perms.put(permissions[i], grantResults[i]);
                // Check for ACCESS_FINE_LOCATION
                if (perms.get(Manifest.permission.ACCESS_FINE_LOCATION) == PackageManager.PERMISSION_GRANTED&& perms.get(Manifest.permission.READ_CONTACTS) == PackageManager.PERMISSION_GRANTED&& perms.get(Manifest.permission.WRITE_CONTACTS) == PackageManager.PERMISSION_GRANTED) {
                    // All Permissions Granted
                    insertDummyContact();
                } else {
                    // Permission Denied
                    Toast.makeText(MainActivity.this, "Some Permission is Denied", Toast.LENGTH_SHORT)
                            .show();
                }
                }
                break;
            default:
                super.onRequestPermissionsResult(requestCode, permissions, grantResults);
        }
    }
The condition is flexible. You have to set it by your own. In some case, if even one permission is not granted, that feature will be just simply disabled. But in some case, it will still work but with limited feature. There is no suggestion from me. It is all by your design.
Use Support Library to make code forward-compatible
Although the code above works perfectly on Android 6.0 Marshmallow. Unfortunate that it will crash on Android pre-Marshmallow since those functions called are added in API Level 23.
The straight way is you can check Build Version with code below.
But code will be even more complicated. So I suggest you to use some help from Support Library v4 which is already prepared for this thing. Replace those functions with these:
- ContextCompat.checkSelfPermission()
No matter application is run on M or not. This function will correctly return PERMISSION_GRANTED if the permission is granted. Otherwise PERMISSION_DENIED will be returned.
- ActivityCompat.requestPermissions()
If this function is called on pre-M, OnRequestPermissionsResultCallback will be suddenly called with correct PERMISSION_GRANTED or PERMISSION_DENIED result.
If this function is called on pre-M, it will always return false.
ALWAYS replace Activity's checkSelfPermission, requestPermissions and shouldShowRequestPermissionRationale with these functions from Support Library v4. And your application will work perfectly find on any Android version with same code logic. Please note that these functions require some additional parameter: Context or Activity. Nothing special to do, just pass what it wants correctly. Here is what source code will look like.
    private void insertDummyContactWrapper() {
        int hasWriteContactsPermission = ContextCompat.checkSelfPermission(MainActivity.this,
                Manifest.permission.WRITE_CONTACTS);
        if (hasWriteContactsPermission != PackageManager.PERMISSION_GRANTED) {
            if (!ActivityCompat.shouldShowRequestPermissionRationale(MainActivity.this,
                    Manifest.permission.WRITE_CONTACTS)) {
                showMessageOKCancel("You need to allow access to Contacts",
                        new DialogInterface.OnClickListener() {
                            @Override
                            public void onClick(DialogInterface dialog, int which) {
                                ActivityCompat.requestPermissions(MainActivity.this,
                                        new String[] {Manifest.permission.WRITE_CONTACTS},
                                        REQUEST_CODE_ASK_PERMISSIONS);
                            }
                        });
                return;
            }
            ActivityCompat.requestPermissions(MainActivity.this,
                    new String[] {Manifest.permission.WRITE_CONTACTS},
                    REQUEST_CODE_ASK_PERMISSIONS);
            return;
        }
        insertDummyContact();
    }
Besides we are also able to call the last two methods in Fragment with some help from Support Library v13 by calling FragmentCompat.requestPermissions() and FragmentCompat.shouldShowRequestPermissionRationale() respectively. These functions will do exactly the same as Activity's.
Shorten source code with 3rd Party Library
You will notice that code is quite complicated. No surprise, there are quite many of 3rd party libraries out there trying to solve this big thing. I gave a try with quite a lot of them and finally found one that satisfy me. It is hotchemi's PermissionsDispatcher.
What is does it exactly the same as I described above but just with shorter and cleaner code. Surely with some trade-off with flexibility. Please give it a try and see if it could be applied in your application. If it couldn't, you can go on the direct way which is also my choice right now.
What will happen if permission is revoked while application is opened?
As mentioned above, a permission can be revoked anytime through phone's Settings.
So what will happen if permission is revoked when application is opened? I have already given it a try and found that application's process is suddenly terminated. Everything inside application just simply stopped (since it is already terminated ...). It sounds make sense to me anyway since if OS allows the application to go on its process, it may summon Freddy to my nightmare. I mean even worse nightmare than currently is ...
Conclusion and Suggestion
I believe that you see the big picture of this new permission system quite clear right now. And I believe that you also see how big issue it is.
However you have no choice. Runtime Permission is already used in Android Marshmallow. We are at the point of no return. Only thing we could do right now is to make our application fully support this new permission system.
Good news is there are only few permission that requires Runtime Permission flow. Most of the frequently-used permissions, for example, INTERNET, are in Normal Permission are automatically granted and you have no need to do anything with them. In conclusion, there are just few part of code that you need to modify.
There are two suggestions to you all:
1) Make Runtime Permission support an urgent issue
2) Don't set application's targetSdkVersion to 23 if your code is not yet supported Runtime Permission. Especially when you create a new project from Android Studio, don't forget to take a look at build.gradle everytime for targetSdkVersion !
Talk about source code modification, I must admit that it is quite a big thing. If code structure is not designed good enough, you may need some serious reconstruction which will surely take some time. Or at least I believe that source code need to be refactored for every single application. Anyway like I said above, we have no choice ...
In the man time, since permission concept is turned upside down. Right now if some permission is not granted, your application need to still be able to work with limited feature. So I suggest you to list all the feature that related to permission you requested. And write down all the case possible, if permission A is granted but permission B is denied, what will happen. Blah blah blah.
Good luck with your code refactoring. Mark it as urgent in your to-do list and start do it today so it will contains no problem on the day Android M is publicly launched.
Hope you find this article helpful and Happy Coding !
Looking for a tool that could mirror non-rooted android phone's screen and allow user to gain a full control on computer? Here is a good news. A new wonderful just-released application called Vysor could do the job for you! I gave it a try already and I must say that I am quite impressive on what it can do.
First of all, Vysor is a Chrome Application so you need to install Google Chrome first before going on.
Press Launch App and then Vysor will appear. Please note that its look and its workflow might be different by platform.
Now pick your phone up and enable USB Debugging since phone and computer needs ADB for communication.
Find Devices and choose one that appear.
If your phone pop up a dialog like below. Press OK to allow USB Debugging. If you accidentally press Cancel, just remove and plug a USB cable once again.
If your phone ask you to install an application called Vysor, do it. Wait for some second and your phone screen will appear on Vysor ... Done!
You can control everything through your computer screen with Keyboard and Mouse: Left Click = Click, Right Click = Back and Middle Click = Home
From the experiment I found that framerate is not so high, there is still some delay and image will lose the quality if screen's details are changed too much before getting better within few seconds. Although it is not perfect but I must say that it is good enough for real use.
However I found that it is pretty useful. And since it is a Chrome Application so it could be installed on any platform such as Windows, Mac OS X, Linux and also Chromebook. Please give it a try. It worths time spent. =D
Retrofit is one of the most popular HTTP Client Library for Android as a result of its simplicity and its great performance compare to the others.
Anyway its weakness is there is no any straight way to cancel the ongoing transaction in Retrofit 1.x. If you want to do that you have to call it on Thread and kill it manually which is quite hard to manage.
Square gave a promise years ago that this feature will be available on Retrofit 2.0 but years passed, there is still no updated news on this.
Until last week, Retrofit 2.0 just passed its Release Candidate stage to Beta 1 and has been publicly launched to everyone. After giving it a try, I must say that I am quite impressed on its new pattern and its new features. There are a lot of changes in the good way. I will describe those in this article. Let's get started !
Same Old Package with New Version
If you want to import Retrofit 2.0 into your project, add this line to your build.gradle in dependencies section.
The way to call a created service is also changed into the same pattern as OkHttp. To call is as a synchronous request, just call execute or call enqueue to make an asynchronous request.
The source code above will block the thread so you cannot call it on Main Thread in Android or you will face NetworkOnMainThreadException. If you want to call execute method, you have to do it on background thread.
Asynchronous Request
// Synchronous Call in Retrofit 2.0

Call<Repo> call = service.loadRepo();
call.enqueue(new Callback<Repo>() {
    @Override
    public void onResponse(Response<Repo> response) {
        // Get result Repo from response.body()
    }

    @Override
    public void onFailure(Throwable t) {

    }
});
The above code will make a request in the background thread and retreive a result as an Object which you can extract from response with response.body() method. Please note that those call methods: onResponse and onFailure will be called in Main Thread.
I suggest you to use enqueue. It fits Android OS behavior best.
Ongoing Transaction Cancellation
The reason behind the service pattern changing to Call is to make the ongoing transaction be able to be cancelled. To do so, just simply call call.cancel()
call.cancel();
The transaction would be cancelled shortly after that. Easy, huh? =D
New Service Creation. Converter is now excluded from Retrofit.
In Retrofit 1.9, GsonConverter is included in the package and is automatically initiated upon RestAdapter creation. As a result, the json result from server would be automatically parsed to the defined Data Access Object (DAO).
But in Retrofit 2.0, Converter is not included in the package anymore. You need to plug a Converter in yourself or Retrofit will be able to accept only the String result. As a result, Retrofit 2.0 doesn't depend on Gson anymore.
If you want to accept json result and make it parse into DAO, you have to summon Gson Converter as a separate dependency.
You also can create a custom converter yourself by implementing a Converter.Factory interface.
I support this new pattern. It makes Retrofit more clear what it actually does.
Custom Gson Object
In case you need to adjust some format in json, for example, Date Format. You can do that by creating a Gson object and pass it to GsonConverterFactory.create()
        Gson gson = new GsonBuilder()
                .setDateFormat("yyyy-MM-dd'T'HH:mm:ssZ")
                .create();

        Retrofit retrofit = new Retrofit.Builder()
                .baseUrl("http://api.nuuneoi.com/base/")
                .addConverterFactory(GsonConverterFactory.create(gson))
                .build();

        service = retrofit.create(APIService.class);
Done.
New URL resolving concept. The same way as <a href>
Retrofit 2.0 comes with new URL resolving concept. Base URL and @Url have not just simply been combined together but have been resolved the same way as what <a href="..."> does instead. Please take a look for the examples below for the clarification.
Here is my suggestion on the new URL declaration pattern in Retrofit 2.0:
- Base URL: always ends with /
- @Url: DO NOT start with /
for instance
public interface APIService {

    @POST("user/list")
    Call<Users> loadUsers();

}

public void doSomething() {
    Retrofit retrofit = new Retrofit.Builder()
            .baseUrl("http://api.nuuneoi.com/base/")
            .addConverterFactory(GsonConverterFactory.create())
            .build();

    APIService service = retrofit.create(APIService.class);
}
loadUsers from code above will fetch data from http://api.nuuneoi.com/base/user/list
Moreover we also can declare a full URL in @Url in Retrofit 2.0:
public interface APIService {

    @POST("http://api.nuuneoi.com/special/user/list")
    Call<Users> loadSpecialUsers();

}
Base URL will be ignored for this case.
You will see that there is a major change on URL resolving. It is totally different from the previous version. If you want to move your code to Retrofit 2.0, don't forget to fix those URLs part of code.
OkHttp is now required
OkHttp is set to optional in Retrofit 1.9. If you want to let Retrofit use OkHttp as HTTP connection interface, you have to manually include okhttp as a dependency yourself.
But in Retrofit 2.0, OkHttp is now required and is automatically set as a dependency. The code below is snapped from pom file of Retrofit 2.0. You have no need to do anything.
OkHttp is automatically used as a HTTP interface in Retrofit 2.0 in purpose to enabling the OkHttp's Call pattern as decribed above.
onResponse is still called eventhough there is a problem with the response
In Retrofit 1.9, if the fetched response couldn't be parsed into the defined Object, failure will be called. But in Retrofit 2.0, whether the response is be able to parse or not, onResponse will be always called. But in the case the result couldn't be parsed into the Object, response.body() will return as null. Don't forget to handle for the case.
If there is any problem on the response, for example, 404 Not Found. onResponse will also be called. You can retrieve the error body from response.errorBody().string().
Response/Failure logic is quite different from Retrofit 1.9. Be careful on handling for all the cases if you decide to move to Retrofit 2.0.
Missing INTERNET Permission cause SecurityException throwing
In Retrofit 1.9, if you forget to add INTERNET permission into your AndroidManifest.xml file. Asynchronous request will immediately fall into failure callback method with PERMISSION DENIED error message. No any exception is thrown.
But in Retrofit 2.0, when you call call.enqueue or call.execute, SecurityException will be immediately thrown and may cause crashing if you do not do the try-catch.
The behavior is just like the same when you manually call HttpURLConnection. Anyway this issue is not a big deal since when INTERNET permission is added into AndroidManifest.xml, there is nothing to concern anymore.
Use an Interceptor from OkHttp
On Retrofit 1.9 you could use RequestInterceptor to intercept a Request but it is already removed on Retrofit 2.0 since the HTTP connection layer has been moved to OkHttp.
As a result, we have to switch to an Interceptor from OkHttp from now on. First you have to create a OkHttpClient object with an Interceptor like this:
        OkHttpClient client = new OkHttpClient();
        client.interceptors().add(new Interceptor() {
            @Override
            public Response intercept(Chain chain) throws IOException {
                Response response = chain.proceed(chain.request());

                // Do anything with response here

                return response;
            }
        });
And the pass the created client into Retrofit's Builder chain.
        Retrofit retrofit = new Retrofit.Builder()
                .baseUrl("http://api.nuuneoi.com/base/")
                .addConverterFactory(GsonConverterFactory.create())
                .client(client)
                .build();
That's all.
To learn more about what OkHttp Interceptor can do, please browse into OkHttp Interceptors.
RxJava Integration with CallAdapter
Beside declaring interface with Call<T> pattern, we also could declare our own type, for example, MyCall<T>, as well. We call it CallAdapter mechanic which is available on Retrofit 2.0
There is some ready-to-use CallAdapter module available from Retrofit team. One of the most popular module might be CallAdapter for RxJava which will return as Observable<T>. To use it, two modules must be included as your project's dependencies.
You can use it in the exact same RxJava way. In addition, if you want to let code inside subscribe part called on Main Thread, observeOn(AndroidSchedulers.mainThread()) is needed to be added to the chain.
Done ! I believe that RxJava fan is very satisfying with this change =D
Conclusion
There are also some other changes, you can check for the official Change Log for more details. Anyway I believe that I have already covered the main issues in this article.
You may be curious that is it time to move to Retrofit 2.0 yet? Since it is still in the beta stage so you may want to stay with 1.9 first except you are an early adopter like me, Retrofit 2.0 works pretty great and there is no any bug found yet based on my own experiment.
Please note that Retrofit 1.9 official document was already removed from Square github website. I suggest you to start studying for Retrofit 2.0 right now and consider moving to the latest version in very near future. =D
I believe that all Android developers would agree that the biggest thing announced in Android Dev Summit 2015 was Android Studio 2.0 and Android Emulator 2.0 which was advertised that it could run and deploy the application incredibly much faster than the first revision.
Few hours ago, Android development team just launched this latest emulator to the public. Let us give you a tour to this biggest update yet on Android Emulator you wouldn't wanna miss.
Installation
Let's start with the installation so we could play along with it together.
The first thing to be installed is Android Studio 2.0 Preview 3b which is now available on Canary Channel. To switch the update channel to Canary, just click at Help -> Check for Update... and change the top-most dropdown menu to Canary Channel. After that, check for the update again and Android Studio 2.0 will be installed on your machine.
Android Emulator 2.0 comes together with Android SDK Tools v25 and newer. So the next thing you have to install is Android SDK Tools v25 rc1 which could be done through SDK Manager. Or if there is the newer version available while you are reading this blog, update to the latest one would be always the best scenario.
And the reason behind its speed is the latest version of Intel x86 Emulator Accelerator (HAXM installer). Just download the latest version available from the Extras section.
As mentioned in the name, what that SDK Manager downloads is just an installer. It doesn't install the HAXM for you yet. You need to manually install it yourself by browsing into Android SDK Folder and follow with extras/intel/Hardware_Accelerated_Execution_Manager. You will see an installer laying down inside. Just do what you have to do.
The latest one to download is Android 5.0 - Google APIs Intel x86 Atom System Image rev 10 to use it as an Emulator's ROM image.
All done ! It's now ready !
Give it a try
Let me skip the Android Virtual Device creating part since I believe that every single Android developer could do that yourself through AVD Manager available inside Android Studio 2.0
Please note that there is a new experimental feature available in this part. You could assign the number of CPU's Core for the emulator unless it will be automatically set to the default value, 1.
Now it's a good time to launch a created AVD.
Woo hooooo, Android Emulator 2.0 ! The change is obvious. You could see the new toolbar on the right side of Emulator screen.
After an hour of playing around, I found that Emulator started and operated much faster than the previous version. Anyway, I must say that I feel that it is still a little bit slower than Genymotion. But well, it is acceptable and very satisfiable.
There are quite a ton of new features available. The most obvious one is you could now easily resize the window!
For those extra features just like GPS simulation, Fingerprint, Phone Calling, SMS Sending and etc which we have to do through the command line in the previous version is now available in GUI version. 100x easier I must say!
These extended controls are one of the most impressive features for me in this new update since it is very convenient and totally complete. And well ... it's FREE.
Now let's test the speed of apk deployment. I found that it could be transferred at the incredible speed, 50MB/s.
It's 10x faster than the transfer speed to Samsung Galaxy Note 3 LTE which could make it at 5MB/s. At this speed, it could significantly increase the speed of development as well.
In conclusion, Android Emulator 2.0 is really satisfiable. I would consider switching my primary emulator from Genymotion to Android Emulator 2.0 by now since the completeness on its feature and it is also FREE of charge!
However, some weakness still persist. It consumes quite a lot of memory.
But it still works quite fine on 8GB+ RAM machine.
Generally, I am so happy with this large update. Please give it a try and feel free to share your opinion over this new big thing!
Yesterday I got a question: "In the end, there will be ton of library modules placed inside the android project. What is the best and sustainable way to organize these libraries for both current and future uses?".
Well, I think the question was quite great and I believe that many of you might have the same doubtfulness in mind so I decide to write this blog giving you an instruction how to "setup your own Private Maven Repository" for the internal use.
Let's get started.
Why should we setup a Private Maven Repository?
It's true that an Android Library module is actually just a bunch of source codes grouped in the same directory. If you want to let other developers use your library, you could simply send them the whole directory and let them include it in their project.
Sounds easy but it doesn't mean it is good. The question is "If company starts to grow and amount of project starts to increase continously. Is it good if we still pass the library as source code like this?"
The answer is a very big NO. Don't do that ! Here are some big reasons you need to concern:
1) Let's imagine. If you have about 10 projects sharing the same library module. At the final, you will find copies of source code scattering around in those projects which is totally not good for code controlling.
2) It's quite not convenient to update library to the newer version. Here is the process: download the source code, copy it, replace the old one with the new one, check if there is something wrong, etc... And you have to do every single step manually.
3) And if your day is bad enough, the updated version of library may cause your has-ever-worked-great-before application into the junky state. In that case, you need to roll the library back to the previous version. Wahhhh, that means we need to keep every single version of source code as a backup in case we might meet the jackpot someday.
4) In term of usage, we need to distribute the library to let other developers "use" it. So there is no need to let them see the source code. Just a legible document how to use the library is more than enough.
5) Library distributed to other developers should not be modifiable. In case there is some problem, issue should be reported to developer involved to let them fix. Letting other developers directly access the source code might cause them accidentally doing a quick fix by themselves which will cause a big problem afterwards.
And that's the reason why we shouldn't ever distribute the library as source code. The better way is to distribute the built-version of library instead which is .jar or .aar file in this case.
Although it looks better but it's not perfect yet. Most of the problem listed above are solved except one: it's still hard to update and roll back over the version. We still need to download, copy, replace, backup, blah blah blah. Developer's time is valueable and shouldn't be wasted from these things.
Is it better if we could just add a line of code in build.gradle's dependencies area just like we do to include the 3rd party library, for example,
compile 'my.company:library:1.1.0'
If you have any problem with the new version of library, you could just simply change the version number back to the worked one in a second.
compile 'my.company:library:1.0.0'
I found this as the perfect choice in every single dimension. It's easy to distribute the library, if you want to use, just add a line of code and done! It's also very easy to update and roll back to whichever version you want. And the source code is also unmodifiable.
So I encourage every company to have a Maven Repository to use internally for this. And since we use it internally then these libraries should be kept private, so Public Repository is not a choice. We must go for a Private Maven Repository with full access control system so that there will be nobody except team members gain an access to the library.
To achieve that, we have two choices:
1) To use private repository hosted service - There are quite a lot service like this out there. The most popular one are Bintray Premium and JitPack Private Repositories. Anyway it's quite pricey (at least for me). Moreover you will be charged more by the number of library artifact you need to host there. For me, it's not a good choice for the long term usage which amount of library artifact may increase to 10 within a year.
2) Setup your own dedicated server - There are so many choices of Open Source software providing you the perfect solution, for example, Artifactory and Nexus. You could put as many library artifacts as you want. Only bill you have to pay is the hosting fee which is not a big concern anymore these days. With DigitalOcean, you can pay just $10/month. That's all. Sounds cool, right?
Alright, I will give you an instruction how to set up our own Private Maven Repository as a dedicated server. The open source software I choose is Artifactory since it is incredibly easy to install despite its countless promising features and its stability.
Artifactory Installation
I know that you all must have your own favorite operating system in mind but to make it easy, let me control the hosting environment a little bit. In this blog entry, I will guide you how to setup Artifactory on Ubuntu 14.04 LTS on DigitalOcean. If you don't want to pay any buck, VM on VirtualBox might be a choice for you as well. Choose one, it's your choice.
Create Ubuntu 14.04 LTS droplet
Initially, let's create an droplet on DigitalOcean with these specifications:
OS: Ubuntu 14.04 LTS
Size: $10/month
Region: Any region but I recommend you to choose the server closed to you most.
After droplet is created, please ssh into the created server with root user and password sent to your email.
Install Java 8
Java 8 doesn't come with Ubuntu 14.04 LTS' default repository. We need to install it through PPA repository. You can do so with these command lines:
Version used in this tutorial is 4.5.1 since it is the latest version at the moment I write this blog entry. Feel free to use any other version you prefer. A list of Artifactory version number is available in Bintray site.
Now it's time to install it with these 4 line of codes. And of course, if you use another version besides 4.5.1, don't forget to change the number of deb package to what you are using.
Installation will be done in a minute. You could start the service immediately with this command.
# service artifactory start
Tomcat is already embedded in Artifactory package so you have no need to install anything else. It is now ready to use as a standalone.
Configure Artifactory
Open your preferred browser and browse to this url: http://IPADDRESS:8081/artifactory/ (replace IPADDRESS with your server's IP Address). You will see the login screen like this:
Login with Username:admin and Password:password
The first thing I suggest you to do immediately after logged in is to change your admin password to prevent furthur security issue. To do so, browse to Admin -> Security -> Users -> admin change the password to what your want.
Anyway we shouldn't work with the library as admin. So we will leave the account like this and create a new one instead. Here is how to do it step-by-step.
Create a Group
Browse into Admin -> Security -> Groups and click at +New at the upper right.
We are going to create a group of user who gain a capability to upload and download any library to/from the system. So I will name the group as "contributors" with description "A group for library contributors". For the Users pane, leave it untouch.
Click Save to create the group.
Create a Permission
Next step is to assign permissions for user in contributors group. Browse into Admin -> Security -> Permissions and click +New at the upper right.
Name the Permission as Contribute to Anything and check both Any Local Repository and Any Remote Repository box to gain an access to any repository in the system to the contributors. Click Next.
In Groups tab, add contributors to the right area and assign the permission like below. Click Save & Finish.
Permissions are now assigned to the contributors group.
Create a new User Account
The last step is to create a new user account with contributors permission assigned. Click at +New at the upper right of Admin -> Security -> Users page.
Enter Username, Password and Email Address. In Related Groups area, please add onlycontributors group to the right pane.
Click Save and ... done ! We now got an account with the proper permission.
If you want to create more user account after this with the same access, you could do it by creating a new user and add it to the contributors group.
But if you want to create a user account with a read-only access. readers is the group you need to assign to that account in this case.
Get an Encrypted Password
In the next step, password is need to be used in gradle script and it's not good to use the clear text version of password. Fortunately Artifactory provides a way to use an encrypted password instead and to acquire this piece of information, you need to logout from admin and login with the account created in previous step.
Once logged in, click on your username at the upper right of the page.
Enter your password and click Unlock.
Some data will be revealed.
Copy text inside Encrypted Password box and keep it somewhere. We will use it in the near future.
Switch Artifactory to Private mode
In default settings, the repositories hosted in Artifactory are publicly accessible. We need to switch to Private mode and let only allowed user(s) to access the repository.
To turn on Private Mode, just simply uncheck Allow Anonymous Access in Admin -> Security -> General page.
Server is now configured and ready to use !
How to upload Android library to Artifactory from Android Studio
Now it's time to start working on Android Studio. To upload a library to Artifactory, we need to modify some gradle script. First step is to define username and encrypted password for the account on Artifactory set up in previous step. Since these information will be visible in the gradle script so we better put them in the file that will not be uploaded to version control. Let's put them into HOME_DIR/.gradle/gradle.properties
For those who are not familiar with this file. It is a global gradle script used in every single gradle project's compilation step. So if we declare anything in this file, those datas will be accessible in Android project's gradle script as well.
I believe that you, developers, must know already that what the HOME_DIR is for each operating system. For Mac OS X and Linux, it is ~ while in Windows, it is C:\Users\USERNAME for the general case. Try to browse into that folder, you will see .gradle directory there. If there is not, you go to the wrong directory.
Create a gradle.properties file inside HOME_DIR/.gradle/ directory if it doesn't exist or modify it if it does. Adding two lines of script like below and replace YOUR_USERNAMEและ YOUR_ENCRYPTED_PASSWORD with your username and encrypted password obtaind in previous step.
Now open build.gradle file placed at the top level in your Android project. Add a line of classpath code like below.
buildscript {
    dependencies {
        // Add this line
        classpath "org.jfrog.buildinfo:build-info-extractor-gradle:4.0.1"
    }
}
Open build.gradleplaced inside your Library Module that you need to upload to Artifactory. Insert two lines of code shown below at the very first line of the file.
Code shown above will result the form of dependency as compile 'my.group.package:thelibrary:1.0.0' when it's available on repository. Please feel free to change libraryGroupId, libraryArtifactId and libraryVersion to anything you want.
In the same working file, add these lines at the end of file.
And don't forget to change IPADDRESS to your server's IP address.
Well done. Now scripts are ready !
Upload the library
It is incredibly easy to upload the library. Just open Terminal inside Android Studio.
And type to following command.
Windows:
gradlew.bat assembleRelease artifactoryPublish
Mac OS X & Linux:
./gradlew assembleRelease artifactoryPublish
Let it does its job and wait until BUILD SUCCESSFUL is shown on the screen.
At this step, your library is now successfully uploaded to your private Maven Repository. Congrats !
Verify the upload binary
Browse into your Artifactory control panel http://IPADDRESS:8081/artifactory and click at Artifacts -> libs-release-local. You will see the library uploaded shown inside there with some metadata like deployer's username.
The repository can be accessed through browser at http://IPADDRESS:8081/artifactory/libs-release-local/. Please feel free to give a check.
Library Usage
Library artifact is now ready to be used. To use it in your project, you need to declare the maven url that points to your repository's address along with the credentials inside project levelbuild.gradle.
Add maven { ... } part of code like below: (And sure, don't forget to change IPADDRESS to your server's IP address)
- Setup your own Maven Repository (either private or public one)
- Upload a library to repository with full user access control.
- Download a library from repository with full user access control.
Library distribution is now far more systematic than any other distribution method and it now doesn't matter how many libraries or how many version of libraries you have. Things are now well organized. =)
One of the most annoying problem of Nested Fragment (a Fragment that is attached on another Fragment) is although we can call startActivityForResult(...) but onActivityResult(...) will not be called on the way back. You can find the reason behind in this blog post "How to make onActivityResult get called on Nested Fragment".
Previously if you want to make it work, you need to do some workaround, for example, NestedFragment introduced by me last year. Anyway good news is here. No any extra workaround is needed anymore since the problem has already been fixed with Fragment brought in Android Support Library rev 23.2 onwards. onActivityResult is now called in Nested Fragment !
Testing
I did some experiment by creating two types of Fragment: MainFragment and SecondFragment. MainFragment is placed on Activity while SecondFragment is placed on MainFragment like shown in diagram below.
SecondFragment is a very simple Fragment contains just a single button named btnGo with simple logic shown in code below.
// SecondFragment.java

// Calling to SecondActivity
@Override
public View onCreateView(LayoutInflater inflater, ViewGroup container,
                         Bundle savedInstanceState) {
    ...
    btnGo = (Button) rootView.findViewById(R.id.btnGo);
    btnGo.setOnClickListener(new View.OnClickListener() {
        @Override
        public void onClick(View v) {
            Intent intent = new Intent(getContext(), SecondActivity.class);
            startActivityForResult(intent, 12345);
        }
    });
}

// Get Result Back
@Override
public void onActivityResult(int requestCode, int resultCode, Intent data) {
    super.onActivityResult(requestCode, resultCode, data);
    Log.d("onActivityResult", "requestCode = " + requestCode);
}
As you can see in the code shown above. When btnGo is clicked, SecondActivity will be launched by startActivityForResult command. And here is the source code of SecondActivity.
// SecondActivity.java
public class SecondActivity extends AppCompatActivity {

    @Override
    protected void onCreate(Bundle savedInstanceState) {
        super.onCreate(savedInstanceState);
        setContentView(R.layout.activity_second);

        Intent intent = new Intent();
        setResult(RESULT_OK, intent);
        finish();
    }
}
SecondActivity does nothing but just simply immediately finish itself right after it is launched and result will be delivered back to the caller.
Expectation: When btnGo is clicked, onActivityResult inside SecondFragment must be called and a line of log must be shown inside logcat window.
And here is the result when tested with rev 23.1.1 and rev 23.2.1
With Android Support Library revision 23.1.1
com.inthecheesefactory.lab.nestedfragment I/OpenGLRenderer: Initialized EGL, version 1.4
com.inthecheesefactory.lab.nestedfragment W/EGL_emulation: eglSurfaceAttrib not implemented
com.inthecheesefactory.lab.nestedfragment W/OpenGLRenderer: Failed to set EGL_SWAP_BEHAVIOR on surface 0xaf853600, error=EGL_SUCCESS
With Android Support Library revision 23.2.1
com.inthecheesefactory.lab.nestedfragment I/OpenGLRenderer: Initialized EGL, version 1.4
com.inthecheesefactory.lab.nestedfragment W/EGL_emulation: eglSurfaceAttrib not implemented
com.inthecheesefactory.lab.nestedfragment W/OpenGLRenderer: Failed to set EGL_SWAP_BEHAVIOR on surface 0xaf853600, error=EGL_SUCCESS
com.inthecheesefactory.lab.nestedfragment D/onActivityResult: requestCode = 12345
As you can see, onActivityResult on SecondFragment is not called on Android Support Library rev 23.1 and belowwhile it is called perfectly on rev 23.2 and above.
Personally this is a little big change which could change the way we code. Let's start switching to Android Support Library rev 23.2+ now and make your code more clean ! =D
findViewById is one of the most annoying boilerplate code in Android application development. This part of code unnecessarily requires bunch of line of codes and can easily cause an expected behavior unintentionally.
Some library was invented to reduce this part of code's size, for example, the popular Butter Knife which adopts Annotation processing to help mapping between Java's variable and ID declared inside layout XML file.
class ExampleActivity extends Activity {
    @BindView(R.id.title) TextView title;
    @BindView(R.id.subtitle) TextView subtitle;
    @BindView(R.id.footer) TextView footer;

    @Override public void onCreate(Bundle savedInstanceState) {
        super.onCreate(savedInstanceState);
        setContentView(R.layout.simple_activity);
        ButterKnife.bind(this);
        // TODO Use fields...
    }
}
Anyway, although it could help reducing a signifant number of line of codes but it still requires some effort and can still cause some mistake since you still have to declare @BindView manually one by one.
Here we go. This blog will introduce you the perfect solution to totally eliminate these annoying codes away using god-level Data Binding Library.
Tools Preparation
To use Data Binding Library, you need to use Android Studio 1.5 or higher version. Anyway I believe that most of you have already upgraded to version 2.0 already so this should not be a problem.
And then open module's build.gradle and add the following line in android block to enable Data Binding.
android {
    ...
    dataBinding {
        enabled true
    }
}
Sync Gradle to finish the process and done. Your project has now gained access to Data Binding Library. Easy, huh? =)
Inflate Layout in Data Binding's way
Layout is required some change to let Data Binding be usable. Here is the original one:
You may notice that ActivityMainBinding is used here although you didn't declare it anywhere. There is nothing magical here. ActivityMainBinding.java was previously auto generated by Data Binding Library when you built your app minutes ago. Its class name comes from activity_main.xml file's name which is turned into Upper CamelCase before appending with Binding, ActivityMainBinding. This is the way this library use to turn file's name into class name. You can use this logic in every single case.
And now it's time to access View inside activity_main.xml. Well ... you can simply access it through binding variable using its ID like this !
binding.tvHello.setText("Hello from Data Binding");
Here is the result.
As you can see, boilerplate findViewById code are all eliminated. Moreover, you have no need to declare even a single variable to access View. The code will still be the same although you add more 100 Views to this layout. Cool, isn't it ?!?
Inflating into Custom ViewGroup
The way to inflate your layout into Activity has already shown above. And how's about inflating into Custom ViewGroup or Layout to create your Custom View. Can we do it? Definitely yes ! And it is as easy as above sample.
First of all, you need to modify your layout XML file by adding <layout>...</layout> as a Root Element.
Code pattern is still be the same as the way we normally do layout inflation. The only change is you need to inflate using the auto-generated Binding class instead, which is ItemBloglistBinding in this example. Again, its name is converted from item_bloglist.xml.
Here is the full code snippet how to inflate item_bloglist.xml into FrameLayout and automatically gain access to all Views indie.
package com.inthecheesefactory.lab.databinding;

import android.annotation.TargetApi;
import android.content.Context;
import android.os.Build;
import android.util.AttributeSet;
import android.view.LayoutInflater;
import android.widget.FrameLayout;

import com.inthecheesefactory.lab.databinding.databinding.ItemBloglistBinding;

/**
 * Created by nuuneoi on 6/28/2016.
 */

public class BlogListItem extends FrameLayout {

    ItemBloglistBinding binding;

    public BlogListItem(Context context) {
        super(context);
        initInflate();
        initInstances();
    }

    public BlogListItem(Context context, AttributeSet attrs) {
        super(context, attrs);
        initInflate();
        initInstances();
    }

    public BlogListItem(Context context, AttributeSet attrs, int defStyleAttr) {
        super(context, attrs, defStyleAttr);
        initInflate();
        initInstances();
    }

    @TargetApi(Build.VERSION_CODES.LOLLIPOP)
    public BlogListItem(Context context, AttributeSet attrs, int defStyleAttr, int defStyleRes) {
        super(context, attrs, defStyleAttr, defStyleRes);
        initInflate();
        initInstances();
    }

    private void initInflate() {
        LayoutInflater inflater = (LayoutInflater) getContext().getSystemService(Context.LAYOUT_INFLATER_SERVICE);
        binding = ItemBloglistBinding.inflate(inflater, this, true);
    }

    private void initInstances() {

    }

}
Yah, you now have a Custom ViewGroup containing item_bloglist.xml layout inside. To access any View inside, you could simply do the same fancy way:
    private void initInstances() {
        binding.tvTitle.setText("I am the Title");
    }
Now let's try to place it somewhere in activity_main.xml.
I must say that code is pretty short and really nice =)
How Data Binding Library convert ID into variable name
You can notice in the sample above that every single @+id declared in XML file are automatically turned into Java variables as XXXBinding's member variable. We should know more in details on how this library uses to convert the id to variable name to prevent the further problem.
Actually the way this library use to convert id to variable name is as simple as: "Turn every id(s) into camelCase"
for instance,
@+id/tvHello
This is already in camelCase format so the variable name in Java is simply be tvHello
@+id/tv_hello
This is in Underscores format. It will be converted into camelCase first to match the rule so it will also be tvHello as above
And what will happen if those two ids are declared into same XML files like this?:
Don't worry that there would be a problem. Data Bind Library is smart enough to seperate those two apart. But since those variable names are just the same so at the final, you will get two variables: tvHello and tvHello1 instead to access those two TextView respectively.
Anyway, although it is usable but it may cause some confusion. To prevent this, it is recommended to set id in only a single format, either camelCase or Underscores. Choose just only one and everything will be good.
Conclusion
This is only a small part of Data Binding Library's potential but I must say that it is the killer feature which could improve your code's quality quite a lot. There are still be a lot that this library is really useful for your application. If you have time, I suggest you to study more about this Data Binding Library. It's a game changer =)
Bonus: Kotlin Android Extensions
If you are developing your Android application using Kotlin. There is also the similar thing named Kotlin Android Extensions available. It is even easier since you have no need to modify the layout even bit. If you are Kotlin's fan, go for it =)